Most questions we get in support in the first week come down to one of a handful of ideas: what counts as a resource, how a team is different from a group in Jira, why the number under someone's name is red, and where logged time fits in. This page explains those ideas once, in plain terms, so the rest of the app makes sense.
If you prefer to click around first, the Quick Start Guide walks through the same concepts as steps.
If you prefer to click around first, the Quick Start Guide walks through the same concepts as steps.
Resource Management
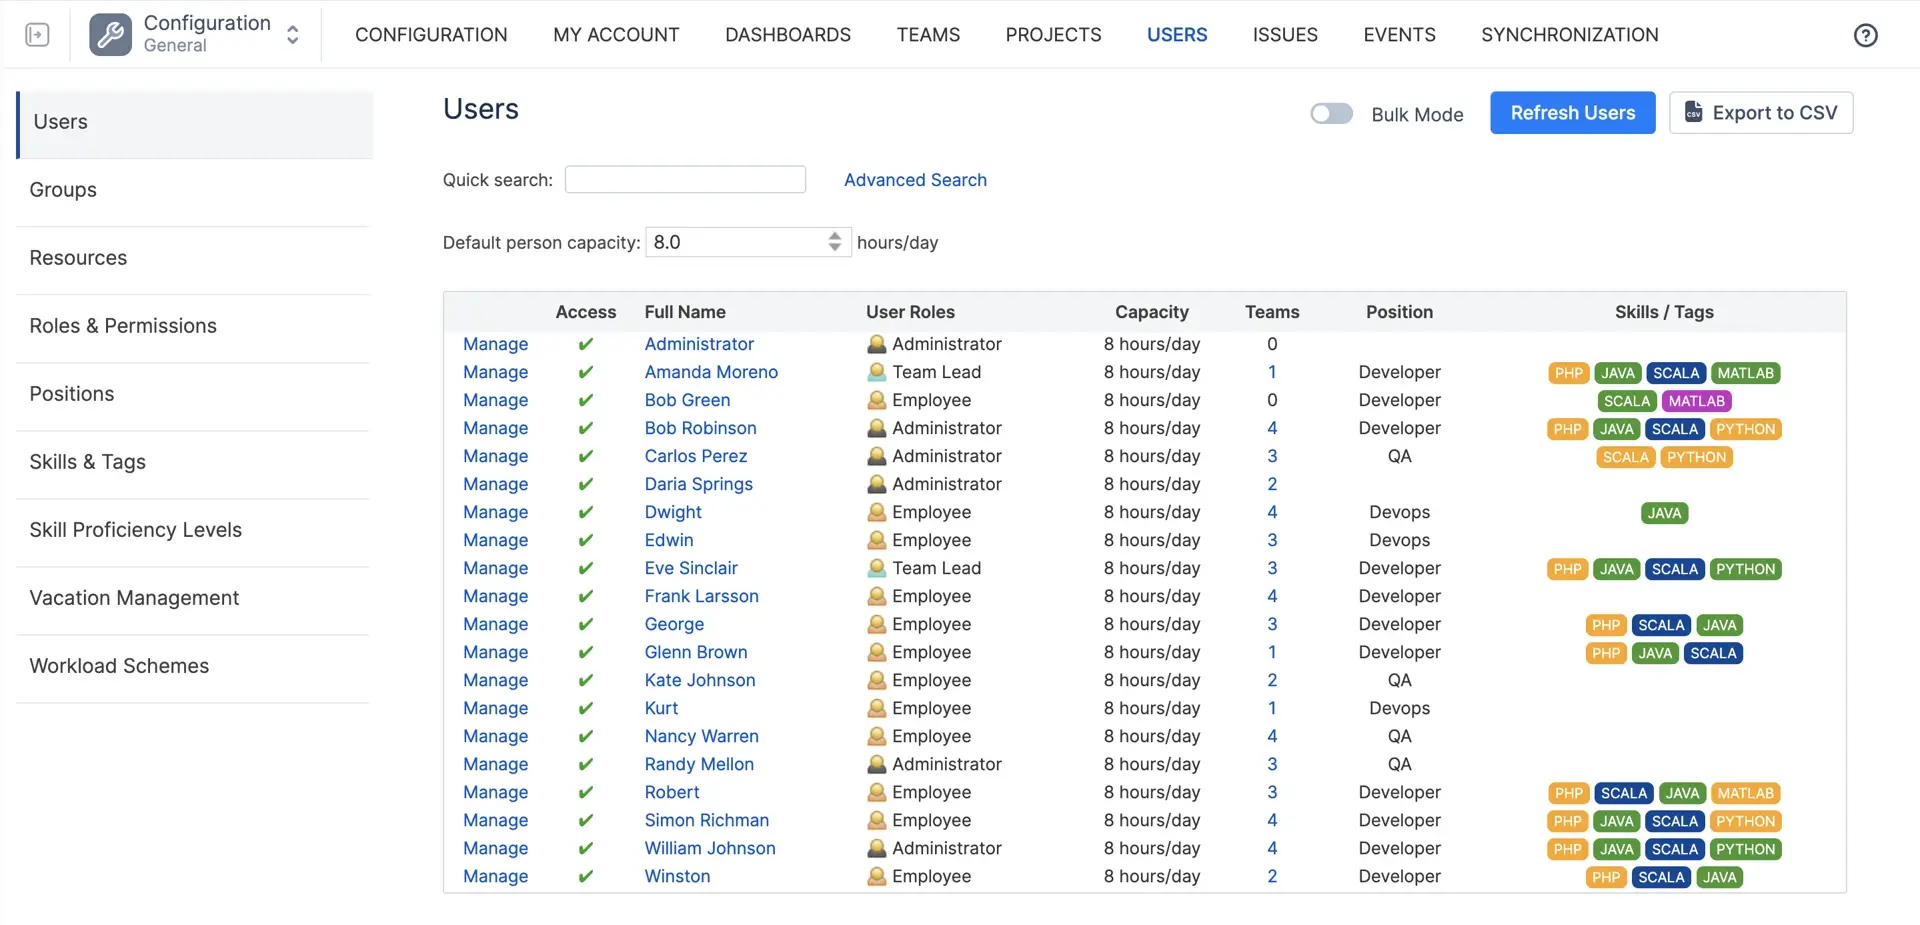
A resource is anyone you plan work for. Usually that is a person with a Jira account who shows up in ActivityTimeline automatically. It can also be someone without a Jira license (a contractor, a designer from an agency) whom you add by hand, or a non-human thing you book time on, like a test rig or a meeting room. The app treats them all the same way: each one gets a row on the timeline.
What makes a resource useful for planning is what you attach to it. A user role decides what the person can see and edit in ActivityTimeline. A position ("QA engineer", "Solution architect") describes what they do. Skills, each with a proficiency level, describe what they can do. Tags are free labels for anything else. Involvement is how many hours a day they are available, which we come back to under Capacity. None of this is required to start, but the more of it you fill in, the more the app can do for you: functional teams, skill and position availability reports, and search by skill in the Planner all depend on it.
You manage resources in ActivityTimeline Configuration → Users. If you have a lot of them, Bulk Mode edits up to 1,000 users on one page, you can remove a skill from many users at once, and Export to CSV gets the whole list into a spreadsheet. On Cloud, you can also tell the app to load users only from selected Jira groups, which keeps the list short on big instances.
What makes a resource useful for planning is what you attach to it. A user role decides what the person can see and edit in ActivityTimeline. A position ("QA engineer", "Solution architect") describes what they do. Skills, each with a proficiency level, describe what they can do. Tags are free labels for anything else. Involvement is how many hours a day they are available, which we come back to under Capacity. None of this is required to start, but the more of it you fill in, the more the app can do for you: functional teams, skill and position availability reports, and search by skill in the Planner all depend on it.
You manage resources in ActivityTimeline Configuration → Users. If you have a lot of them, Bulk Mode edits up to 1,000 users on one page, you can remove a skill from many users at once, and Export to CSV gets the whole list into a spreadsheet. On Cloud, you can also tell the app to load users only from selected Jira groups, which keeps the list short on big instances.
Team Management
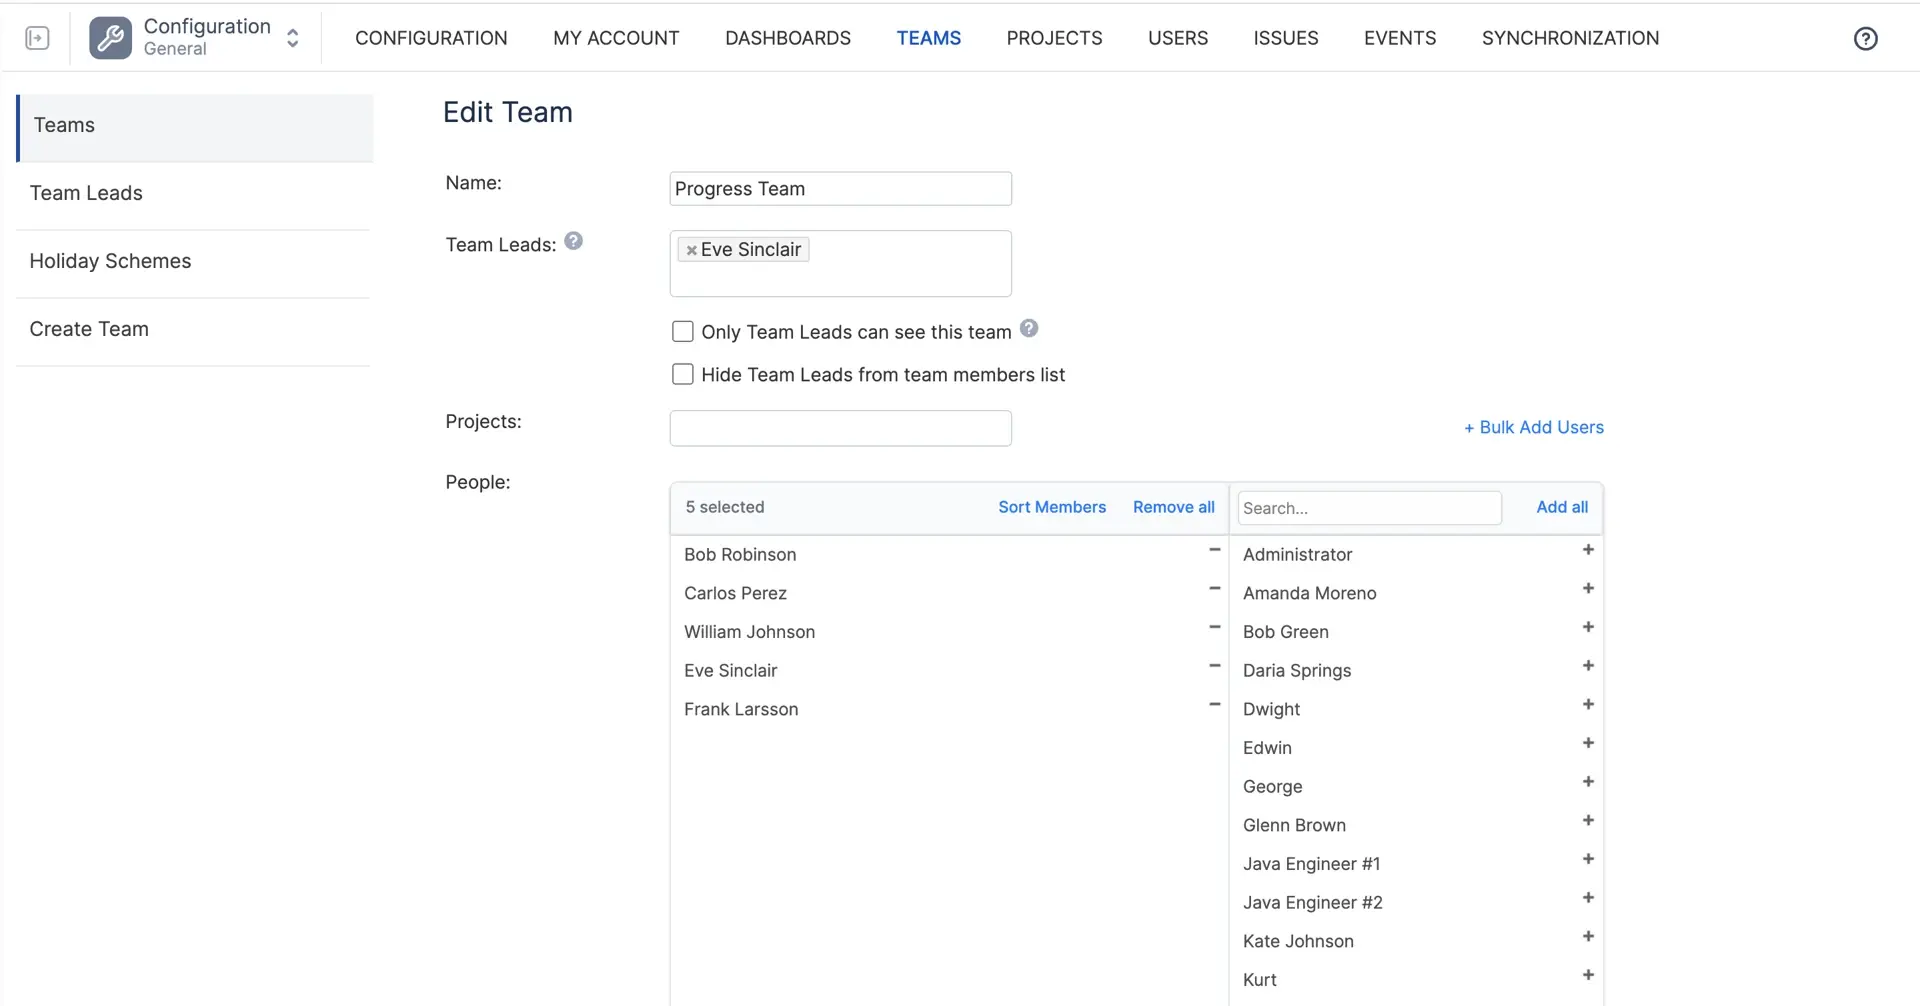
A team is a group of resources you want to plan and report on together. That is the whole definition. What differs is how the group gets built and who keeps it up to date.
A classic team is one you assemble by hand: pick the people, save, done. You add and remove members whenever you like, and you can hand that job to a team lead so it stops landing on the Jira admin. This is the right choice when membership is a management decision, like a project team or a squad.
A classic team is one you assemble by hand: pick the people, save, done. You add and remove members whenever you like, and you can hand that job to a team lead so it stops landing on the Jira admin. This is the right choice when membership is a management decision, like a project team or a squad.
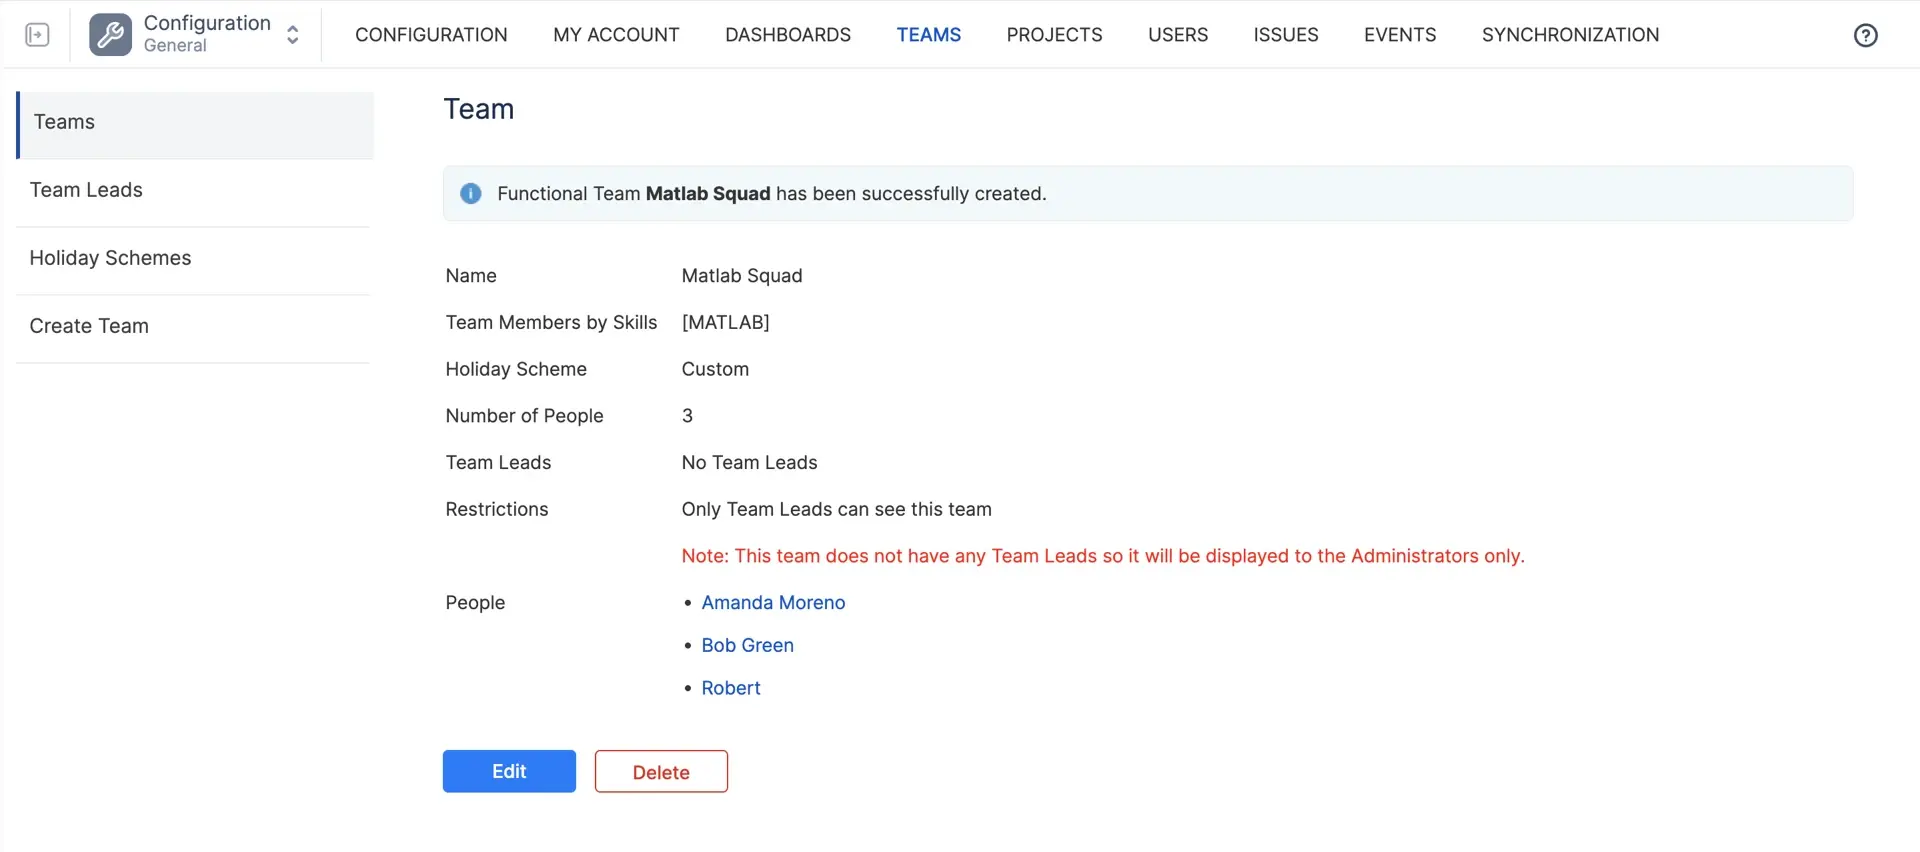
A functional team builds itself from user attributes. You choose a skill or a position, and everyone with that skill or position is in the team, now and in the future. If you hire a third Java developer next month and give them the Java skill, they appear in the "Java" team without anyone editing it. This is the right choice when membership follows what people can do rather than who they report to. The catch is that it only works if skills and positions are actually maintained, so decide who owns that before you rely on it.
If your groups already exist in Jira, you do not have to rebuild them: a team can be imported from a Jira group or from Jira Teams and kept in sync from there.
A few small things that make teams nicer to live with: you can order the members inside a team the way you want them to appear on the Planner (by role, by seniority, whatever helps the planning meeting), and a day off or a note can be created for the entire team at once instead of person by person, which is handy for company events and offsites.
A few small things that make teams nicer to live with: you can order the members inside a team the way you want them to appear on the Planner (by role, by seniority, whatever helps the planning meeting), and a day off or a note can be created for the entire team at once instead of person by person, which is handy for company events and offsites.
Personal Timeline
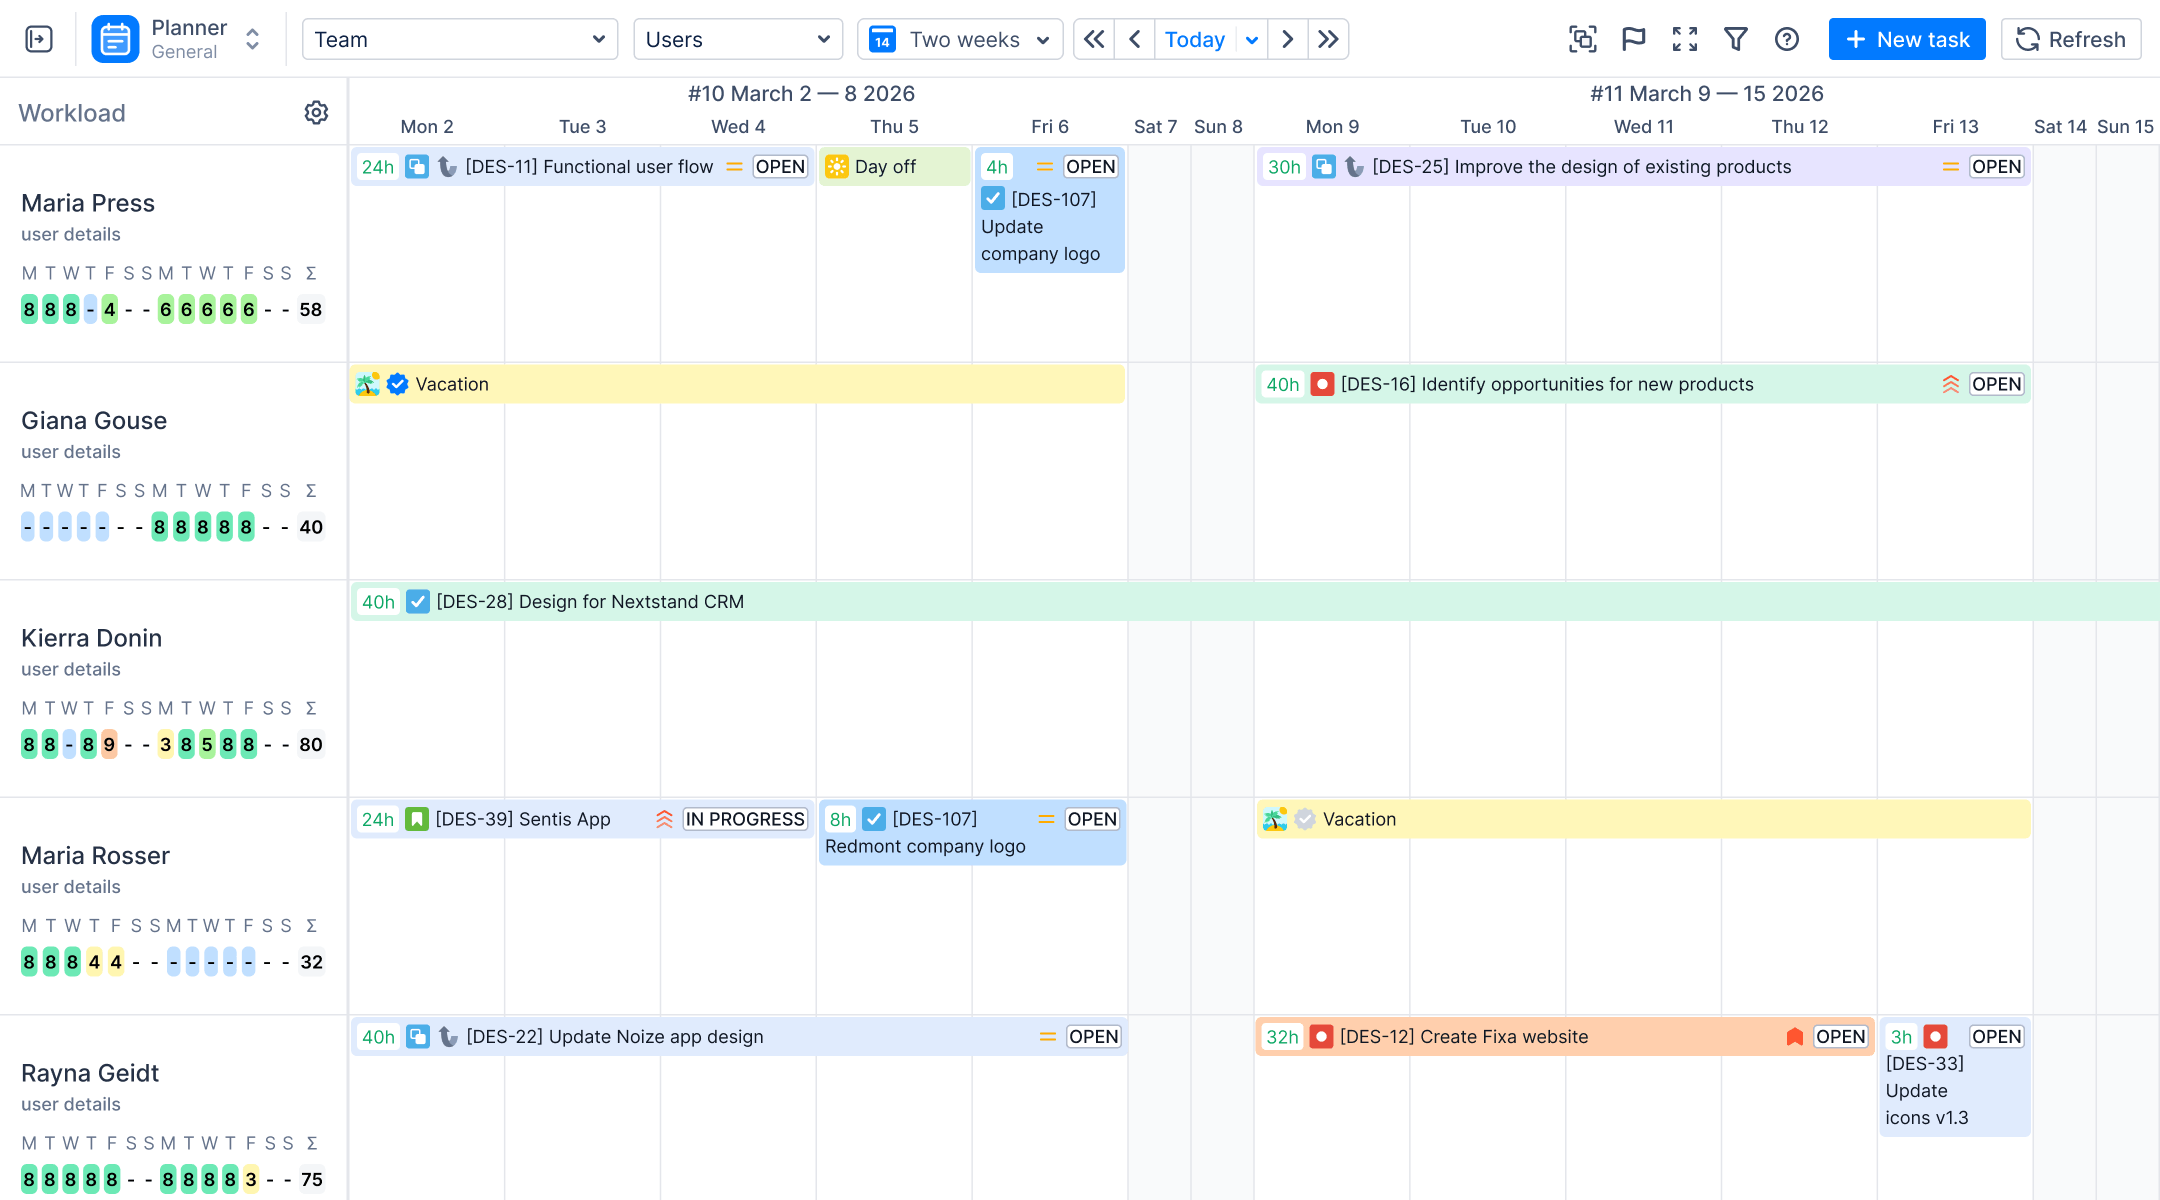
Everything in ActivityTimeline comes back to one picture: a person, a row, and time going left to right. Each resource has a personal timeline, and everything scheduled for them sits on it, whether it is a Jira issue, a booking, a vacation or a note.
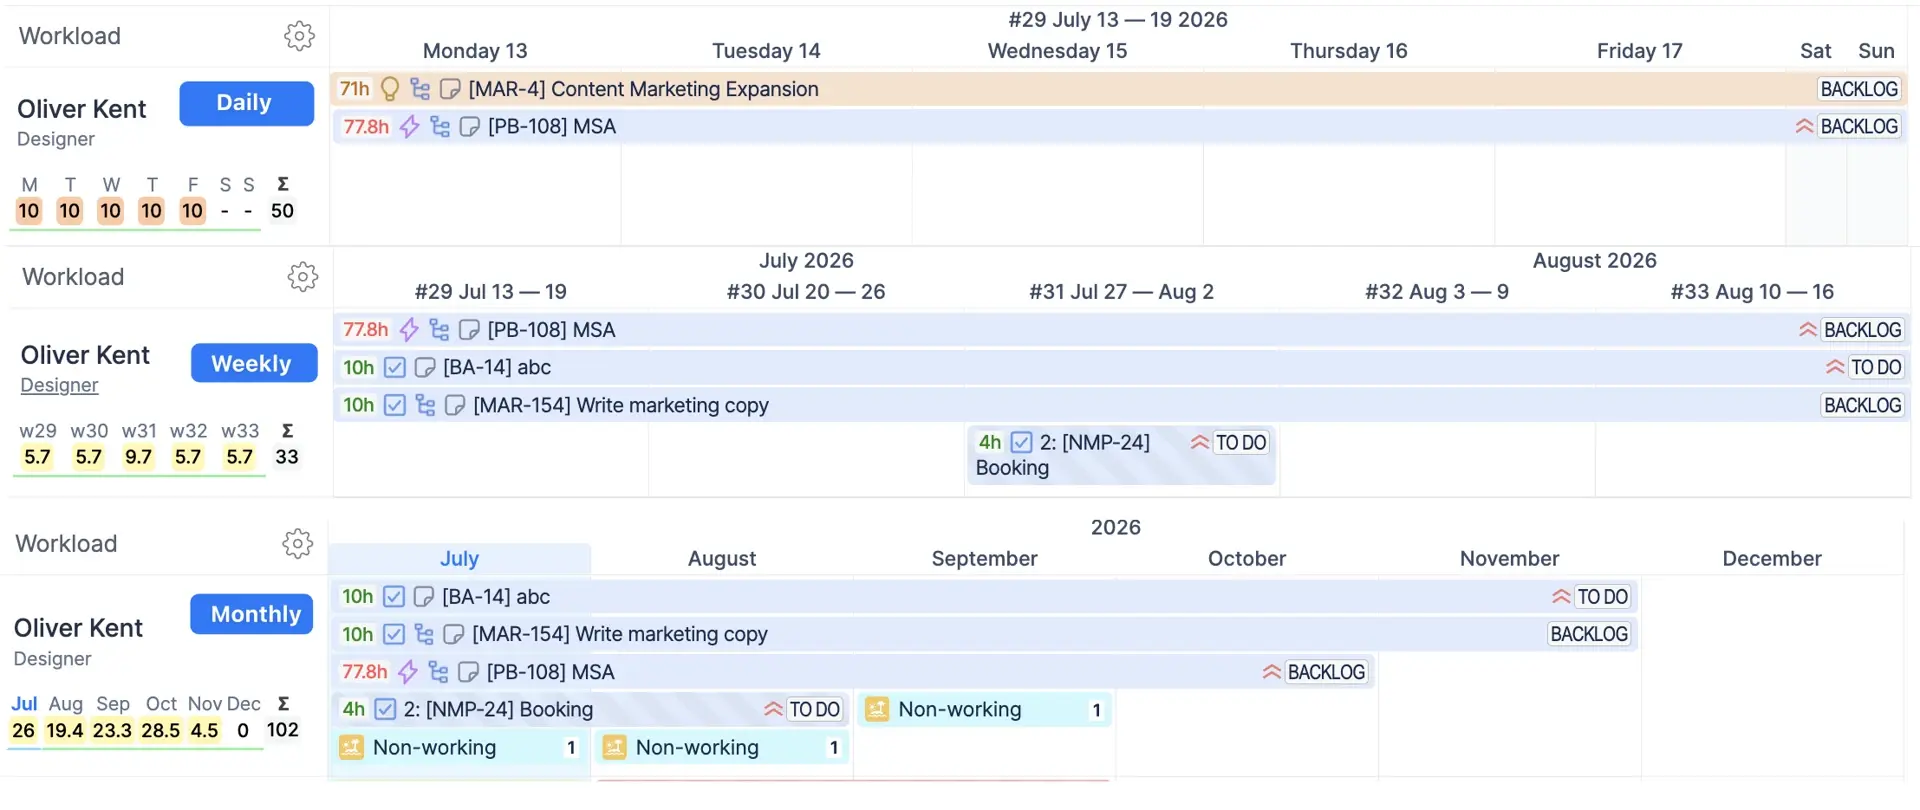
Under the person's name you see the workload indicator, a small number per day (or per week and month when you zoom out) that says how many hours are planned against how many they have. The color tells you at a glance what to do about it: yellow and olive mean there is room for more, green means the day is full, light red and red mean too much has been planned and something has to move, blue means the person is out (day off, vacation, sick leave, holiday), and grey means nothing is planned. The thresholds behind the colors are configurable under Configuration → Workload Indicator, so if your team considers 6 planned hours a full day, you can say so.
Under the person's name you see the workload indicator, a small number per day (or per week and month when you zoom out) that says how many hours are planned against how many they have. The color tells you at a glance what to do about it: yellow and olive mean there is room for more, green means the day is full, light red and red mean too much has been planned and something has to move, blue means the person is out (day off, vacation, sick leave, holiday), and grey means nothing is planned. The thresholds behind the colors are configurable under Configuration → Workload Indicator, so if your team considers 6 planned hours a full day, you can say so.
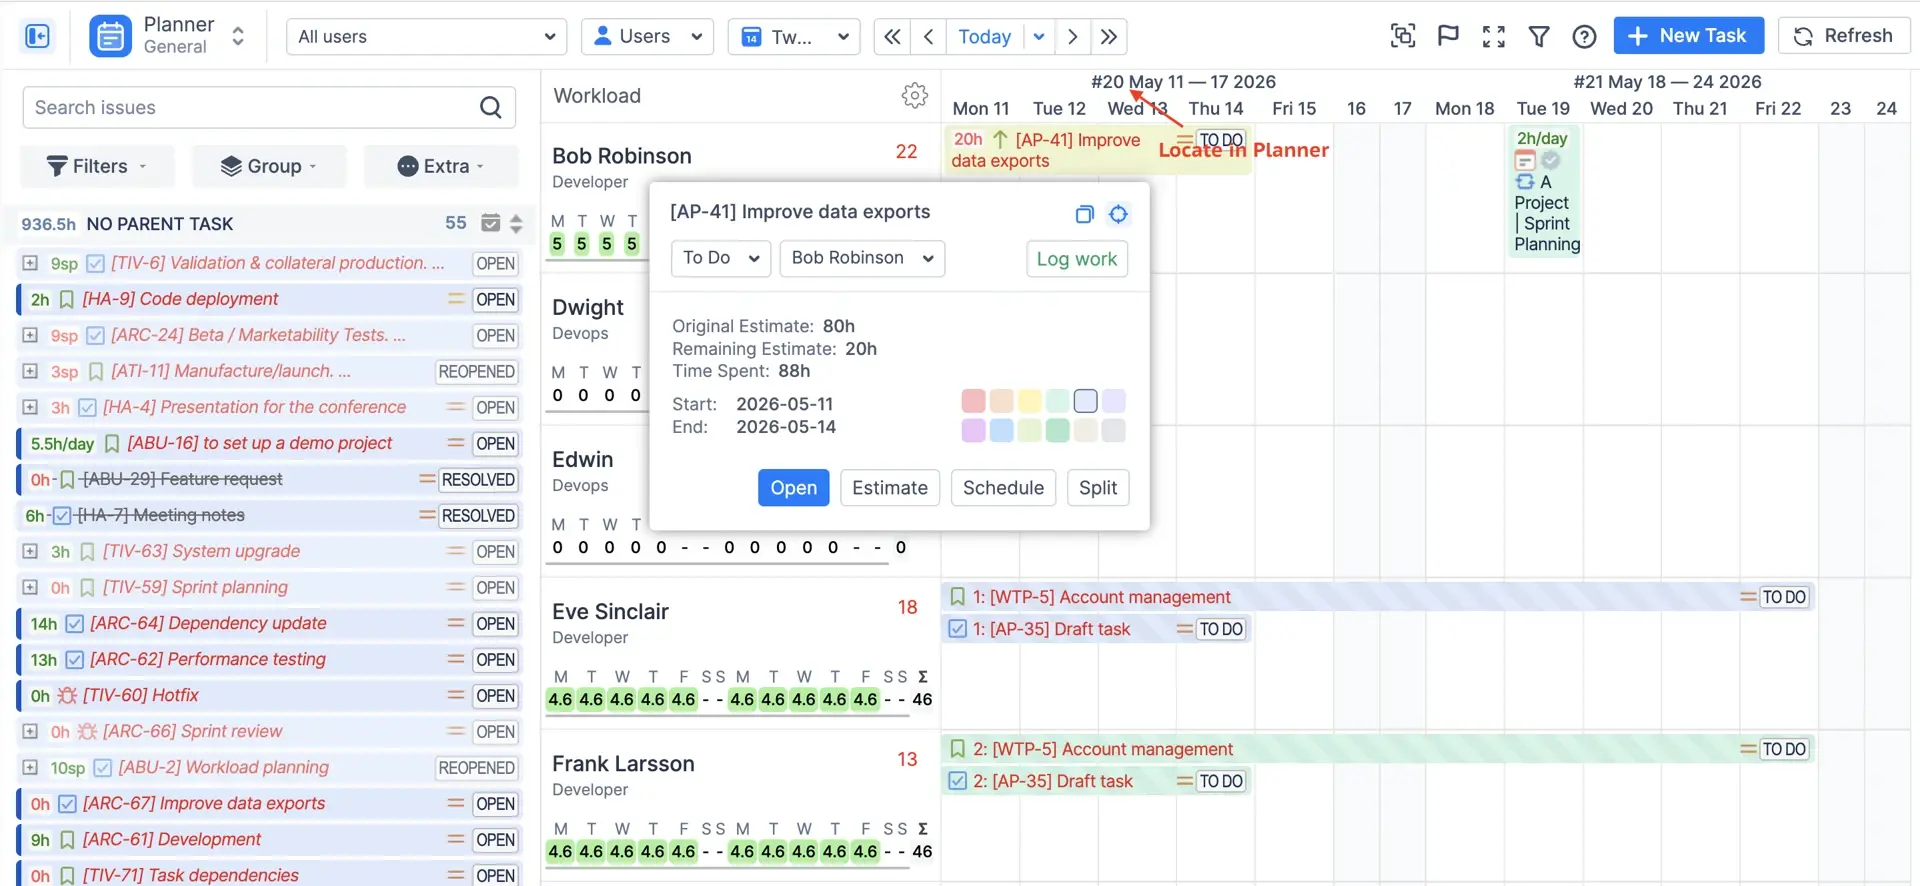
The timeline is where most planning happens: drag an issue from the panel on the left onto a person's row to assign and schedule it, stretch it to cover more days, or drag it to someone else's row when the first person turns red. If you start from an issue instead, the Locate in Planner icon on the issue card takes you straight to the person and the dates it is scheduled on.
Team Timeline
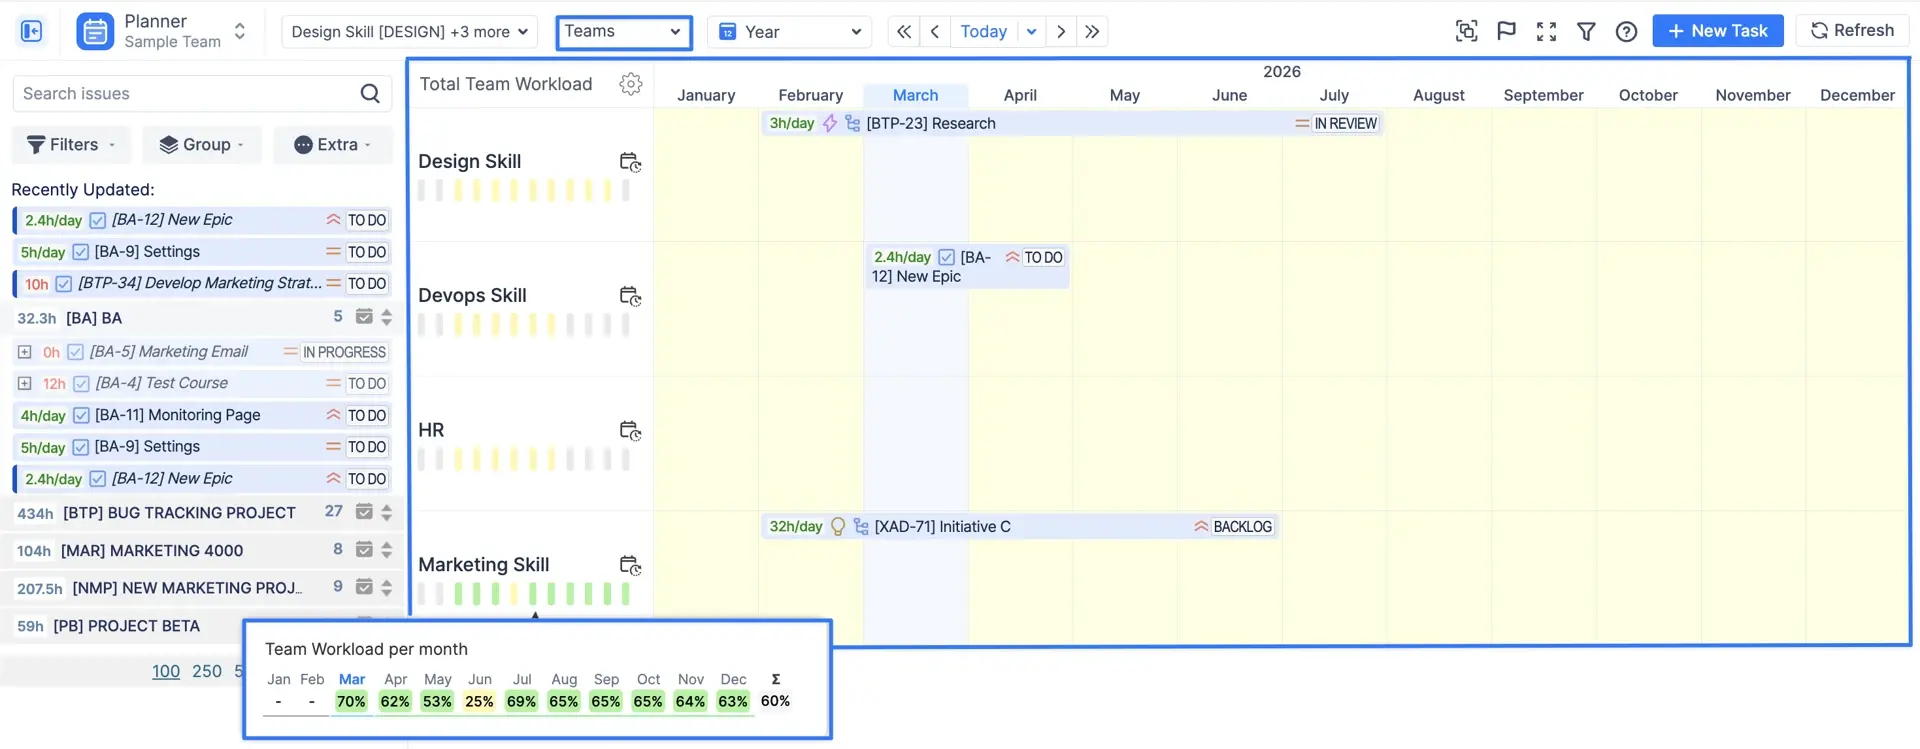
Sometimes you know a team will spend roughly 200 hours on a project in Q4, but you have no idea yet who will do which ticket. The team timeline is for exactly that. You can put work on the team as a whole, see the team's total capacity against it, and only later split it into individual assignments. This is the normal way to plan a quarter ahead, when the certainty is low and nobody wants to pretend otherwise.
The selector on the Planner top panel switches between three views. Users shows individual timelines only. Teams shows one row per team.
The selector on the Planner top panel switches between three views. Users shows individual timelines only. Teams shows one row per team.
Team with Users shows the team row on top and the members underneath, so you can see the unassigned team-level work and each person's load in one screen. Team-level assignments are counted in the reports too: the Team Capacity Chart and the utilization forecasts can include or exclude team panel workload, so you can look at a team as a whole or drill down to the people.
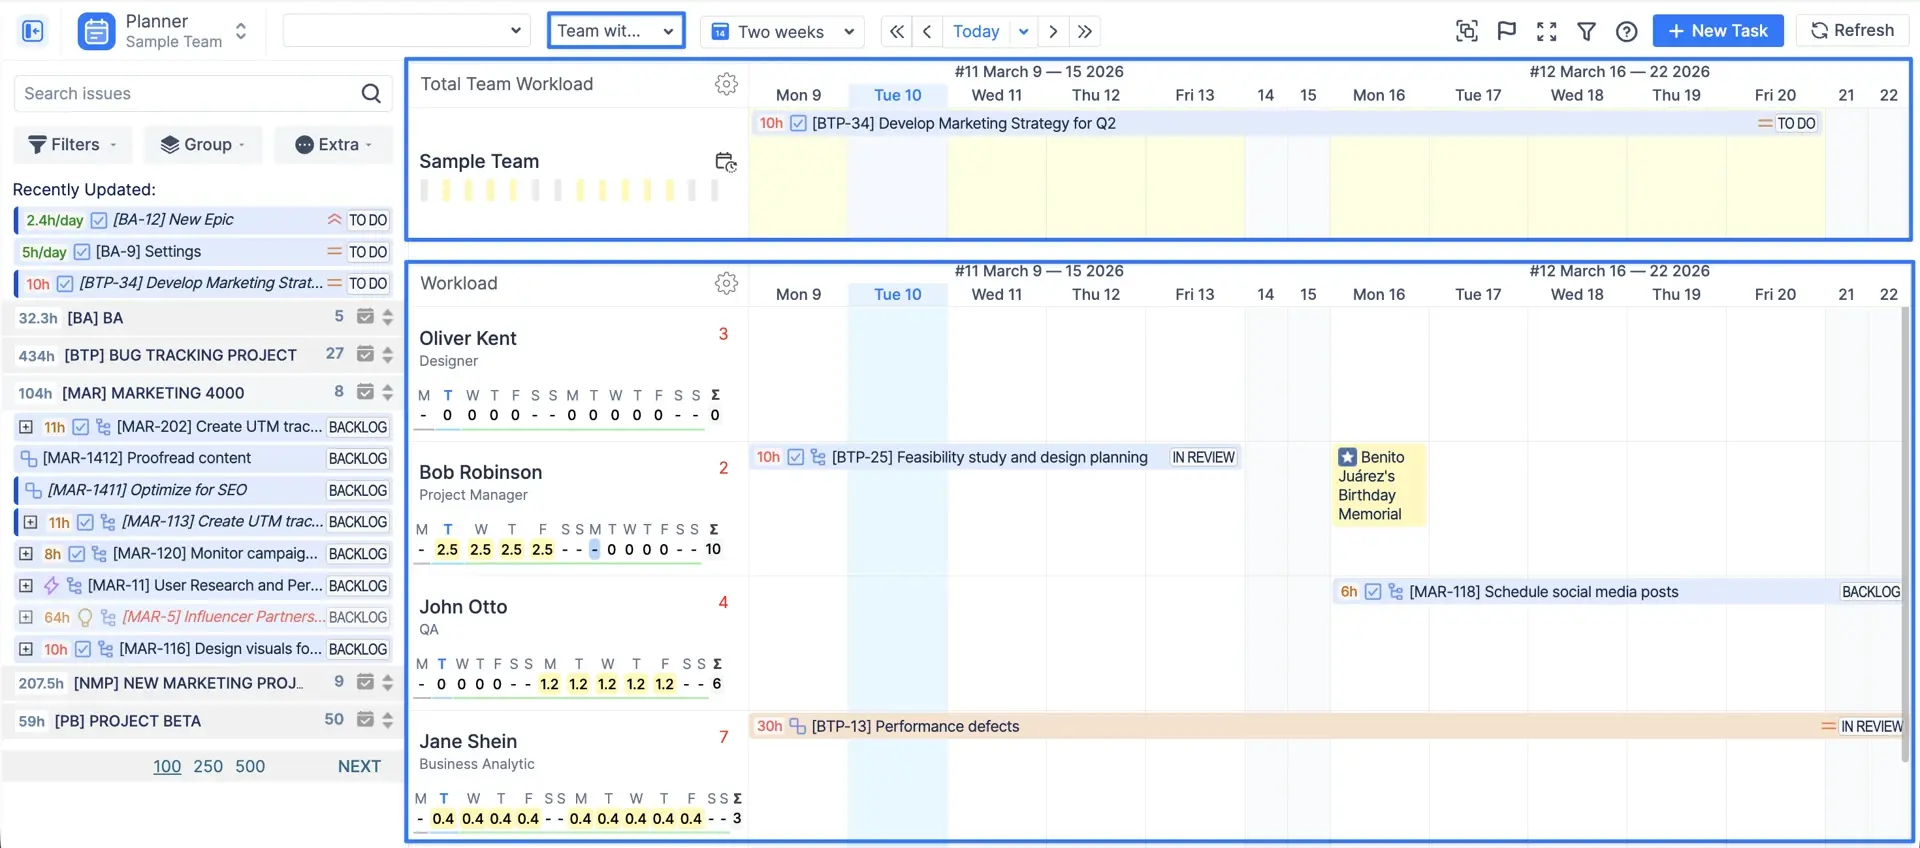
You can check the detailed guide on the Team panel in our documentation: Team panel
Jira Tasks
Jira tasks are your Jira issues, synchronized into ActivityTimeline. When you enable a project, its issues load into the app and become available for planning to anyone with the right permissions. You do not create a second copy of anything: change the assignee or dates in ActivityTimeline and Jira updates, and the other way round.
The panel on the left of the Planner is the backlog you plan from. One thing to know up front: by default it lists issues updated in the last 30 days, so if an old issue seems to be missing, add a filter and it will appear. Filters can include or exclude projects, sprints, assignees, statuses and custom fields, and you can search by key or text. Once you have found an issue, you drag it onto a timeline.
The panel on the left of the Planner is the backlog you plan from. One thing to know up front: by default it lists issues updated in the last 30 days, so if an old issue seems to be missing, add a filter and it will appear. Filters can include or exclude projects, sprints, assignees, statuses and custom fields, and you can search by key or text. Once you have found an issue, you drag it onto a timeline.
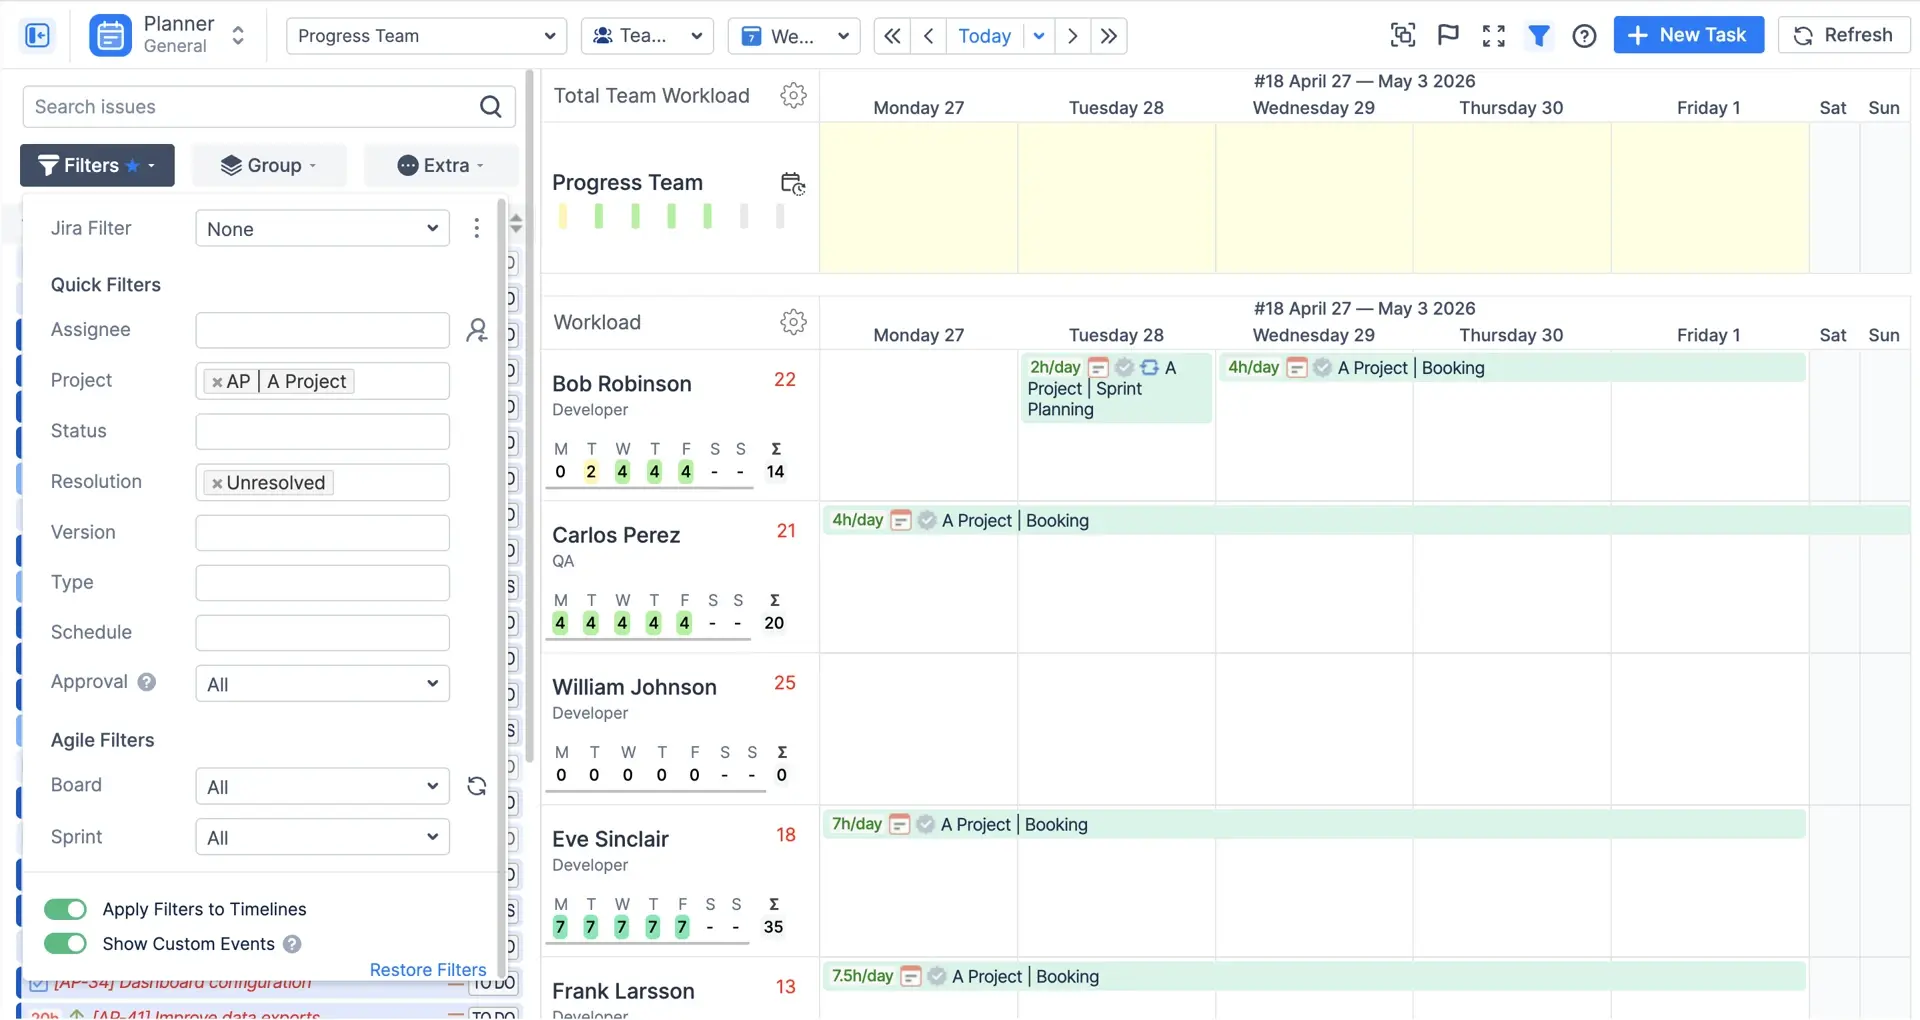
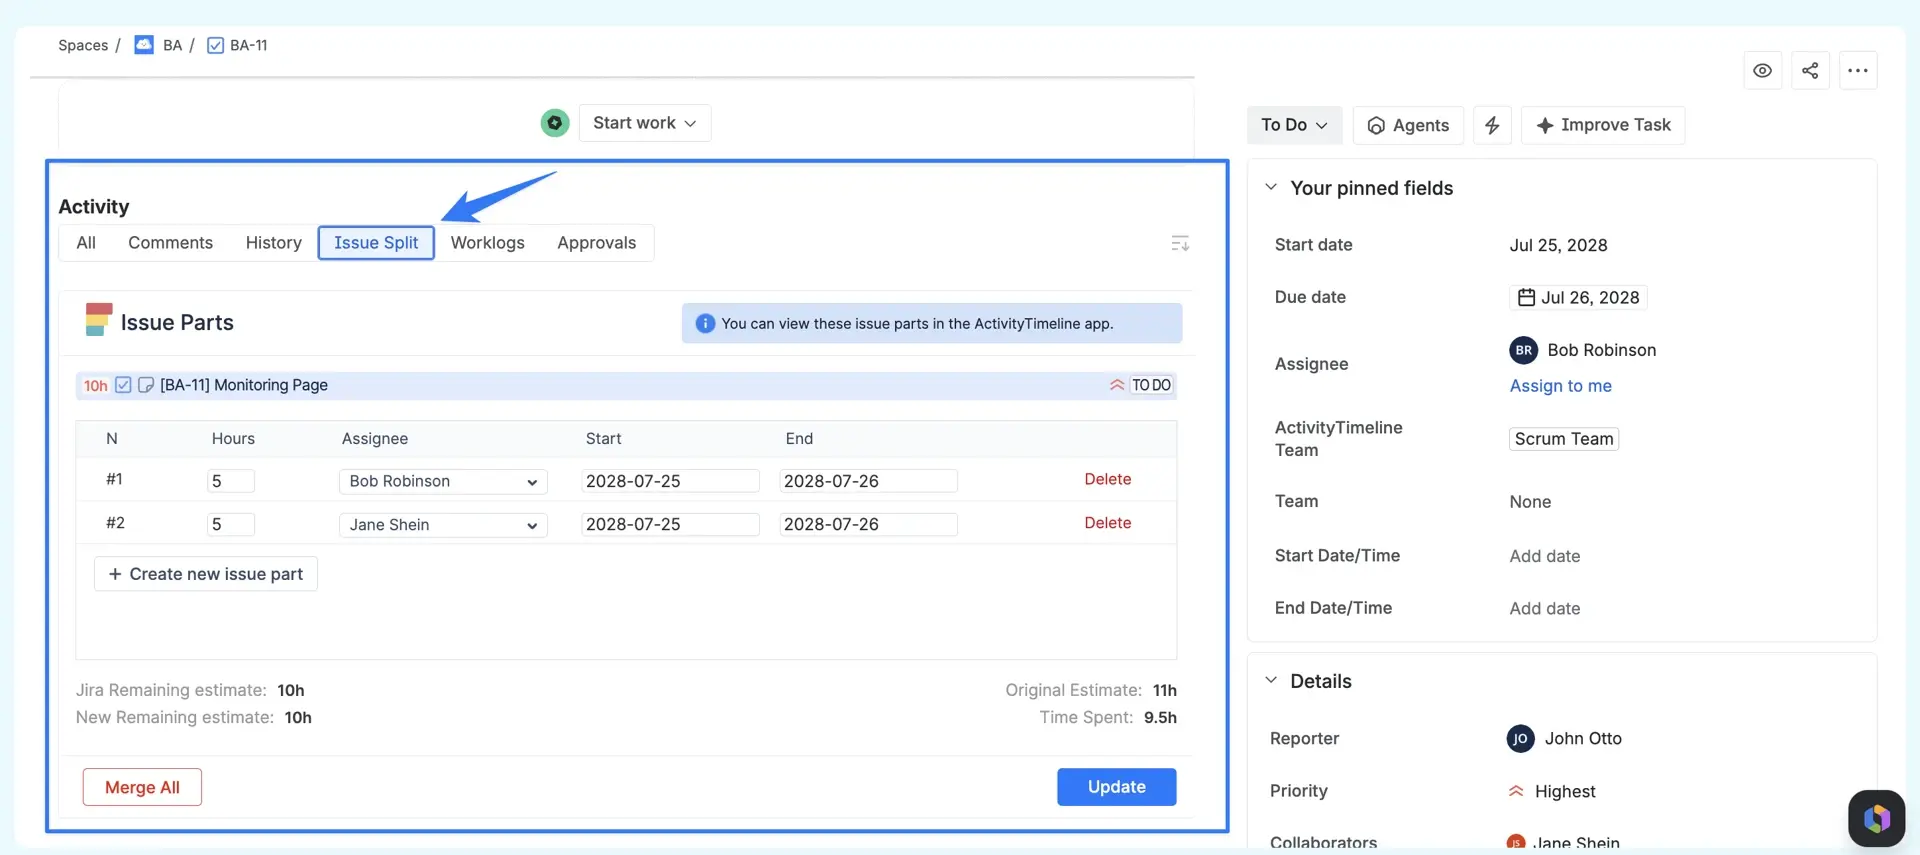
On the timeline each issue is a bar with the details you care about on it: key, summary, priority, type, estimate. Which details, and in what colors, is up to you in Configuration → Issues. Two things that are easy to miss: an issue can be split into parts scheduled on different dates (the parts stay one Jira issue), and if an issue has placeholders attached to it, the bar shows how many, so you can see planned-but-not-committed work next to the real thing.
Custom Events
Not everything that takes up a person's week is a Jira issue. Vacations, public holidays, a half day at the dentist, three hours a day reserved for a client, a note saying "on call this week": none of these belong in Jira, but all of them change what a person can take on. Custom events cover that. They live only in ActivityTimeline and never create noise in Jira.
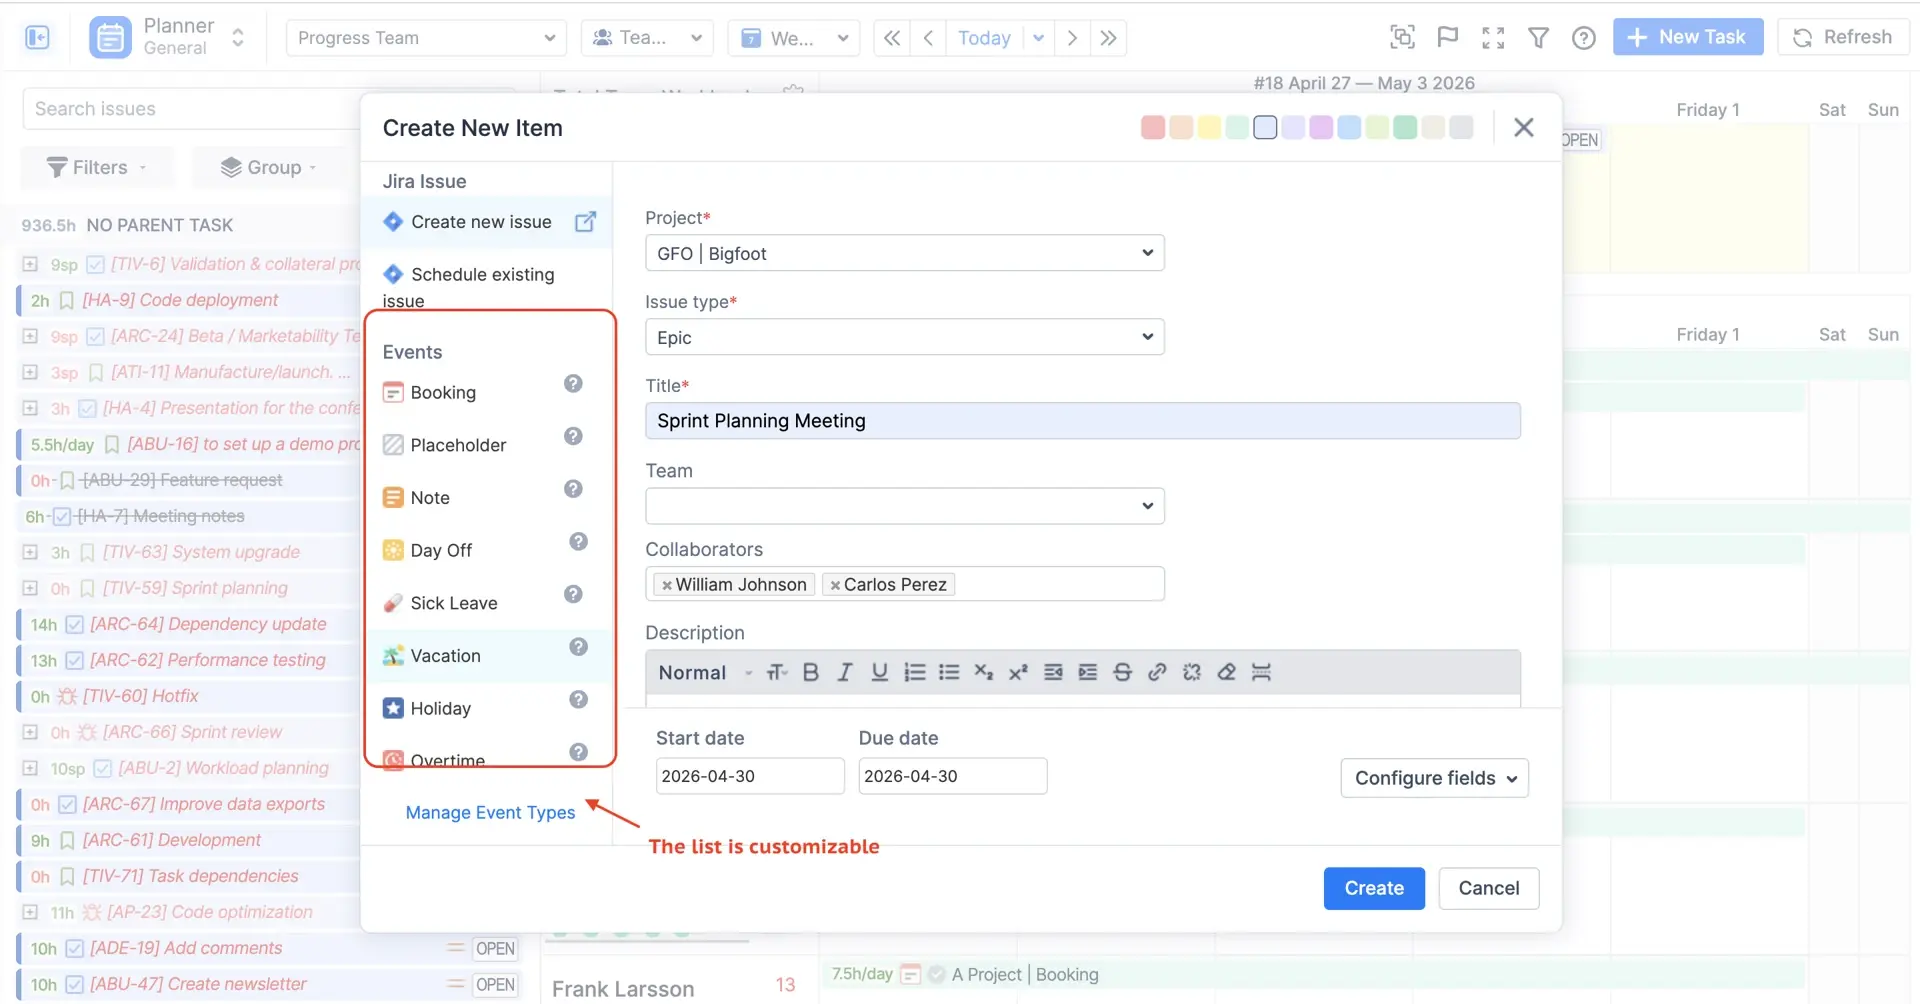
There are eight built-in types, and the useful way to think about them is by what they do to capacity.
- Booking takes hours away every day it covers, which is how you reserve someone for a project before the tickets exist.
- Overtime adds hours, for the days when extra time is agreed in advance and you do not want the person to show as overloaded.
- Day Off, Vacation, Sick Leave and Holiday remove the day, or part of it: a day off can be a full day or a set number of hours, and holidays usually come from a holiday scheme so you are not entering Christmas by hand for every country.
- Note does nothing to capacity; it is a text reminder on the timeline.
- Placeholder is the odd one out: it is a "what if" item. Use placeholders to try a plan without touching Jira, and when the plan is agreed, approve the placeholder and it turns into a real Jira issue, description included.
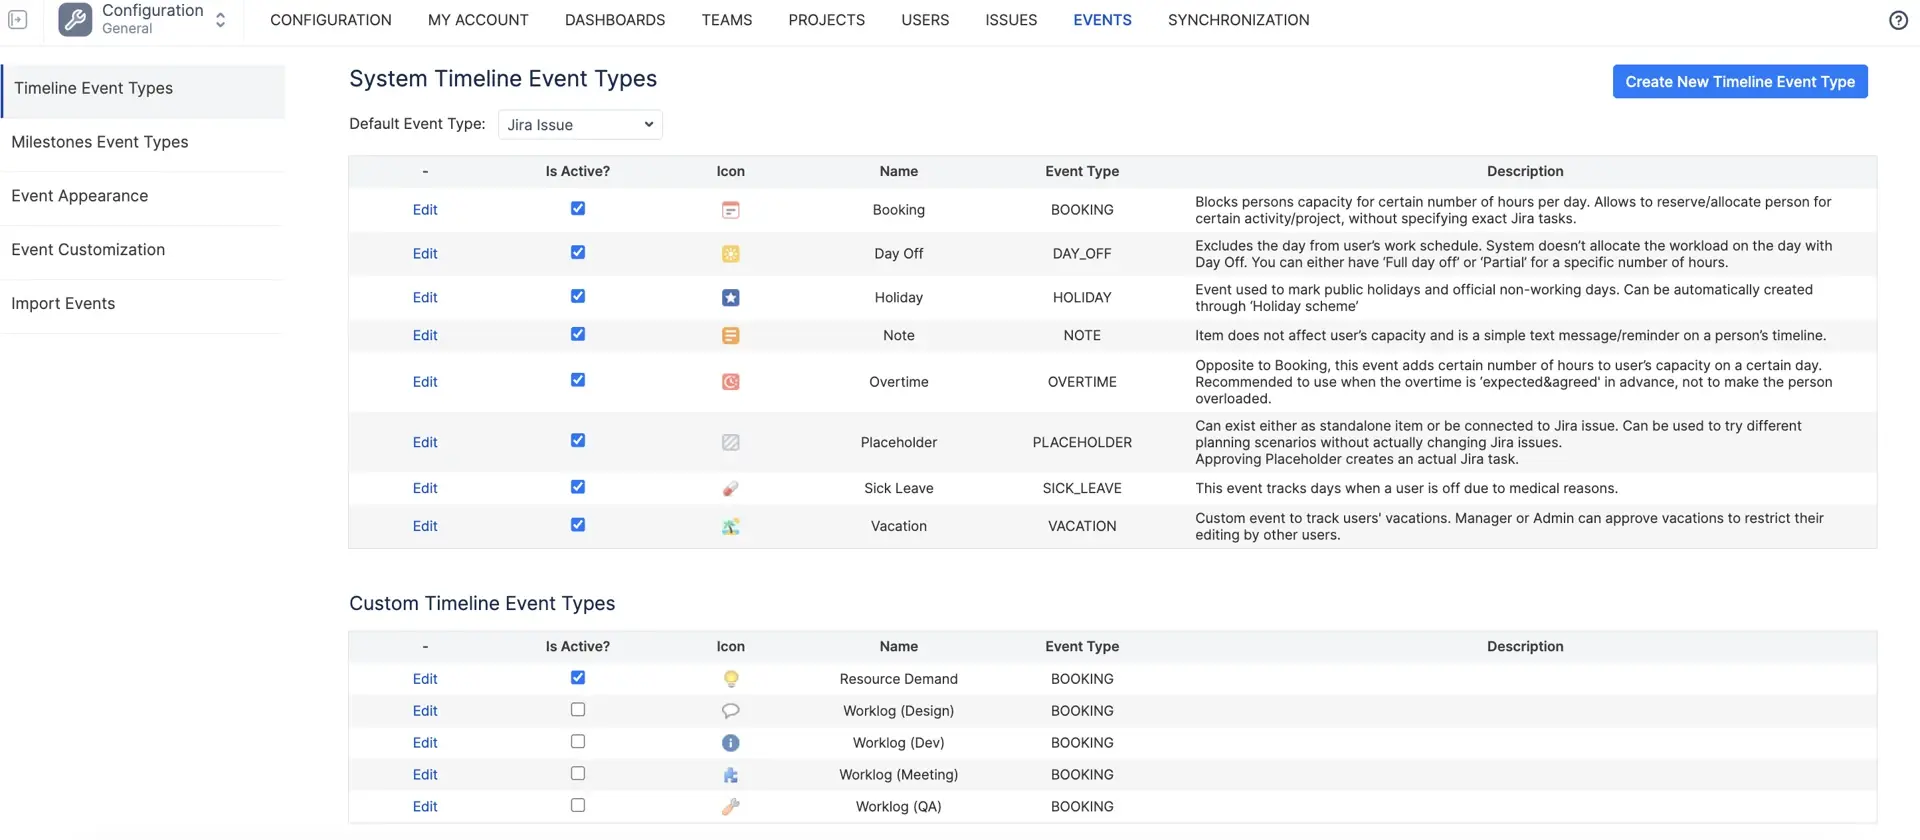
You can also make your own event types based on these eight (a "Training" event that behaves like a booking, say), and you decide per type whether it needs approval. Vacation used to require approval always; now that is a setting, and the same goes for bookings, placeholders, days off and sick leave.
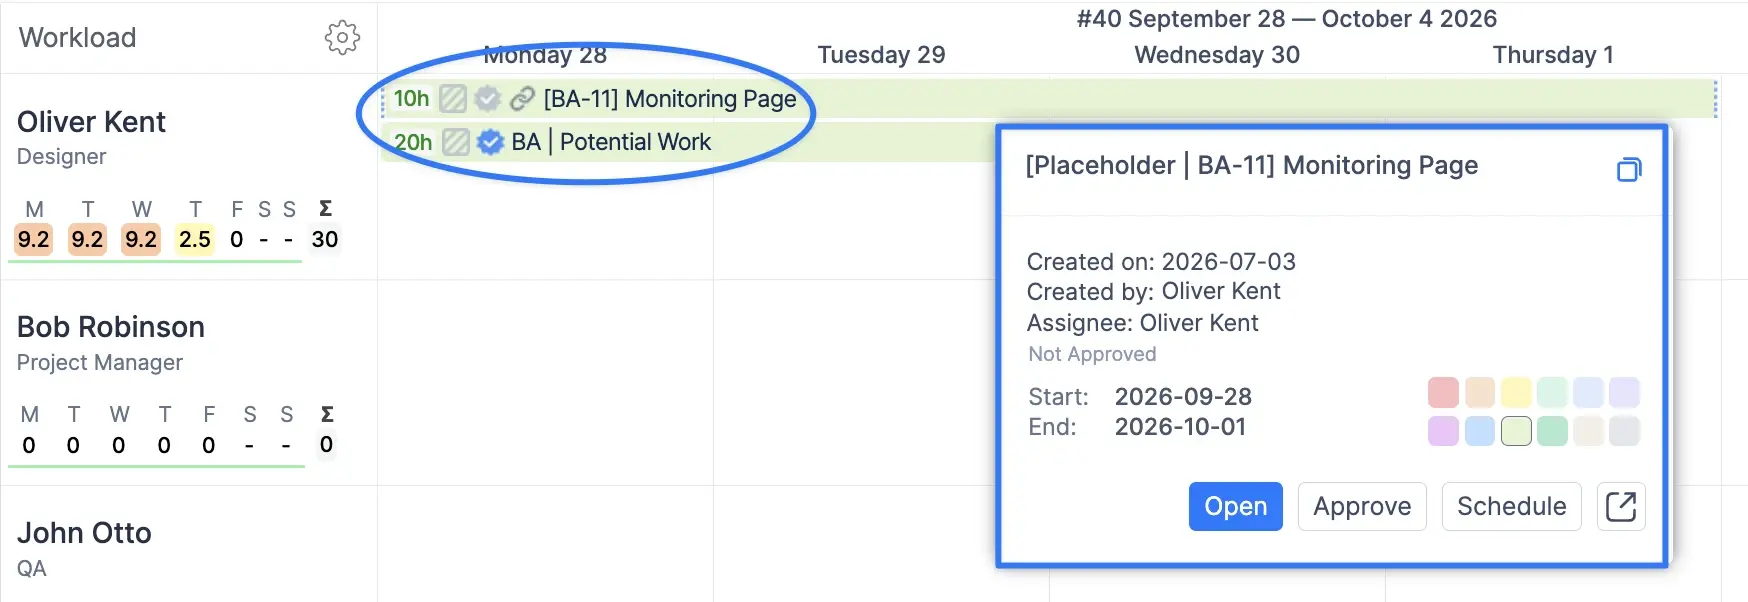
If your team keeps its meetings in Google Calendar or Outlook, those can be imported and shown on the timeline as events as well, so a Tuesday full of calls looks full. Whether imported events count as logged time or are shown just for context is a setting in the timesheet configuration.
Workload Management
Workload is planned work: the estimated hours assigned to a person for a period. Simple in principle, but it helps to know what feeds the number. For Jira issues it is the remaining estimate, spread across the days the issue is scheduled on (or a daily estimate, if you plan that way). Teams that estimate in story points can set a conversion factor, for example 1 point = 4 hours, and the app does the maths. Bookings, placeholders and overtime bring their own hours. Notes bring none.
One consequence worth stating plainly: an issue with no estimate adds nothing to the workload. It will sit on the timeline and the indicator under the person will stay yellow. If you see a full-looking timeline and a relaxed indicator, missing estimates are almost always why.
One consequence worth stating plainly: an issue with no estimate adds nothing to the workload. It will sit on the timeline and the indicator under the person will stay yellow. If you see a full-looking timeline and a relaxed indicator, missing estimates are almost always why.

The workload indicator under each name is the quickest way to read workload day by day. For anything beyond that, the Team Capacity Chart and the utilization forecasts show the same numbers per team, per project or per custom field over a longer range. If your organization plans in days rather than hours, there is a setting to display estimates and timesheets in days throughout.
You can learn more about the workload indicator in our documentation: Workload Indicator
You can learn more about the workload indicator in our documentation: Workload Indicator
Capacity Management
Capacity is available time. Before the app can tell you someone is overloaded, it needs to know what "full" means for them, and that is what we call involvement: the number of hours a day a person is available for planned work. The default is set once for the whole organization (8 hours is typical), and then you override it wherever reality differs: a part-timer at 4 hours, a team lead at 6 because two hours a day go to meetings, a specific week at 0 because of a conference. Involvement can be set per person and per day.
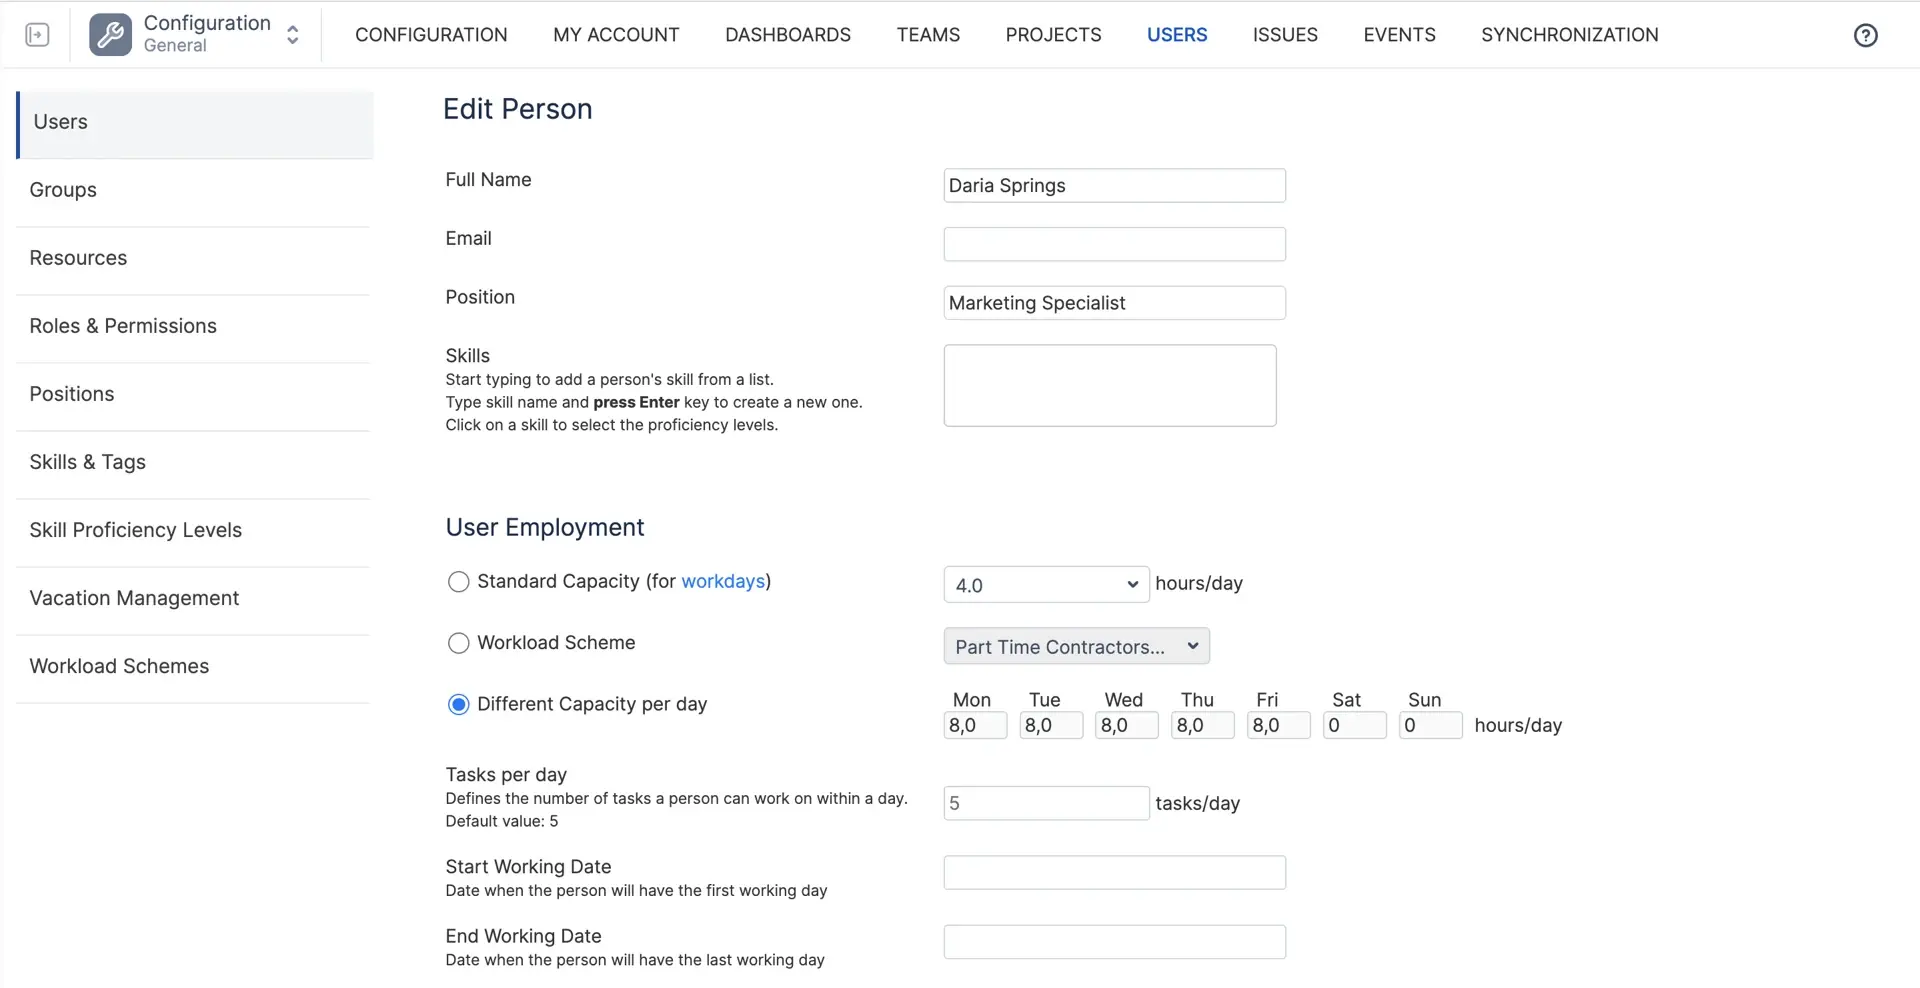
Time off then reduces capacity automatically. A vacation, sick leave, holiday or day off takes the day (or the hours, for a partial day off) out of the calculation, so you do not have to remember to lower anyone's involvement by hand. Overtime does the opposite and adds to it. If your company has fixed working patterns, workload schemes let you define them once and assign them to people instead of editing days.
The comparison of workload against capacity is what colors the indicator: below capacity is yellow or olive, at capacity is green, above it is light red or red. Vacation balances have their own cycle, and you can set when that cycle starts, globally or per person, so it lines up with your HR calendar rather than the January default.
The comparison of workload against capacity is what colors the indicator: below capacity is yellow or olive, at capacity is green, above it is light red or red. Vacation balances have their own cycle, and you can set when that cycle starts, globally or per person, so it lines up with your HR calendar rather than the January default.
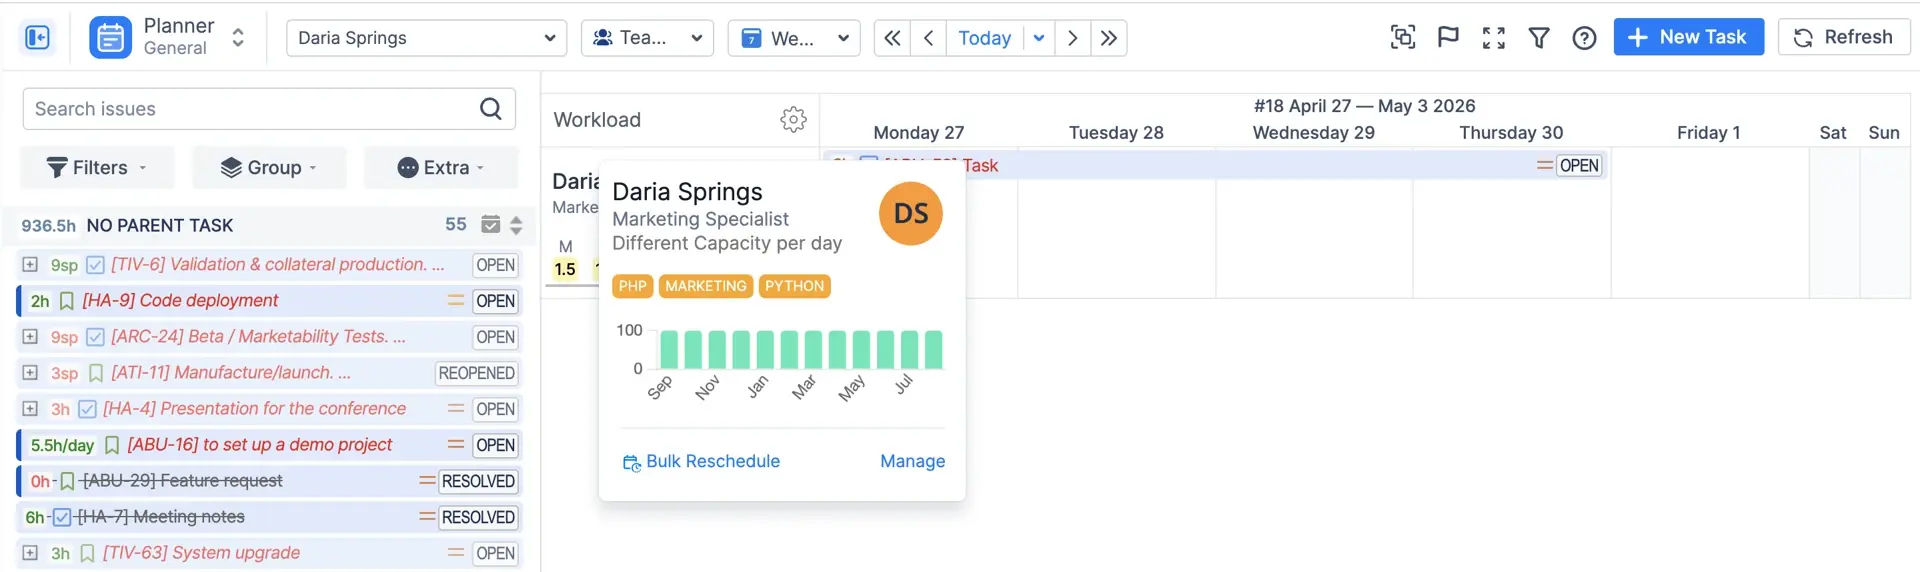
You manage involvement in each person's profile under Configuration → Users.
Jira Time Tracking (Worklogs)
Worklogs are actual work: the time people say they spent, as opposed to the time you planned for them. They come from wherever your team already logs time. If people log in Jira, those worklogs sync into ActivityTimeline. If they log in ActivityTimeline (from the Planner, the Workspace, the timesheet, or the Log Work button inside the Jira issue view), they are written back to Jira, so there is one set of numbers either way. Frequently used issues can be marked as favorites in the Log Work dialog, and a Recent tab remembers what you logged last, which for most people means two clicks a day.
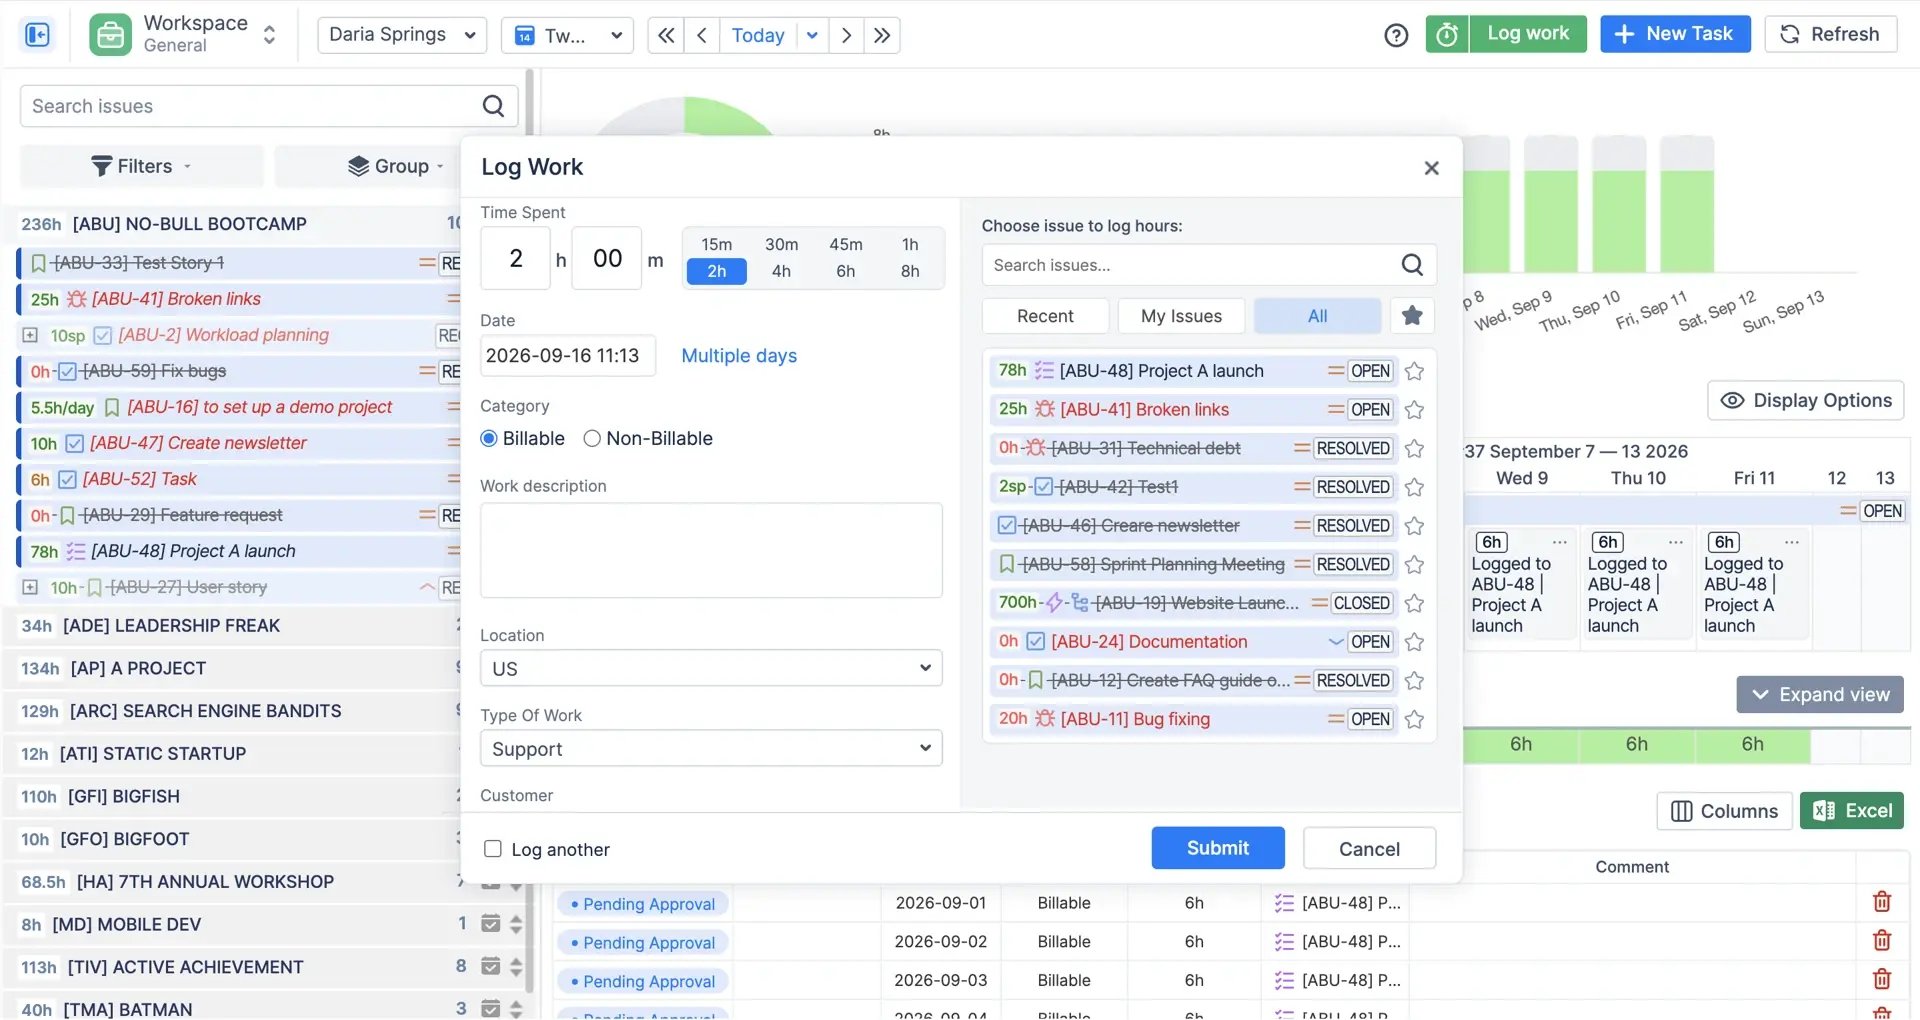
Worklogs can carry more than a number: a category (billable or not, say) and custom attributes your finance team asks for. Admins can limit how far back someone may log, with options from a few days to 75, which matters if you close books monthly.
Where worklogs show up: the Timesheets module is the main place, with filters that separate Jira worklogs from bookings and calendar events. On the Planner, the default indicator mode called Worklogs & Workload shows logged time for the past and planned time for the future in the same row, which is the fastest way to see whether the plan matched reality. That comparison, planned against actual, is what makes estimates get better over time: if a type of task is always logged at twice its estimate, you will see it within a few sprints.
Where worklogs show up: the Timesheets module is the main place, with filters that separate Jira worklogs from bookings and calendar events. On the Planner, the default indicator mode called Worklogs & Workload shows logged time for the past and planned time for the future in the same row, which is the fastest way to see whether the plan matched reality. That comparison, planned against actual, is what makes estimates get better over time: if a type of task is always logged at twice its estimate, you will see it within a few sprints.
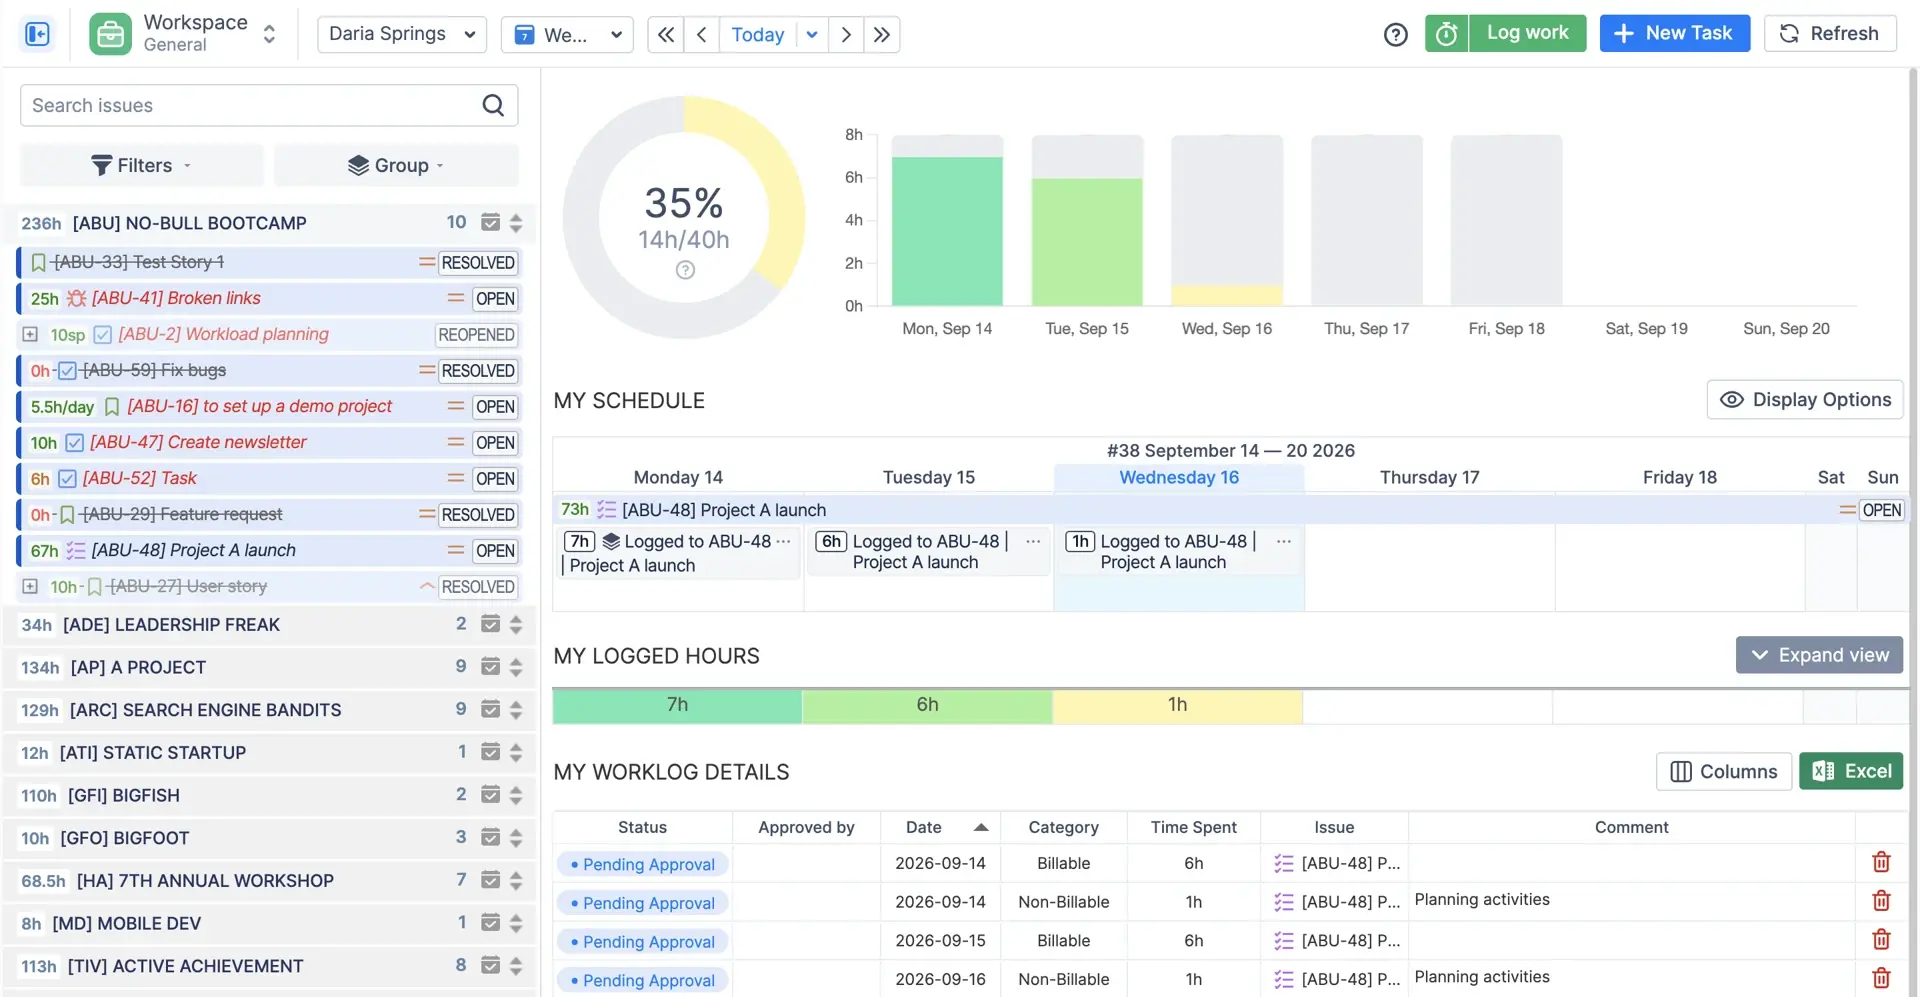
Two honest limits: logging time on future dates is off by default (you can turn it on, but most teams should not), and worklogs on the Planner are read-only; to move or resize them you use the Workspace.
How it all fits together
Everything above reduces to three numbers per person per day. Capacity is how much time they have. Workload is how much you have planned for them. Worklogs are how much they actually spent. Workload against capacity tells you whether the plan is realistic. Worklogs against workload tells you whether your estimates were.
Resources and teams are who those numbers belong to, personal and team timelines are where you see them, and Jira tasks and custom events are what produces them. That is the whole model. Most teams never need more than this, and the teams that do (finance modules, forecasts by skill, REST API) find it two or three clicks further in.
If something on this page does not match what you see in your instance, tell us at reliex.com/support. This page gets updated when the app does, and a fair share of those updates started as a support ticket.
Resources and teams are who those numbers belong to, personal and team timelines are where you see them, and Jira tasks and custom events are what produces them. That is the whole model. Most teams never need more than this, and the teams that do (finance modules, forecasts by skill, REST API) find it two or three clicks further in.
If something on this page does not match what you see in your instance, tell us at reliex.com/support. This page gets updated when the app does, and a fair share of those updates started as a support ticket.

Try it with your own Jira. The trial is 30 days, no credit card, and the setup wizard walks you through the same concepts in the same order as this page.