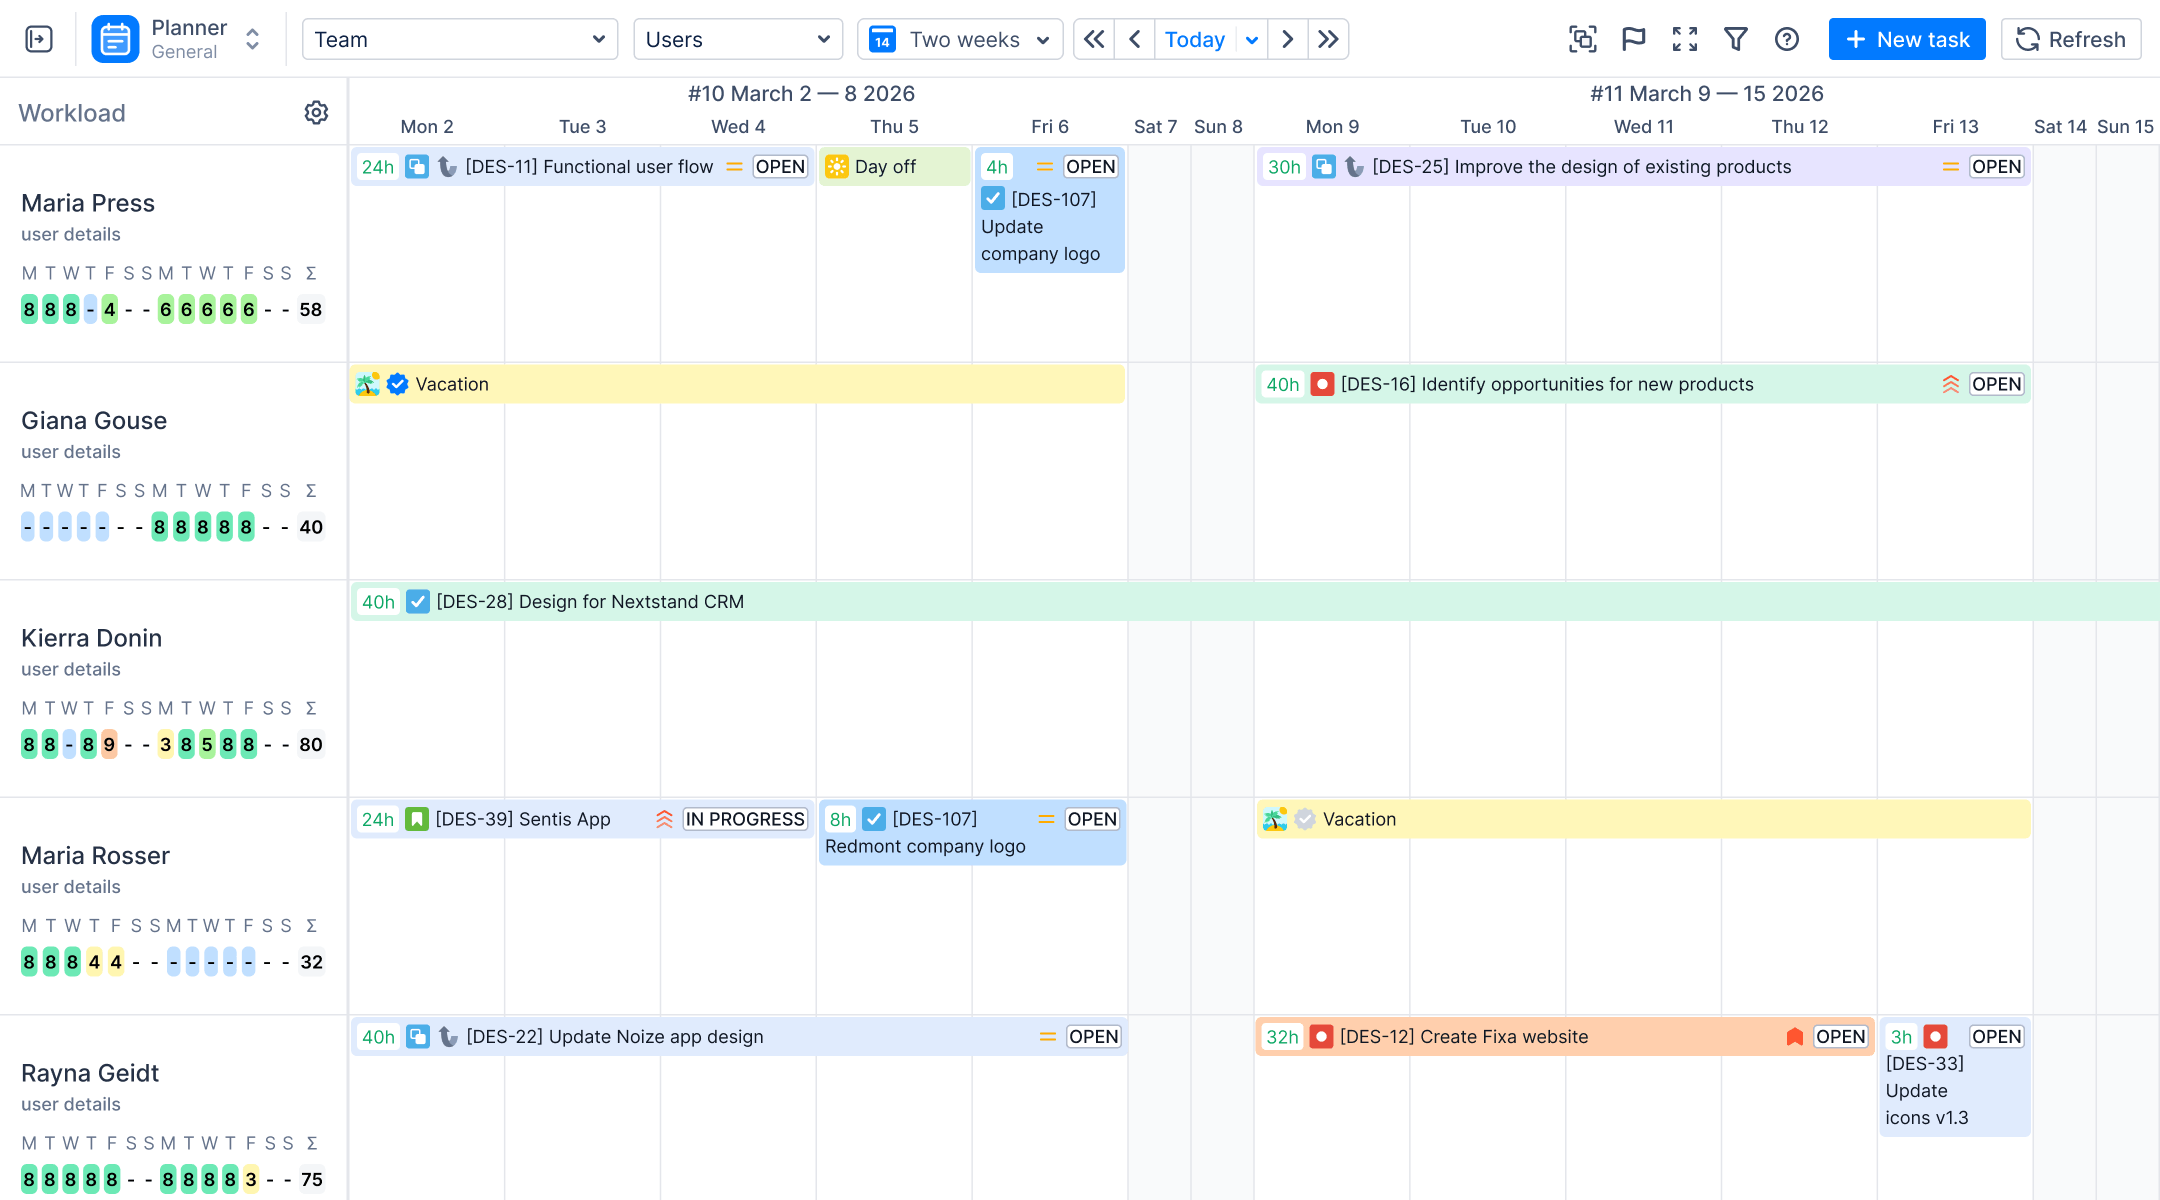
You installed ActivityTimeline. The Setup Wizard finished. Now you're looking at a Planner full of users and Jira issues and thinking: okay, where do I actually start?
Here.
This guide is the setup order we give every new customer. Nine steps, one question each, and a "skip this if" line under most of them, because most teams don't need every setting. A first setup takes 30 to 60 minutes. If you'd rather watch than read, the video at the bottom covers the same steps in about 7 minutes.
Here.
This guide is the setup order we give every new customer. Nine steps, one question each, and a "skip this if" line under most of them, because most teams don't need every setting. A first setup takes 30 to 60 minutes. If you'd rather watch than read, the video at the bottom covers the same steps in about 7 minutes.
Key takeaways
- ActivityTimeline setup comes down to nine areas: Jira data sync, Users, Teams, Workload and Holiday Schemes, work assignment, workload calculation, time tracking, Planner appearance, and a pilot rollout
- Five of the nine are answered by defaults for a typical company. Availability (Workload and Holiday Schemes), Time Tracking Mode, and the pilot team are the three worth a real conversation
- Webhooks are the one item every instance should add, so deletions in Jira reach ActivityTimeline
- Nothing here requires re-running the Setup Wizard, which re-initializes the instance.
One thing to know up front: ActivityTimeline pulls changes from Jira every 10 minutes. If something you just changed in Jira isn't there yet, that's normal. Wait a bit, or hit Refresh in Configuration if you need it now.

Configurar Classic ActivityTimeline Team para Jira
Una vez que añadas a tu instancia de Jira y pases por el Asistente de Configuración, verás un panel de usuarios, una lista de tareas y una pregunta abierta: «¿Por dónde empiezo?».

Asigne a los usuarios de Jira funciones, puestos y habilidades
son una parte integral de ActivityTimeline y, para poder gestionarlos correctamente en la aplicación, te recomendamos que les asignes un conjunto de metadatos que permitan una mejor planificación de los recursos.
Projects. Open Project Synchronisation and make sure the projects you want to plan are active. Picked the right ones in the wizard? You're done here. If you deactivate a project later, new changes from it stop syncing, and the data already loaded stays until you remove it. How syncing works: Synchronization.
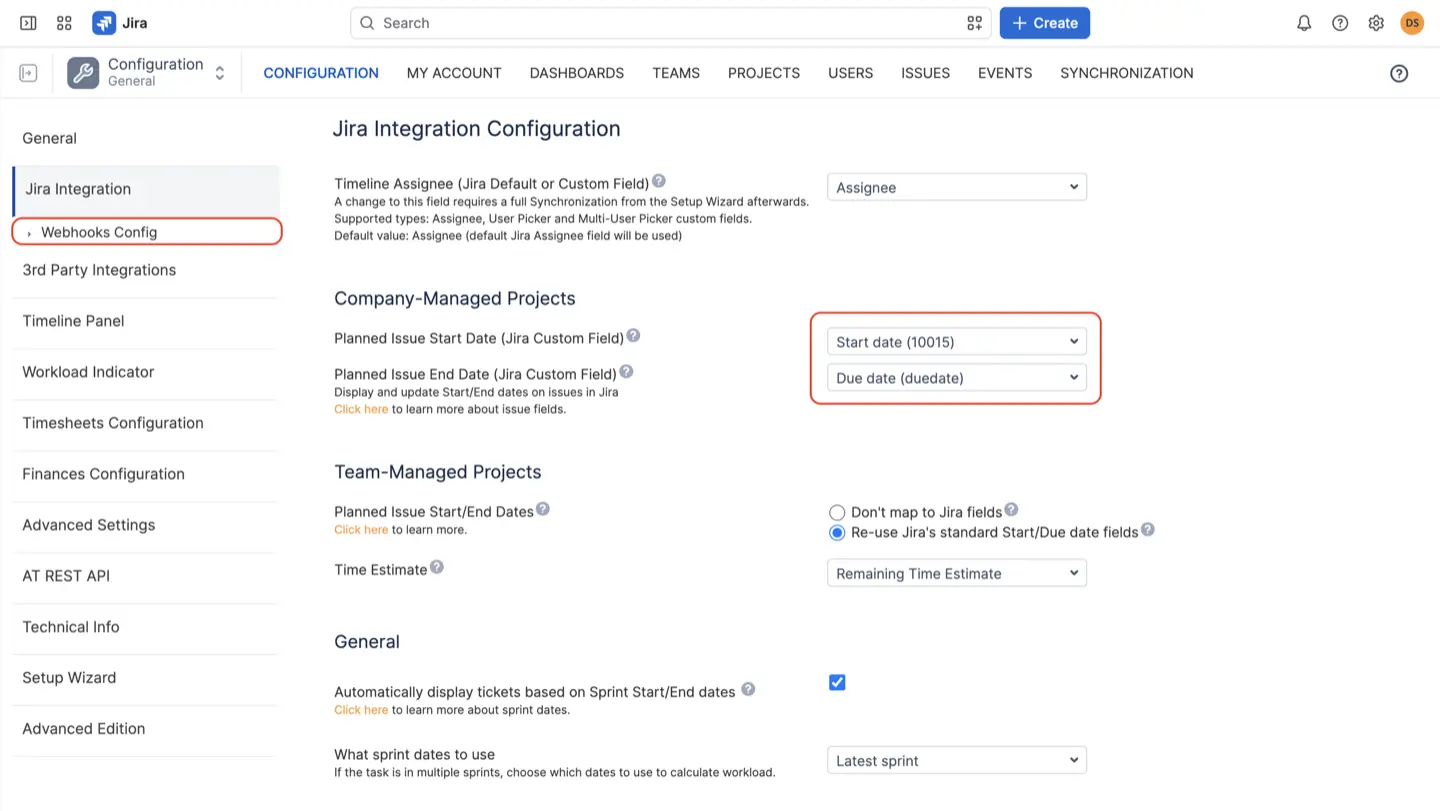
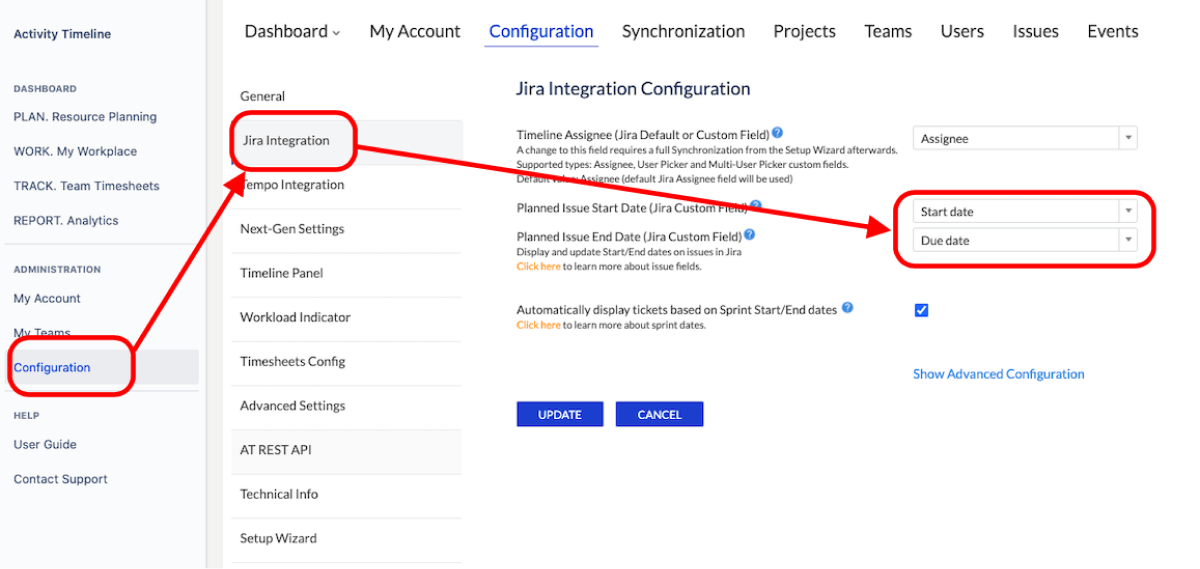
Planning dates. For Company-Managed projects, ActivityTimeline reads Jira's Start Date and Due Date by default. If those are the fields your teams already fill in, nothing to do. If you plan with other date fields, map them as Planned Start and End Date in Map Custom Fields. Team-Managed projects are set up separately: reuse Jira's Start/Due Date so both tools stay in sync, or keep planning dates only inside ActivityTimeline.
Sprints. If your teams plan in Jira Sprints, issues without their own dates land on the timeline using the Sprint start and end. On by default. One rule to remember: an issue's own dates always beat Sprint dates. Want an issue to follow the Sprint? Leave its individual dates empty. Details: Sprint start/end dates.
Webhooks. This one we actually recommend to everyone. Add the ActivityTimeline webhooks so that issues and worklogs deleted in Jira are also removed from ActivityTimeline. Without them, deleted items can hang around on timelines. Instructions: Configure Webhooks.
Skip this step if: you accepted the wizard defaults and plan with standard Jira dates. Just add the webhooks and move on. That's most new customers.
Projects. Open Project Synchronisation and make sure the projects you want to plan are active. Picked the right ones in the wizard? You're done here. If you deactivate a project later, new changes from it stop syncing, and the data already loaded stays until you remove it. How syncing works: Synchronization.
Planning dates. For Company-Managed projects, ActivityTimeline reads Jira's Start Date and Due Date by default. If those are the fields your teams already fill in, nothing to do. If you plan with other date fields, map them as Planned Start and End Date in Map Custom Fields. Team-Managed projects are set up separately: reuse Jira's Start/Due Date so both tools stay in sync, or keep planning dates only inside ActivityTimeline.
Sprints. If your teams plan in Jira Sprints, issues without their own dates land on the timeline using the Sprint start and end. On by default. One rule to remember: an issue's own dates always beat Sprint dates. Want an issue to follow the Sprint? Leave its individual dates empty. Details: Sprint start/end dates.
Webhooks. This one we actually recommend to everyone. Add the ActivityTimeline webhooks so that issues and worklogs deleted in Jira are also removed from ActivityTimeline. Without them, deleted items can hang around on timelines. Instructions: Configure Webhooks.
Skip this step if: you accepted the wizard defaults and plan with standard Jira dates. Just add the webhooks and move on. That's most new customers.
Step 2. Who are you planning for?
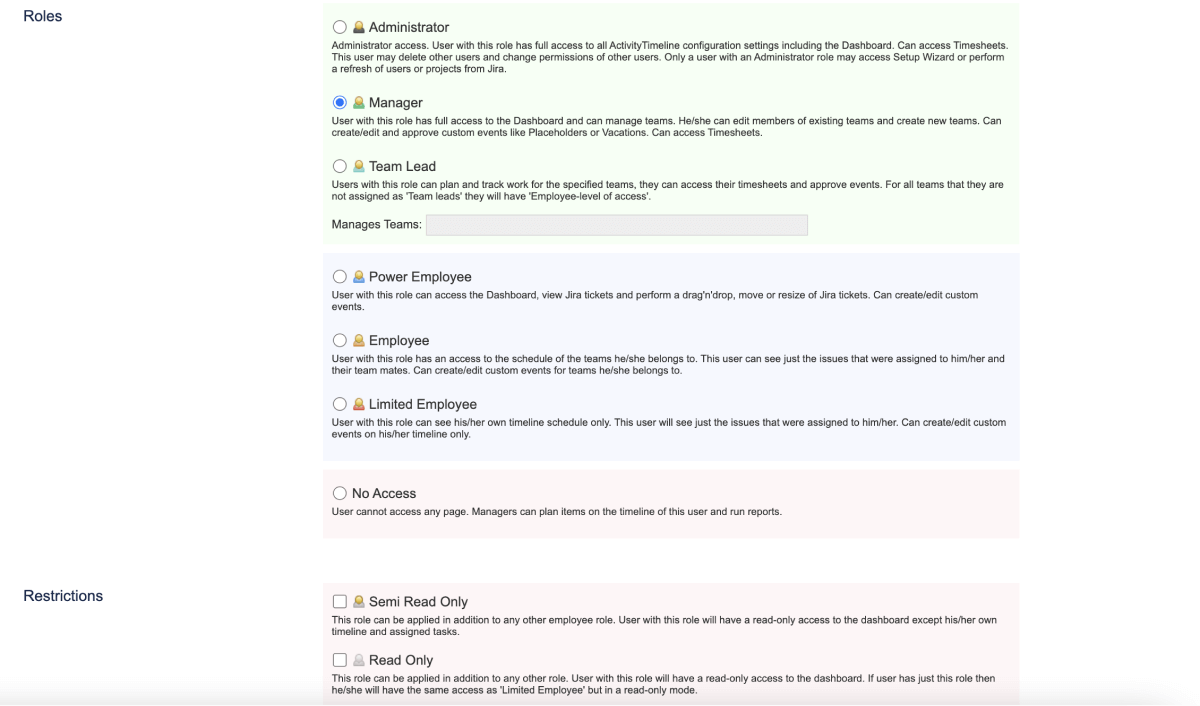
Los roles son esenciales para los permisos en ActivityTimeline, ya que definen lo que las personas pueden ver y hacer en la aplicación. A continuación puedes ver nuestras recomendaciones para cada uno de los roles:
Start with roles and permissions, because they control who sees and changes what. The rule of thumb: Admin for whoever configures the app, Manager for people who plan for others, User for everyone else.
More than a handful of people? Don't edit them one by one. Turn on Bulk Mode and set roles, capacity or positions for many users at once.
If you already organize people in Jira Groups, open the Groups tab, click Manage, and assign roles, workload and holiday schemes to the whole group. Everyone in the group inherits the settings, including people who join next month. This is the setup that ages best, because nobody has to remember to configure new hires.
Optional: positions and skills. Add them if you plan to search people by skill, staff work by position, or build teams automatically from those attributes (Step 3). If not, skip for now. You can add them any time.
Start with roles and permissions, because they control who sees and changes what. The rule of thumb: Admin for whoever configures the app, Manager for people who plan for others, User for everyone else.
More than a handful of people? Don't edit them one by one. Turn on Bulk Mode and set roles, capacity or positions for many users at once.
If you already organize people in Jira Groups, open the Groups tab, click Manage, and assign roles, workload and holiday schemes to the whole group. Everyone in the group inherits the settings, including people who join next month. This is the setup that ages best, because nobody has to remember to configure new hires.
Optional: positions and skills. Add them if you plan to search people by skill, staff work by position, or build teams automatically from those attributes (Step 3). If not, skip for now. You can add them any time.
Step 3. How are your teams organized?
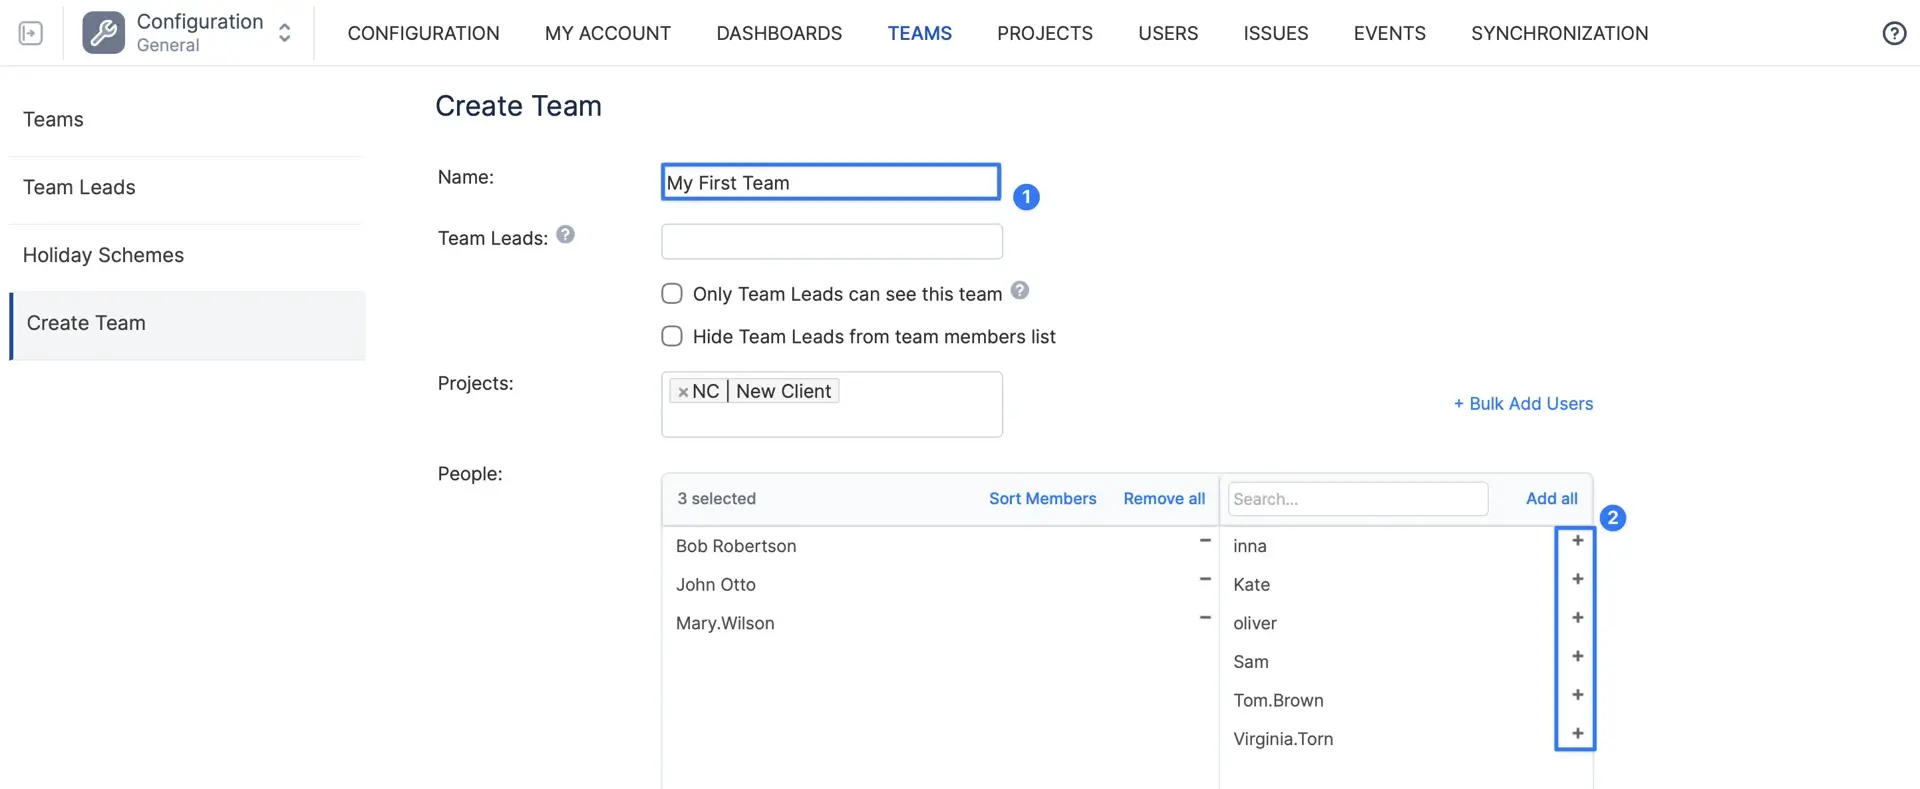
Teams are the backbone of the Planner, timesheets, reports and every capacity number. Whatever team you create here shows up in the team dropdown across the app.
Four ways to build one:
-> Classic teams: built by hand. Name it, pick a team lead, add people. Full control -> Functional teams: built automatically from the positions or skills you set in Step 2 -> Teams from Jira Groups: mirror a group you already maintain in Jira -> Imported Jira Teams: if your company already uses Atlassian's Teams feature. Tempo users also get an option to import from Tempo.
Our honest advice: create one classic team first. Get to know the Planner with it. Then decide whether you want the other types.
A team lead is optional but useful: the lead gets access to that team's plans, timesheets and user details without needing a Manager role.
Four ways to build one:
-> Classic teams: built by hand. Name it, pick a team lead, add people. Full control -> Functional teams: built automatically from the positions or skills you set in Step 2 -> Teams from Jira Groups: mirror a group you already maintain in Jira -> Imported Jira Teams: if your company already uses Atlassian's Teams feature. Tempo users also get an option to import from Tempo.
Our honest advice: create one classic team first. Get to know the Planner with it. Then decide whether you want the other types.
A team lead is optional but useful: the lead gets access to that team's plans, timesheets and user details without needing a Manager role.
Asignar campos personalizados de Jira
Este paso es opcional, pero recomendamos hacerlo, ya que permitirá utilizar toda la capacidad de ActivityTimeline.Por defecto, ActivityTimeline se conecta a Jira solo a través del campo «Asignado», lo que significa que sabe a quién está asignada la tarea, pero no sabe dónde ubicarla en el cronograma de la persona, por lo que todo debe hacerse manualmente.La planificación manual mediante arrastrar y soltar es perfectamente válida. Sin embargo, si quieres que las fechas de la tarea se muestren también en Jira y poder programar tareas directamente desde tu incidencia, te recomendamos asignar tus fechas de Inicio/Fin a ActivityTimeline.Para conectar tus campos de fecha de Inicio/Fin de Jira a ActivityTimeline, sigue esta sencilla guía:Si ya tienes campos personalizados de Fechas de Inicio/Fin en tu Jira... puedes asignarlos a ActivityTimeline para que pueda leer estos datos de Jira y mostrar tus Incidencias automáticamente.Puedes hacerlo de la siguiente manera:
Ve a Configuración de ActivityTimeline -> Integración con Jira -> En el menú desplegable, elige tus campos de fecha de Inicio/Fin -> Haz clic en el botón «Actualizar»:
Ve a Configuración de ActivityTimeline -> Integración con Jira -> En el menú desplegable, elige tus campos de fecha de Inicio/Fin -> Haz clic en el botón «Actualizar»:
Asignar tareas y eventos personalizados a Jira
Cuando hayas creado tus equipos y los usuarios asignados a los roles y puestos necesarios, estarás listo para empezar a planificar las tareas reales de Jira.
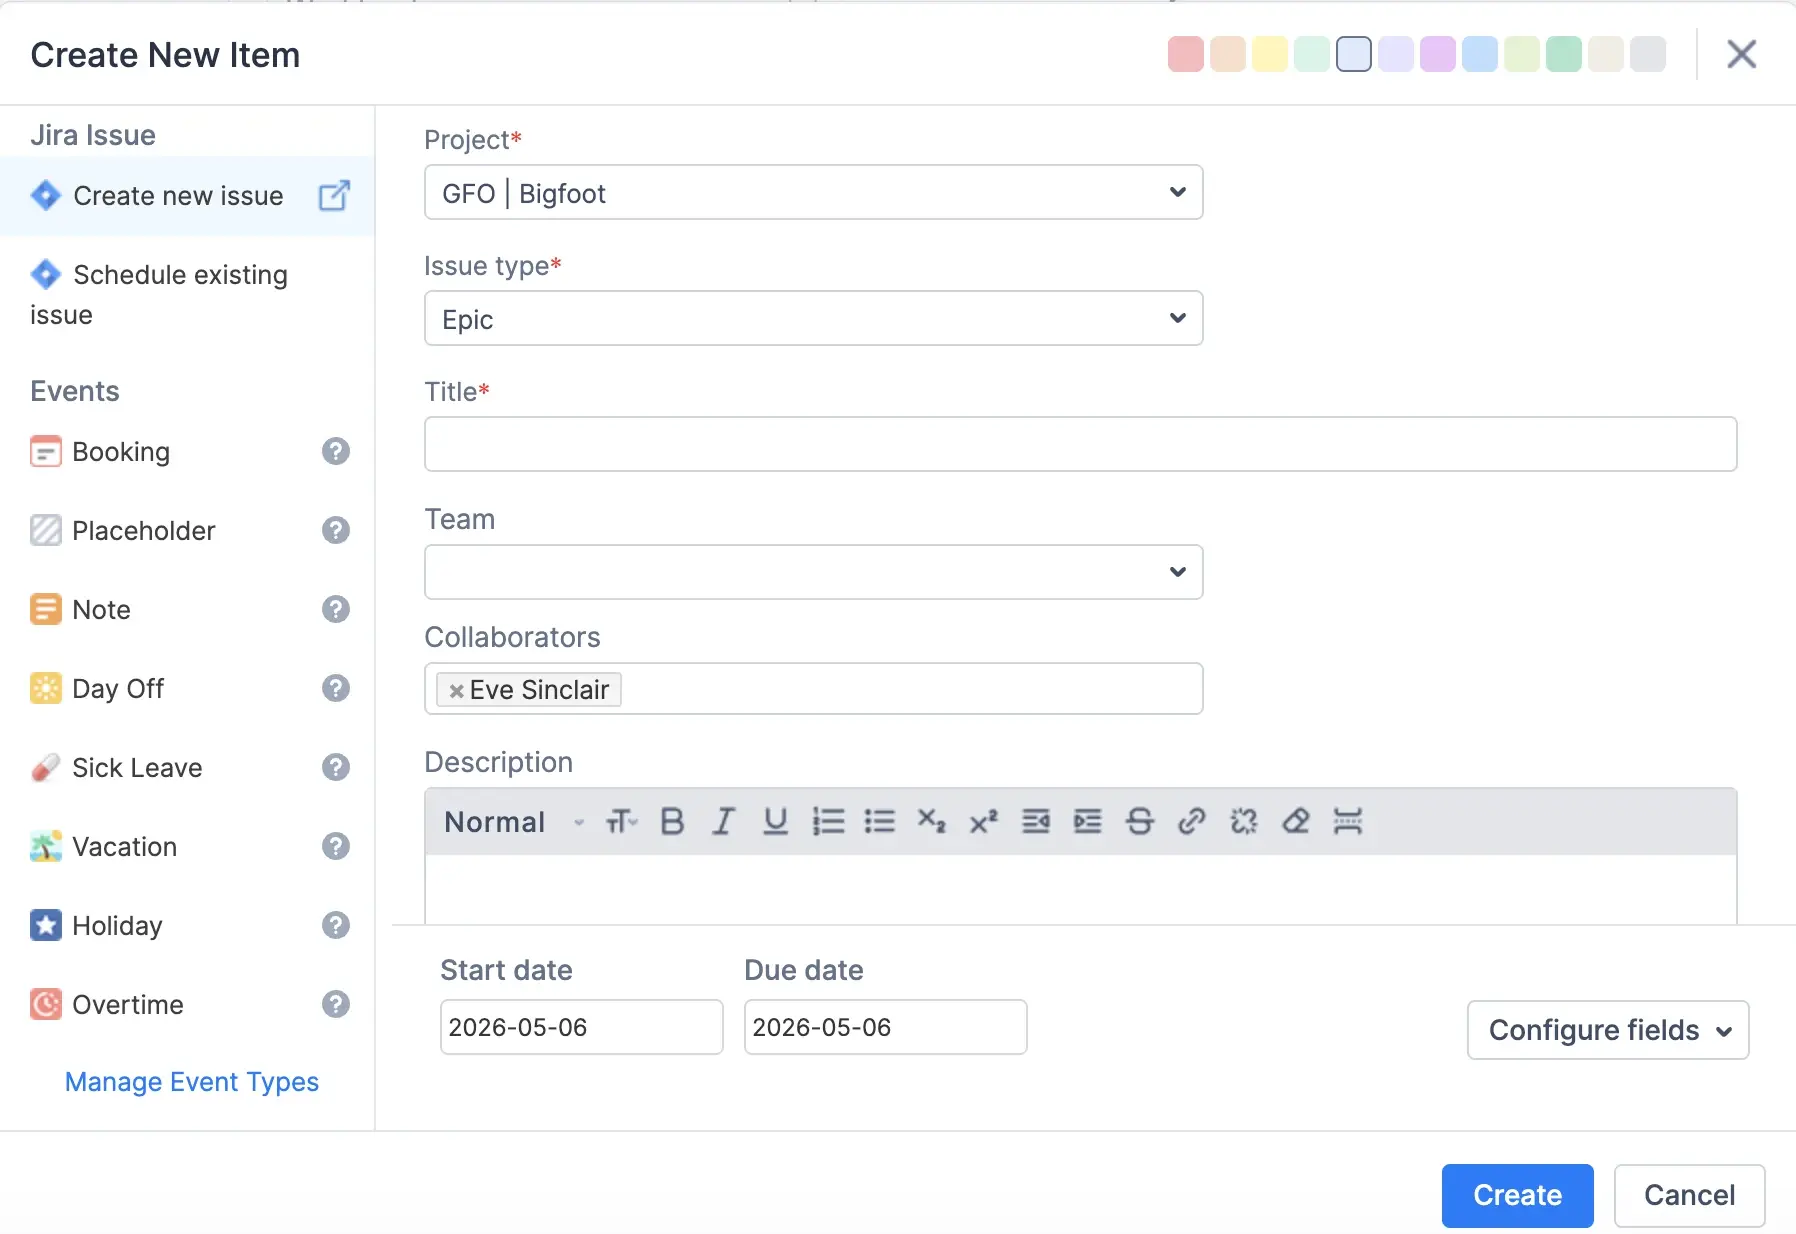
Two optional fields cover the cases where the assignee alone isn't enough:
-> ActivityTimeline Team field: the issue belongs to a team before anyone knows who exactly will do it. It sits on the team's timeline until an assignee is set -> Issue Collaborators: several people work on the same issue, so it should appear on all of their timelines.
Two optional fields cover the cases where the assignee alone isn't enough:
-> ActivityTimeline Team field: the issue belongs to a team before anyone knows who exactly will do it. It sits on the team's timeline until an assignee is set -> Issue Collaborators: several people work on the same issue, so it should appear on all of their timelines.
Step 6. How much capacity does planned work use?
People, hours and assignments are in place. Now decide how an issue's estimate is spread across the days it's scheduled on.
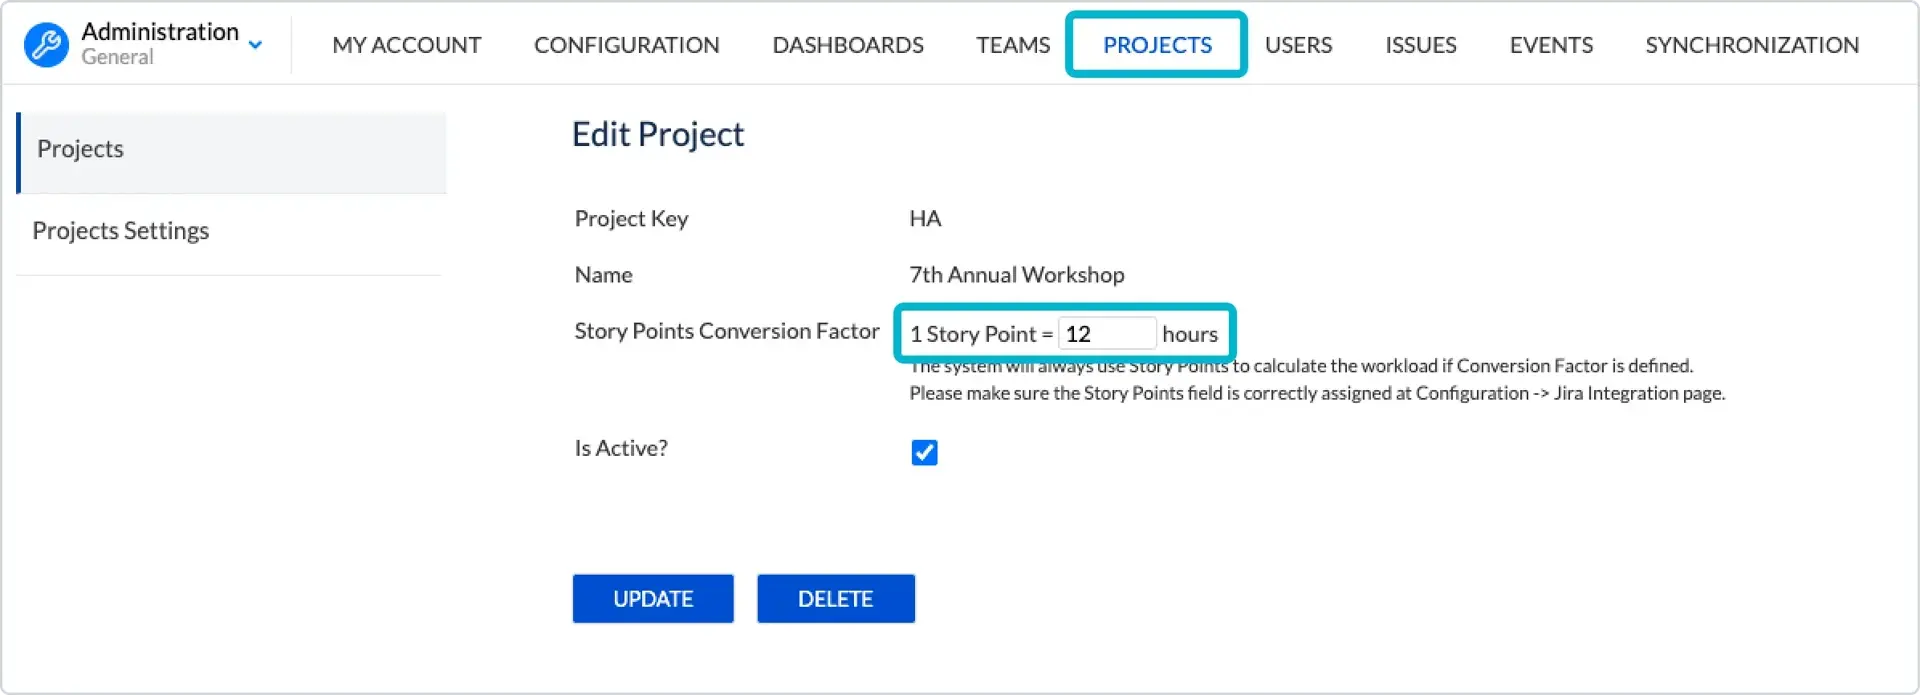
By default, ActivityTimeline uses the Jira Remaining Estimate. Teams estimate in Story Points? Set a Story Points to hours conversion, for example 1 point = 4 hours. Both can live side by side: each issue uses whichever estimate it has.
For work that should take the same amount of time every day (support duty, a long-running assignment), use a Daily Estimate. When set, it wins over Remaining Estimate and Story Points.
Last, pick a Workload Calculation Mode. Balance spreads the estimate evenly across all scheduled days. Liquid fills each day as full as possible and moves on to the next. Balance is the default and the one most customers keep. Switch to Liquid if your teams like to see work front-loaded and finished early.
Skip this step if: your teams estimate in hours and Balance mode sounds right. It already works.
By default, ActivityTimeline uses the Jira Remaining Estimate. Teams estimate in Story Points? Set a Story Points to hours conversion, for example 1 point = 4 hours. Both can live side by side: each issue uses whichever estimate it has.
For work that should take the same amount of time every day (support duty, a long-running assignment), use a Daily Estimate. When set, it wins over Remaining Estimate and Story Points.
Last, pick a Workload Calculation Mode. Balance spreads the estimate evenly across all scheduled days. Liquid fills each day as full as possible and moves on to the next. Balance is the default and the one most customers keep. Switch to Liquid if your teams like to see work front-loaded and finished early.
Skip this step if: your teams estimate in hours and Balance mode sounds right. It already works.
Step 7. Do your teams log time?
Answer this one question first, because it decides how much of this step applies to you.
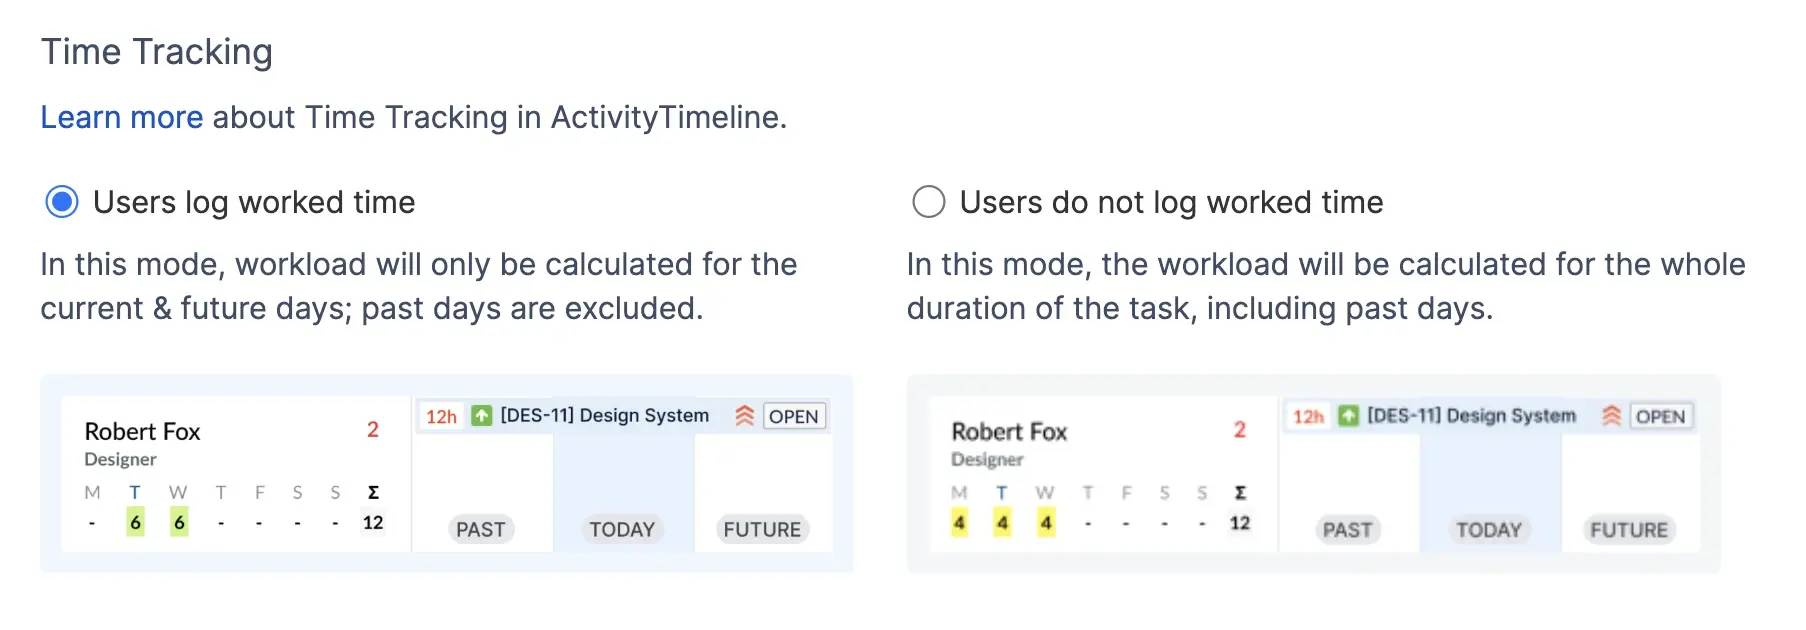
If people do not log worked time: open Time Tracking Modes, select "Users do not log worked time", and skip the rest of this step. Planning works exactly the same without timesheets.
If people do log time: pick the Time Tracking Mode that matches how you plan (the page shows each mode with an example). Then go through these settings and turn on only what you actually need:
-> Timesheet rules: can people log time on resolved issues, in the future, in the past, and is a work description required -> Worklog Categories and Attributes: if logged time needs a label for billing, reporting or internal work types -> Timesheet Approval: if managers or team leads review submitted time. Period Closure, if you need to lock past periods so nobody edits old worklogs -> ActivityTimeline as the Jira time tracking provider: if you want people to log time with categories and attributes right from a Jira issue (the option from the Setup Wizard).
A tip from our support inbox: start with no restrictions and no approval. Add rules once you see what people actually do wrong, not before. Teams that lock everything down on day one usually spend the first month loosening it again.
If people do not log worked time: open Time Tracking Modes, select "Users do not log worked time", and skip the rest of this step. Planning works exactly the same without timesheets.
If people do log time: pick the Time Tracking Mode that matches how you plan (the page shows each mode with an example). Then go through these settings and turn on only what you actually need:
-> Timesheet rules: can people log time on resolved issues, in the future, in the past, and is a work description required -> Worklog Categories and Attributes: if logged time needs a label for billing, reporting or internal work types -> Timesheet Approval: if managers or team leads review submitted time. Period Closure, if you need to lock past periods so nobody edits old worklogs -> ActivityTimeline as the Jira time tracking provider: if you want people to log time with categories and attributes right from a Jira issue (the option from the Setup Wizard).
A tip from our support inbox: start with no restrictions and no approval. Add rules once you see what people actually do wrong, not before. Teams that lock everything down on day one usually spend the first month loosening it again.
Step 8. Optional: make the Planner easier to read
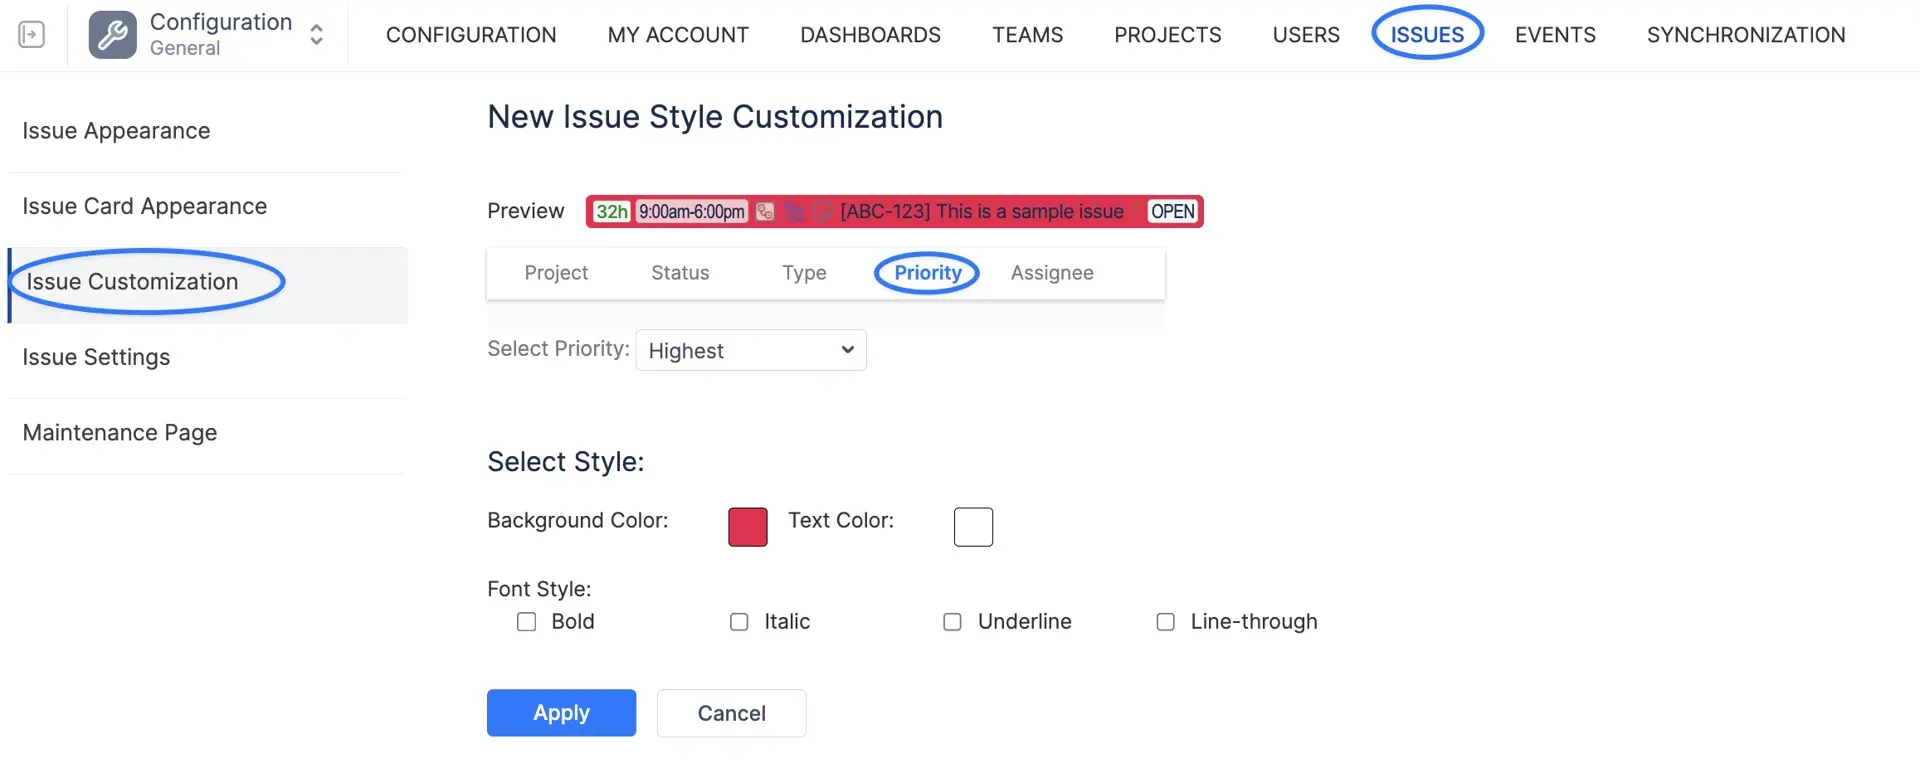
Go to Configuration, then Issues, then Issue Customization. Choose what an issue card shows on the timeline (key, summary, estimate, status, custom fields) and how cards are colored.
Nothing here changes planning logic. Skip it now, come back after your team has looked at the Planner and told you what they'd like to see.
Nothing here changes planning logic. Skip it now, come back after your team has looked at the Planner and told you what they'd like to see.
Step 9. Try it with one team before rolling out
Pick one team that represents how your organization works. Use the app with them for a week or two.
Almost every configuration change we help customers with comes out of this pilot. And it's far cheaper to adjust for 10 people than for 300.
Walk through this list with the pilot team:
-> the right Jira projects and issues are in ActivityTimeline -> issues sit on the correct users and teams -> planning dates match Jira, and Sprint dates behave as expected if you use them -> working hours and holidays are reflected in capacity -> Team field and Issue Collaborators work as intended, if you set them up -> workload is calculated and spread the way you expect -> a new or edited worklog syncs correctly -> time logging rules and approvals behave as configured, if you turned them on
If something looks off, it's usually one of three things: a project not activated (Step 1), a date field not mapped (Step 1), or a workload scheme that doesn't match reality (Step 4). A quick look at your configuration solves it faster than re-running the Setup Wizard, which re-initializes the whole instance. And if you're stuck, write to support.
Almost every configuration change we help customers with comes out of this pilot. And it's far cheaper to adjust for 10 people than for 300.
Walk through this list with the pilot team:
-> the right Jira projects and issues are in ActivityTimeline -> issues sit on the correct users and teams -> planning dates match Jira, and Sprint dates behave as expected if you use them -> working hours and holidays are reflected in capacity -> Team field and Issue Collaborators work as intended, if you set them up -> workload is calculated and spread the way you expect -> a new or edited worklog syncs correctly -> time logging rules and approvals behave as configured, if you turned them on
If something looks off, it's usually one of three things: a project not activated (Step 1), a date field not mapped (Step 1), or a workload scheme that doesn't match reality (Step 4). A quick look at your configuration solves it faster than re-running the Setup Wizard, which re-initializes the whole instance. And if you're stuck, write to support.
Optional: Financial tracking (Advanced Edition)
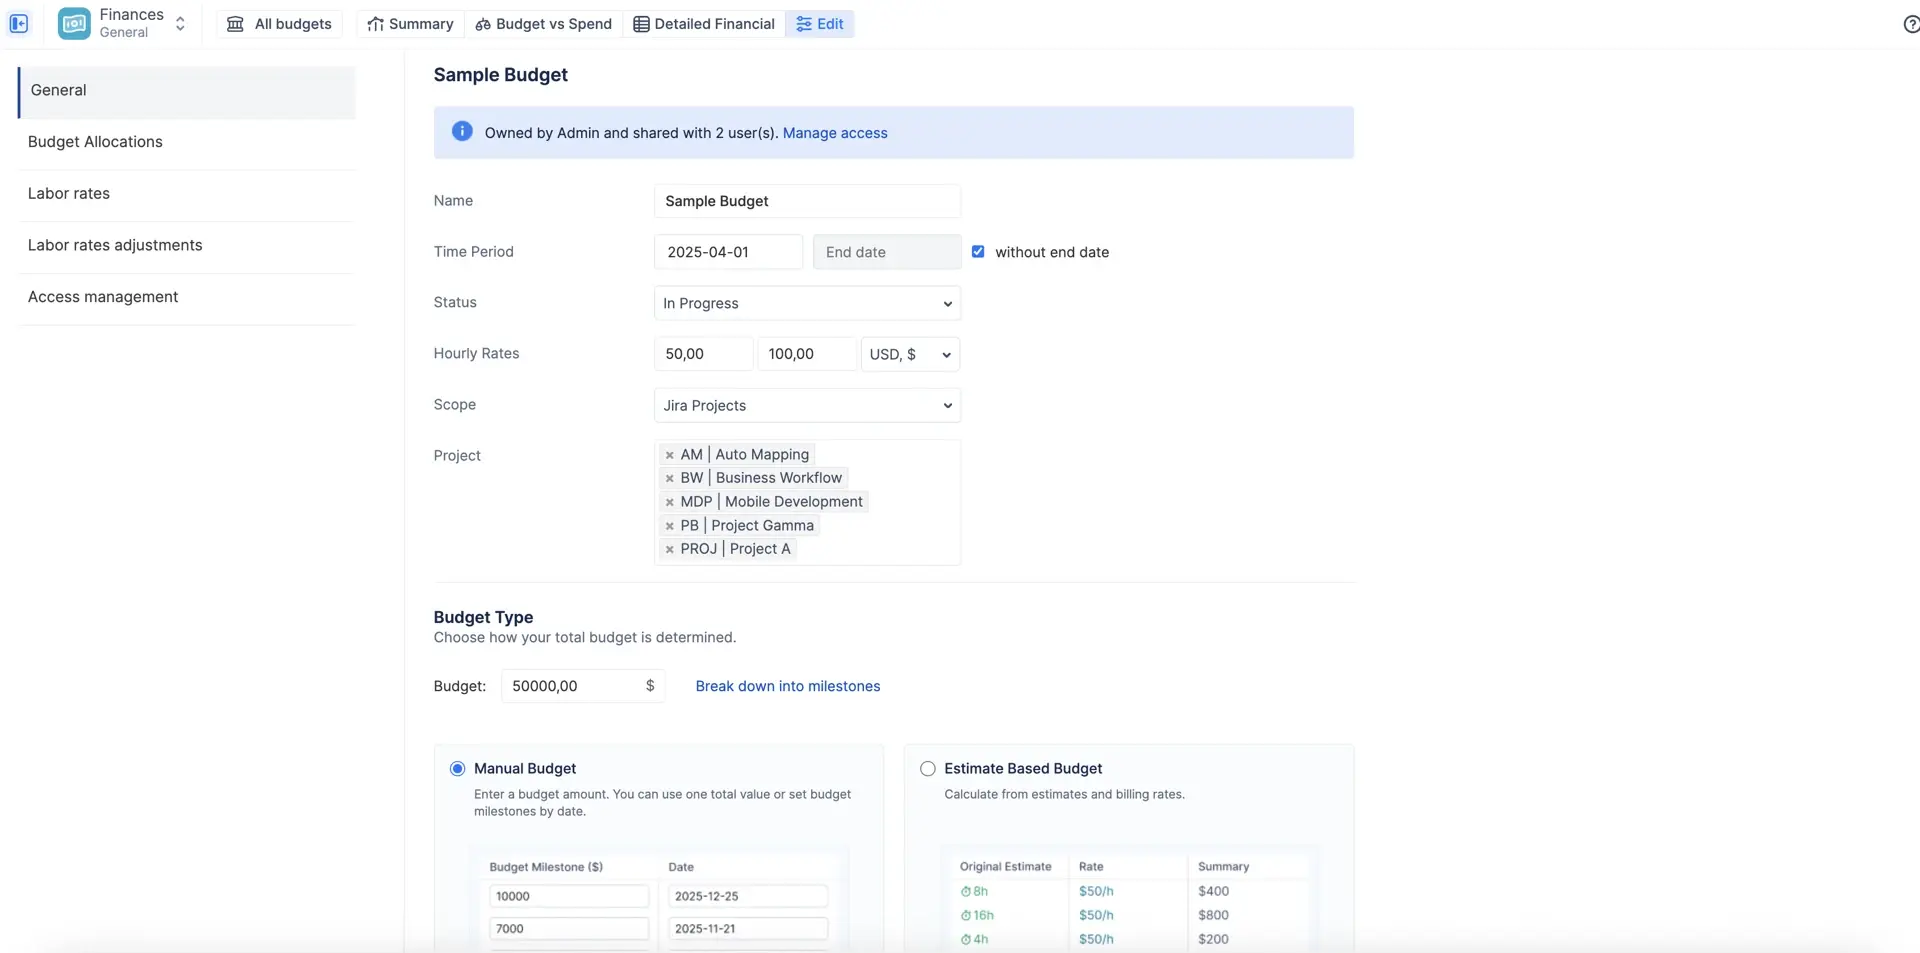
On the Advanced Edition and want to know what work actually costs? Configure Finances.
The order that works: create a Budget and define which Jira work it tracks, set cost and billing rates so labor cost and revenue come from worklogs, add Budget Allocations if you want to compare planned targets with actual spend, add manual transactions for costs or revenue that don't come from worklogs, then check the financial reports.
Do this after Step 9, not before. Finances build on the worklogs and rates you set up earlier. If those aren't right yet, the numbers won't be either.
The order that works: create a Budget and define which Jira work it tracks, set cost and billing rates so labor cost and revenue come from worklogs, add Budget Allocations if you want to compare planned targets with actual spend, add manual transactions for costs or revenue that don't come from worklogs, then check the financial reports.
Do this after Step 9, not before. Finances build on the worklogs and rates you set up earlier. If those aren't right yet, the numbers won't be either.
Setup video
Watch the video below to see the whole setup done in under 7 minutes: installing the app, the Setup Wizard, users and groups, creating a team, connecting Jira fields, webhooks, workload calculation, and issue card customization.