Your teams are drowning in Jira issues, shifting deadlines, and disconnected planning spreadsheets.
Every sprint, the same pattern repeats: workloads are uneven, deadlines slip quietly, and no one can quite explain why.
It’s not that your team isn’t working hard — it’s that your planning system has hit its limits.
Jira alone gives you visibility into issues, but not into people — their true capacity, availability, or real-time workload balance.
ActivityTimeline is the missing visibility layer between Jira tasks and the humans actually doing them.
Most companies struggle with installing a new planning tool and getting hundreds of people to actually use it. So this playbook is designed to fix that. In the next 30 days, you’ll not only configure ActivityTimeline technically — you’ll achieve full adoption across teams.
By the end of this guide, even if you’re a large enterprise, you’ll have:
- A fully configured, Jira-synced planning environment.
- Managers trained in capacity forecasting and scheduling.
- Employees confidently managing their workloads and logging time in one intuitive place.
Let’s get started.
Your 4-Week Roadmap
Week 1: Foundation & Technical Setup (Days 1–7)
Goal: Install the app, configure core settings, sync with Jira, and structure your users and teams. This foundational week ensures ActivityTimeline is correctly integrated and ready to align with your existing Jira setup.
Day 1-2: Installation & Initial Setup
Your journey begins with integrating ActivityTimeline directly into your Jira instance.
- Install the App.
Navigate to Apps → Explore more apps within your Jira instance. Search for "ActivityTimeline" and click "Try it free" to initiate the installation.

- Initial Configuration Wizard.
Once installed, a setup wizard will guide you through crucial initial choices:- Select Projects: Choose which Jira projects you intend to manage within ActivityTimeline. You can always adjust this later.
- Time Tracking Provider: Decide whether ActivityTimeline will serve as your primary time tracking provider. Enabling this allows for more detailed work logs directly within Jira, streamlining data entry for your team.

Day 3-4: User Configuration & Management
With the app installed, it's time to populate it with your team members and define their roles and capacities.
- Access User Settings.
Go to Configuration → Users. Here, you’ll find a comprehensive list of your users along with essential details such as roles, permissions, and capacity.

- Define Skills and Positions.
Use the dedicated Skills and Positions tabs to create attributes relevant to your organization (e.g., "Frontend Developer," "Scrum Master," "Java," "UI/UX Design"). These will be vital for creating functional teams later. - Assign Skills and Positions.
Apply these newly created attributes to your users. You can do this manually for individual users or utilize Bulk Mode (toggle the switch in the top right) to edit information for multiple users simultaneously, saving significant time. - Pro-Tip: Leverage Jira Groups.
Go to the Groups tab. Here, you can click "Manage" for your existing Jira groups and assign attributes like roles, default workloads, and holiday schemes. All current and future members of that Jira group will automatically inherit these settings, ensuring consistency and reducing administrative overhead.
Day 5-6: Team Creation & Structure
Effective planning relies on well-defined teams. ActivityTimeline offers flexible options to mirror your organizational structure.
- Understand Team Types.
ActivityTimeline supports four distinct team types:- Classic Teams: Manually created, offering full control over individual membership.
- Functional Teams: Automatically generated based on assigned user skills or positions.
- Jira-Synced Teams: Pulled directly from existing Jira projects or groups.
- Tempo Teams: Imported if you are also using the Tempo app in Jira.

- Create Your First Classic Team.
For initial setup, we recommend starting with a Classic Team to familiarize yourself with the process.- Navigate to the Teams menu → Create a New Team → Classic Team.
- Give your team a meaningful name and assign a Team Lead. The Team Lead will have specific access to the team's plans, timesheets, and user details, empowering them to manage their team's work effectively.
- Associate the team with relevant projects and drag individual users into the team.
- Once created, your teams will instantly appear in dropdown menus across the Planner, Timesheets, and Reports modules, making it easy to filter and analyze data by team.

- Set Up Holiday Schemes.
While in the Teams section, take the opportunity to define Holiday Schemes. These schemes specify non-working days and public holidays for specific geographical locations or regions. You can then apply these schemes to your defined teams or groups, ensuring accurate capacity calculations.

Day 7: Jira Integration & Synchronization
Seamless data flow between ActivityTimeline and Jira is paramount. This step ensures everything stays in sync.

- Connect to Jira Fields:
- Go to Configuration → Jira Integrations.
- By default, Jira's "Start Date" and "Due Date" fields are already mapped. Review these, and if you use different custom date fields for task planning in Jira, adjust the mapping here. You can also remove mappings if desired.
- For Jira team-managed projects, select "Reuse Jira’s standard start or due date fields."
- Team-Level Planning: If you plan to assign tasks at a team level within ActivityTimeline, the app can create a dedicated Team field in Jira. This field will link directly to your team panel inside ActivityTimeline.
- Splitting Tasks: To enable the functionality of splitting tasks between multiple assignees, map the Collaborators field as well.
- Click Update to save your mappings, then click Refresh Issues to pull all your existing Jira data into ActivityTimeline with the new configurations.
- Configure Webhooks for Clean-up.
To keep your ActivityTimeline data pristine and reflect real-time changes in Jira:- Look for the in-app warning message related to webhooks.
- Click it to automatically add the necessary webhooks. This configuration ensures that when Jira issues or work logs are deleted, those changes are automatically mirrored in ActivityTimeline, preventing stale data.
Week 2: Pilot Program & Manager Training (Days 8-14)
Goal: Configure workload logic and train a pilot group of managers on the core planning and scheduling features. This week focuses on empowering your key users to start leveraging ActivityTimeline effectively.
Day 8-9: Define Workload & Planning Logic
Accurate capacity planning is the cornerstone of ActivityTimeline. This step configures how the system calculates and displays workloads.
- Workload Calculation Method:
- Go to Configuration → General Configuration.
- By default, ActivityTimeline uses the Remaining Estimate field from Jira to determine workload. This is a common and effective method.
- Story Points Conversion.
If your team primarily uses Story Points for estimation, you must define a conversion rate to hours. ActivityTimeline uses hours as the baseline for all estimations. You can set this conversion rate globally or on a per-project basis. To do this, go to Projects → Manage, select your project, enter the conversion rate (e.g., 1 Story Point = 8 hours), and click Update.

- Effort Distribution Modes: Once effort is defined, you can choose how it’s spread across the scheduled days of a task.
- Balance Mode: This mode splits the task's estimated effort evenly across all scheduled days. Ideal for tasks where consistent daily progress is expected.
- Liquid Mode: This mode fills each day with as much estimated effort as possible until the remaining estimate runs out. This is useful for tasks that might be front-loaded or completed quickly.

- Time Logging Impact on Workload:
- If your team does not log time, workload is spread evenly across the full duration of the task (including past days). This keeps plans stable for reporting on both past and future periods.
- If your team does log time (the default and recommended setting), workload is only calculated from "today" forward, with past effort being derived directly from logged work entries. This provides the most accurate, real-time workload calculations.
Day 10-12: Manager Training: The Planner Module
The Planner is the heart of ActivityTimeline for managers. This training focuses on its core functionalities.
- Introduction to Modules.
Start by briefly outlining the four main modules: Planner (key planning), Workspace (individual task management), Timesheets (time utilization insights), and Reports (forecasting and analytics). Emphasize that for managers, all four are essential. - Deep Dive: The Planner Module
- Issue Panel (Left Side).
This panel mirrors your Jira backlog.- By default, it shows issues modified within the last 30 days.
- Customization: Demonstrate how to easily customize this view using filters and grouping options to display exactly what they need (e.g., issues for a specific project, unassigned tasks, tasks with a certain priority).
- The Timeline (Right Side).
This provides a clear, cross-project view of everything assigned to users.- Filtering: Explain how to narrow down the timeline view by enabling the "Apply filters to timelines" option. Point out that a red filter icon and a star next to the filters tab indicate an active filter.
- Core Action: Assigning Tasks.
Show how simple it is to assign a task by dragging it from the Issue Panel and dropping it onto a user's timeline. Explain that the task is instantly scheduled in both ActivityTimeline and Jira for the same dates, ensuring everything stays in sync.
- Issue Panel (Left Side).
- Two-Way Synchronization.
Emphasize this critical feature. Synchronization works both ways: if a manager updates the dates, assignee, estimate, or time tracking fields in Jira, those changes will automatically appear in ActivityTimeline. By default, issues sync from Jira every 10 minutes, but you can manually trigger a sync at any time by clicking the Refresh button. - Creating & Managing Tasks.
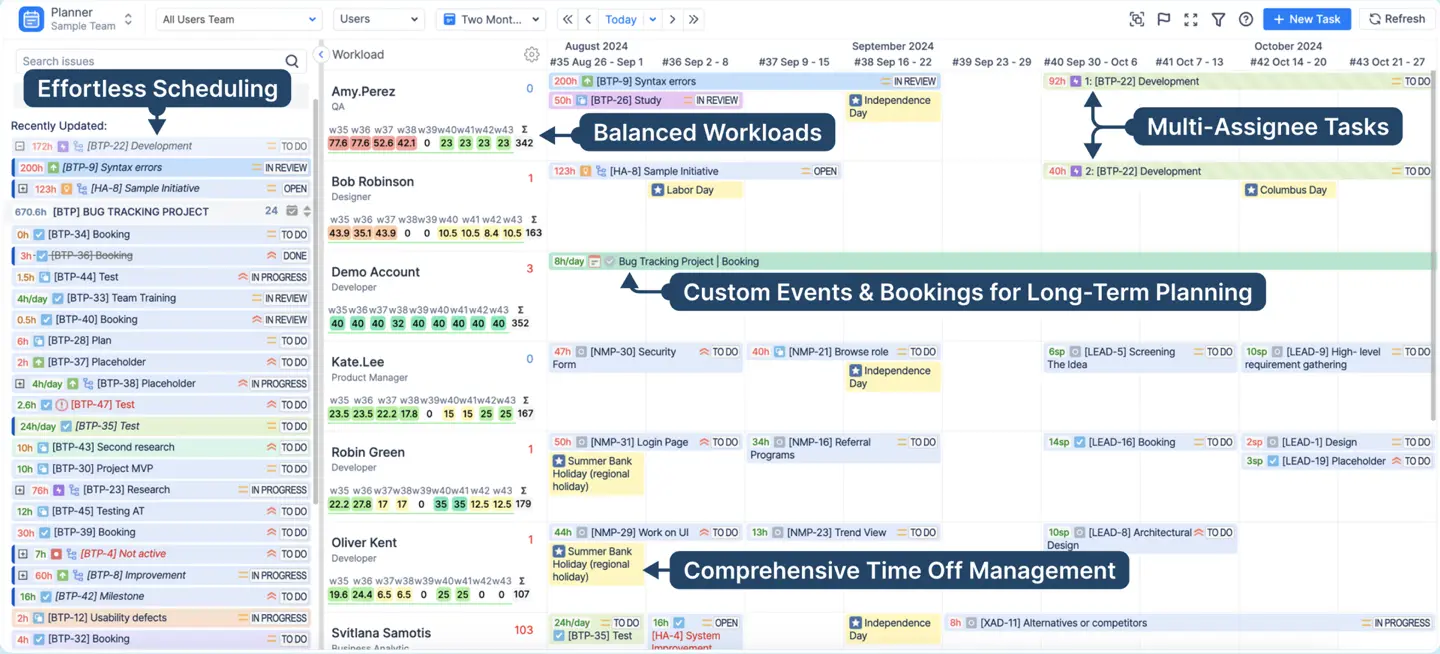
- Create New Tasks: Show managers how to create new tasks directly in ActivityTimeline by clicking on a cell in the timeline or using the New Task button. Once created, clicking the task reveals key details for updates.
- Modify Tasks: Demonstrate the intuitive drag-and-drop interface. Tasks can be resized to change their duration, dragged to a different date, or dropped onto another user to reassign them.
- Unassign/Unschedule: To remove a task from the timeline, simply drag it to the bottom-left corner of the planning board.
- Splitting Tasks.
What about tasks requiring collaboration? Introduce the Split button. This allows a manager to divide a single Jira task between multiple assignees within ActivityTimeline, defining each person's specific contribution (e.g., in hours). In Jira, the task remains a single entity, but ActivityTimeline visualizes the divided parts for precise workload visibility and management.
Day 13-14: Manager Training: Capacity & Strategic Planning
Now that your managers understand task scheduling, it's time to introduce strategic capacity planning using ActivityTimeline's internal events and team-level views.
- Internal & Non-Working Events.
Explain that planning isn't just about Jira tasks. ActivityTimeline provides internal events to get a true picture of resource capacity.- Placeholder: Use this for "what-if" planning scenarios. A manager can create a placeholder to reserve time for a potential project without modifying any Jira issues. It can be standalone or linked to an issue and later converted into an actual Jira task.
- Booking: Ideal for blocking a person's capacity for repetitive tasks or meetings (e.g., "Team Sync," "Support Duties"). This blocks a set number of hours per day.
- Non-working Events: These are crucial for accuracy. Events like Days Off, Sick Leaves, Vacations, and Holidays reduce a user's availability.
- Overtime: Conversely, an Overtime event increases a user's availability for a specific period.

- Workload & Availability Metrics.
As a capacity planning tool, ActivityTimeline's core value lies in its workload calculations.- Point out the Workload Indicator (often a color-coded bar or percentage) next to each user. Explain that this shows their workload based on remaining estimates, daily estimates, and all scheduled events.
- Show the Availability metric, which displays how many hours a user still has free.
- Demonstrate how to customize these metrics (display in hours or percentages) and adjust the timeline's time frame (view by weeks, months, or even years).

- Team & Milestone Planning.
Move from individual planning to team and project-level views.- Team Capacity: Show managers how to click Users → Team with Users View to open the Team Panel. Here, they can review the entire team's workload and availability and even assign Jira issues at the team level before scheduling individuals. For a broader perspective, show the Teams View, which allows analyzing multiple teams simultaneously—perfect for cross-team planning.
- Milestones & Sprints: To track key dates, have them enable the Milestones Panel (via the flag icon). This panel highlights important items like sprints, releases, and deadlines.
- Managers can select the Jira boards they want to display, and sprints will appear automatically based on their start and end dates.
- Show the hierarchy icon to view all sprint tasks and their statuses.
- Pro-Tip: Demonstrate how to plan sprints directly in ActivityTimeline by dragging and dropping tickets from the backlog into the sprints shown on the milestone panel, eliminating the need to switch back to Jira.Saving Your View as a Dashboard: After configuring the perfect view (period, filters, grouping, milestones), what's next?Show managers how to save this view as a Dashboard.
- Saving Your View as a Dashboard: After configuring the perfect view (period, filters, grouping, milestones), what's next?
- Show managers how to save this view as a Dashboard.
- Navigate to Configuration → Dashboards → Configure to manage these saved views and share them with colleagues, ensuring everyone is looking at the same consistent plan.
Week 3: Full Team Rollout & Employee Onboarding (Days 15-21)
Goal: Onboard all end-users (employees) to the platform, focusing on the Workspace, time logging, and managing personal schedules. This week is all about user adoption and empowerment.
Day 15: Prepare for Rollout
- Customize Visuals for Clarity.
Before inviting everyone, make the tool as intuitive as possible.- Go to Configuration → Issues → Issue Customization.
- Set up custom styles—assign specific colors, fonts, or labels based on project, issue status, or priority. This small step makes the planning timeline much more visual and easier for everyone to navigate at a glance.

- Announce the Rollout.
Send a clear communication to all users. Explain what ActivityTimeline is, why the company is adopting it (e.g., "to improve workload balance and simplify time tracking"), and what the training schedule for the week will look like.
Day 16-18: Employee Training: The Workspace & Time Off
Focus this training on the Workspace module, which will be the default view and primary hub for most employees.
- The Workspace Overview.
Explain that the Workspace is their personal area to manage their schedule, backlog, and worklogs across all their projects.- My Schedule: This shows what's currently planned for them. Demonstrate how to use the arrows to navigate between periods or switch views (one week, multiple weeks, or a full month).
- Issue Panel: This panel displays their personal backlog. If permissions allow, show them how they can even plan their own schedule by dragging tasks from their backlog onto their My Schedule timeline.
- Task Details: Clicking a task reveals key details like deadline, status, and estimate, which they can update if permissions allow.

- Scheduling Time Off.
Show how easy it is to book leave.- They can click an empty cell in their timeline or use the New Task button at the top.
- They simply select the event type (e.g., Vacation, Sick Leave) and set the start and end dates.
- Emphasize that they can easily drag the event to move it or click it to update details later.
- Google Calendar Integration (Optional but Recommended).
For a truly unified schedule, guide users to My Account → Calendar Integration.- Show them how to click Import from Google Calendar, approve the integration, and select the calendars they want to sync.
- Once connected, their meetings and out-of-office events will appear automatically, factoring into their workload calculations for more accurate planning.
Day 19-21: Employee Training II: Time Logging & Review
This part of the training is crucial for data accuracy and reporting.
- How to Log Time (4 Easy Ways): Show the flexibility of time logging.
- Click directly on the chart for the day you want to log time.
- Quickly log time to recent tasks via the My Logged Hours section.
- Use the main Log Work button at the top of the Workspace.
- Start and stop the Timer for real-time tracking as they work.

- Worklog Details.
When logging time, users can:- Select a predefined time (e.g., 1h, 2h) or enter a custom duration.
- Set the date or log time across multiple days.
- Choose a category (e.g., billable, non-billable), if configured.
- Add a worklog description.
- Finding Issues: To make finding the right Jira issue easy, point out the three tabs in the dialog: Recent (last-viewed issues), My Issues (tasks assigned to them), and All (search all accessible issues).
- . Reviewing Your Logged Time:
- In Workspace: Users can track their progress with the visual charts (the pie chart for required vs. logged, and bar charts for daily logs). They can also review entries in My Logged Hours or My Worklog Details.
- In Timesheets: Introduce them to the Timesheets module for self-review. Explain the three views:
- Progress View: Shows logged time vs. expected capacity.
- Timeline View: A visual breakdown of daily logged time.
- Detailed View: A table to break down time by project, issue, or epic.
- Understanding Timesheet Approvals.
If the company uses the Timesheet Approval Process, workers must submit their timesheets. Once a worklog is approved or a timesheet period is closed, they will not be able to edit or create new entries for that period.
Week 4: Reporting, Governance & Optimization (Days 22-30)
Goal: Empower managers to use data for forecasting and decision-making. Establish review rhythms and refine the configuration based on the first few weeks of use.
Day 22-24: Manager Focus: Mastering Timesheets
This training is for managers to learn how to review and analyze their team's time.
Deep Dive: Timesheets Module (Manager View).
Explain that this module provides complete visibility into how their team spends time.
- Progress View: Review the four key templates:
- Timesheet Progress: Tracks logged time vs. team capacity.
- Resource Utilization: Compares planned time vs. available capacity.
- Planned vs. Actual: Compares logged hours against original estimates.
- Timesheet Approval: (If enabled) Shows the approval status of all work logs.
- Timeline View: A powerful visual overview of the entire team's logging compliance, with color-coded indicators for over- or under-logging.
- Detailed View: This is the ultimate configurable report. Show managers how to group data (by project, epic, user) and add Jira custom fields to create granular reports. Remind them that all reports are exportable to Excel.

Day 25-27: Manager Focus: Forecasting with Reports
Move from analyzing the past (Timesheets) to predicting the future (Reports).
- Deep Dive: Reports Module:
- Resource Utilization Forecast: This is the key report for future capacity. Show how it displays expected workloads—as a summary or broken down by project. Managers can see total capacity, used capacity, and utilization rate to identify future bottlenecks.
- Team Capacity Chart: A real-time visual tool for assessing workload and availability over time.
- Project Progress Report: Shows progress across projects or epics based on time tracking or the completion of child issues.
- Jira Dashboard Integration:
- Show managers how to bookmark their favorite reports and add them as gadgets to their main Jira dashboards. This brings crucial planning analytics directly into their daily Jira workflow, so they don't even need to open the app to see high-level status.
Day 28-30: 30-Day Review & Next Steps
- Gather Feedback: The rollout is complete, but the work isn't done. Hold a review session with your pilot managers and a small focus group of employees. Ask: What's working? What's confusing? What features are they missing?
- Refine Configuration:
- Based on feedback and real data, adjust your settings. Is the Story Point conversion rate correct? Do you need to create new Functional Teams (e.g., "All Senior Developers") based on the Skills you set up in Week 1? Now is the time to do it.
- Explore Advanced Features:
- Plan your next steps. Now that your team is comfortable with the basics, you can explore advanced features like setting up a formal Timesheet Approval Process or defining strict Time Tracking Periods and grace periods to enforce logging deadlines.
Your Implementation is Just the Beginning
Congratulations! In just 30 days, you have successfully installed, configured, and rolled out ActivityTimeline. You've empowered managers with unparalleled visibility into team capacity and given employees a simple, unified tool to manage their work and time. The key now is to maintain this momentum. Continue to gather feedback, refine your processes, and leverage the powerful insights from ActivityTimeline to make smarter, more effective planning decisions every day.
We are sure that you will transit from task management to data driven planning in just a couple of weeks. That’s why you can use ActivityTimeline for free during the first 30 days and see how easy it is to integrate with your workflows.
{{rich-cta-1}}


