If you’re running a medium or large team in Jira, you’ve probably seen symptoms like:
- Logged hours that don’t match team capacity.
- Inconsistent worklogs across projects.
- “Planned vs. Actual” charts that tell a different story every week.
You think the root cause is your team or lack of focus. In reality, when Jira’s technical setup is even slightly misaligned (fields unmapped, wrong estimation units, missing provider settings, or deleted worklogs not syncing) you end up with reports built on sand.
To fix this, you need a reliable system that not only consumes Jira’s data but helps you structure, validate, and visualize it. ActivityTimeline is built for teams that require visibility, accuracy, and workload control across multiple projects.
To help you set a solid foundation, here is the 10-point configuration checklist that every Jira Admin and Technical Project Manager should complete before expecting time tracking to work reliably.
⚠️ Why Configuration Is the Foundation of Accurate Time Tracking
Accurate reporting is impossible without accurate inputs. If the underlying Jira configuration is misaligned, even the most powerful reports will deliver unreliable insights.
When settings aren’t correct:
- Workload charts contradict logged hours.
- Timesheets look complete but hide gaps.
- Resource allocation is based on assumptions rather than reality.
- Managers remain blind to over- or under-allocation.
The result is predictable: chaotic reporting and frustrated teams. But with proper configuration, Jira’s raw data becomes structured, predictable, and ready for consumption by tools like ActivityTimeline, which transforms it into actionable workload charts, capacity forecasts, timeline dashboards, progress views, and timesheet analytics.
✅ The 10-Point Configuration Checklist for Jira and ActivityTimeline
Below is the complete setup your organization must implement before expecting trustworthy capacity and timesheet reporting.
1. Configure Jira Integration: Map Your Start & End Dates
ActivityTimeline gives you two options for handling dates:
- Option A — Isolated Planning (No Mapping). ActivityTimeline maintains its own schedule, and Jira fields remain untouched. This is useful for teams that want strict planning inside ActivityTimeline without affecting Jira.
- Option B — Synced Dates (Recommended for Enterprises). ActivityTimeline maps your Jira Start Date and Due Date fields and keeps both systems synchronized.
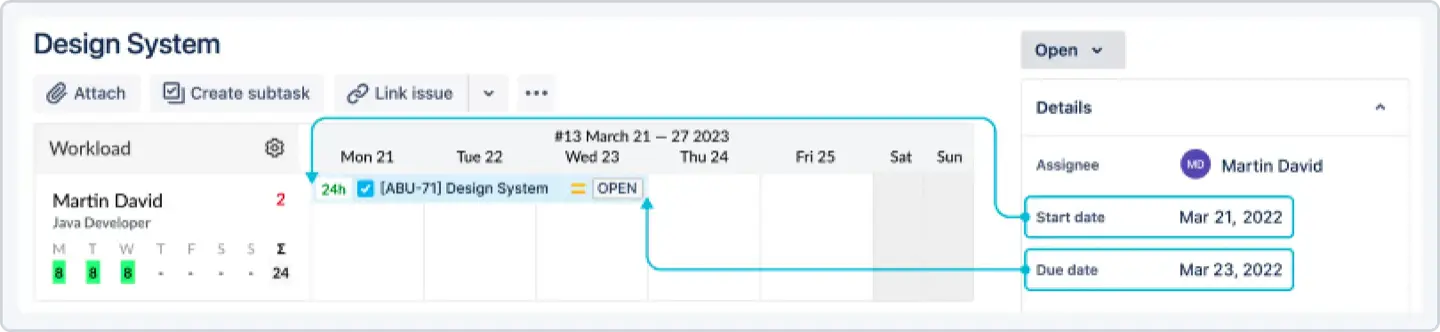
For company-managed projects, you must ensure your Jira date fields are properly mapped inside ActivityTimeline so that scheduling in AT updates Jira, and vice versa. This is the first and most important step to stop timeline drift between the two tools.
2. Set Your Time Tracking Provider
Under Jira’s Time Tracking settings, you can choose between Jira-provided time tracking or the ActivityTimeline Time Tracking Provider.
Using ActivityTimeline’s provider:
- Enhances the Log Work dialog in Jira.
- Adds Worklog Categories (e.g., Billable / Non-Billable).
- Improves reporting consistency.
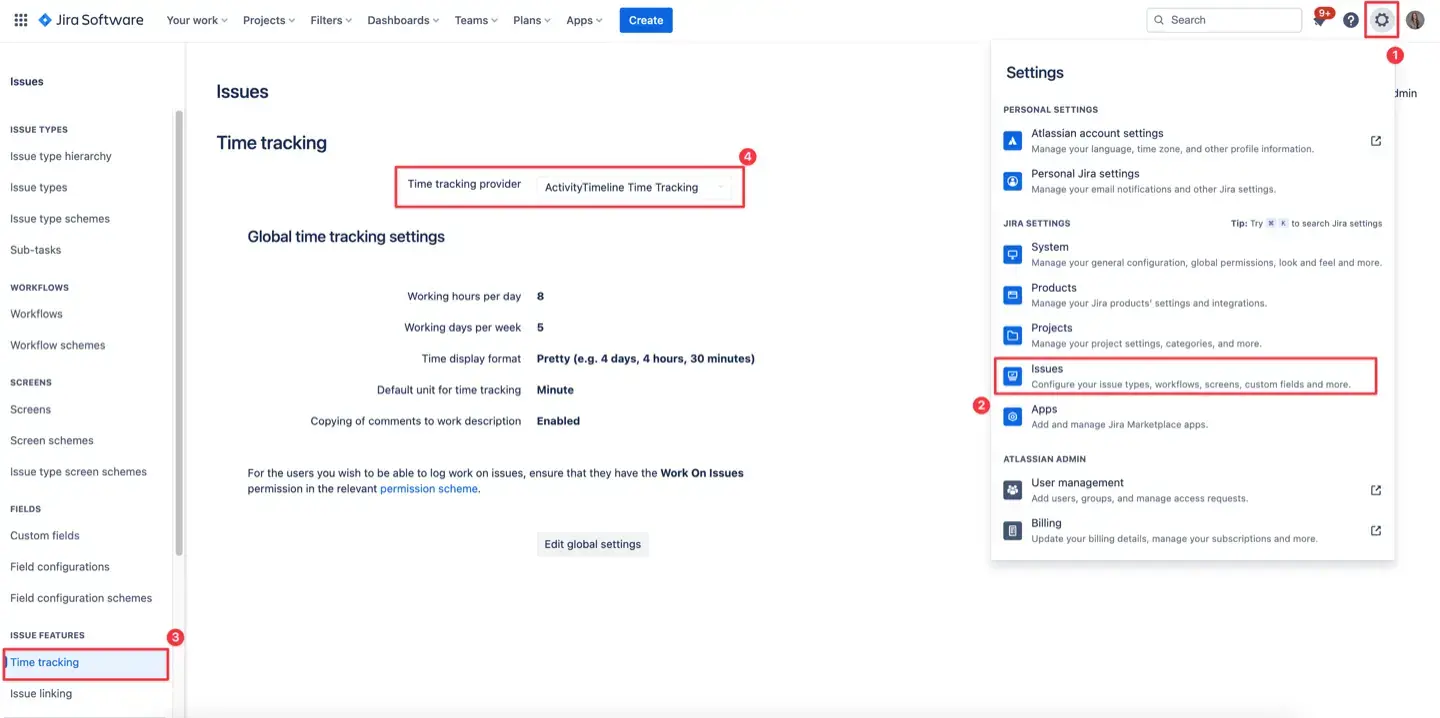
If you need advanced cost tracking, auditability, and structured worklogs, AT’s provider is strongly recommended.
3. Define Your Estimation Unit (Hours vs. Story Points)
Your workload logic depends entirely on the estimation unit your teams use.
- If you use Hours: Ensure Original Estimate and Remaining Estimate fields are correctly enabled, as these values feed ActivityTimeline’s workload engine.
- If you use Story Points: You must configure a Story Point > Hours conversion factor inside ActivityTimeline so it can calculate availability and workload. Without this, AT cannot determine whether a person is overloaded or underutilized.

4. Configure the Story Point Conversion Factor
ActivityTimeline provides two levels for conversion:
- Global Conversion Factor: Set in Configuration > General, this applies to all projects by default.
- Project-Level Conversion Factor: Set in Configuration > Projects, this value overrides the global one when defined.
If team velocities differ, project-level conversion ensures each team’s workload is calculated correctly.

5. Set the Correct Time Tracking Mode
This setting alone determines whether your workload calculations will ever make sense. ActivityTimeline supports two modes:
If your velocity is based on Story Points and you do not track hours daily, the "Users do not log worked time" mode gives you accurate capacity forecasting without forcing your team into granular time tracking.
6. Define Worklog Categories
If your organization cares about cost tracking, billability, or financial reporting, this step is non-negotiable.
Configure this in Timesheets > Configuration > Worklog Categories.
Common setups include: Billable, Non-Billable, Development, and QA. Without categories, you'll never have clean financial data or billable utilization insights.

7. Configure Timesheet Approval Settings
Once your team logs time, ActivityTimeline includes a built-in approval workflow to ensure data accuracy.
Configure this under Configurations > Timesheets Configuration > Timesheet Approval Settings.
- Define approval periods (weekly or monthly).
- Assign approvers (Team Leads, Managers, Admins).
- Lock timesheets after approval so no one can change past entries, ensuring compliance.

8. Set User Roles & Permissions
Your permission model should mirror how your team actually operates. ActivityTimeline includes six primary role levels, including Admin, Manager, Team Lead, and Employee.
- Managers can view team workload and approve timesheets.
- Team Leads can manage a subset of users and approve worklogs for their specific teams.
The key setting, "Allow to log time for other users", is crucial for centralized time management by Executive Assistants or Team Leads handling time for junior team members.

9. Configure Webhooks for Data Sync
Jira does not notify external apps when a worklog is deleted, leading to ghost entries and inconsistent reports unless you configure webhooks.
ActivityTimeline requires the ActivityTimeline Deleted Worklog Webhook. This ensures deleted Jira worklogs disappear from ActivityTimeline, keeping Timesheets and Reports accurate and preventing inflated utilization.
10. Define Your Workload Calculation Algorithm
ActivityTimeline supports two advanced workload models configurable in the Main Configuration:
Selecting the right algorithm helps ensure your resource planning visuals reflect how your teams actually work.
🛠️ The ActivityTimeline Ecosystem Explained
ActivityTimeline is organized into four main modules: Planner, Workspace, Timesheets, and Reports.
Planner Module: Your Central Command Center
The Planner is your visual command center for everything related to team allocation, capacity, and scheduling.
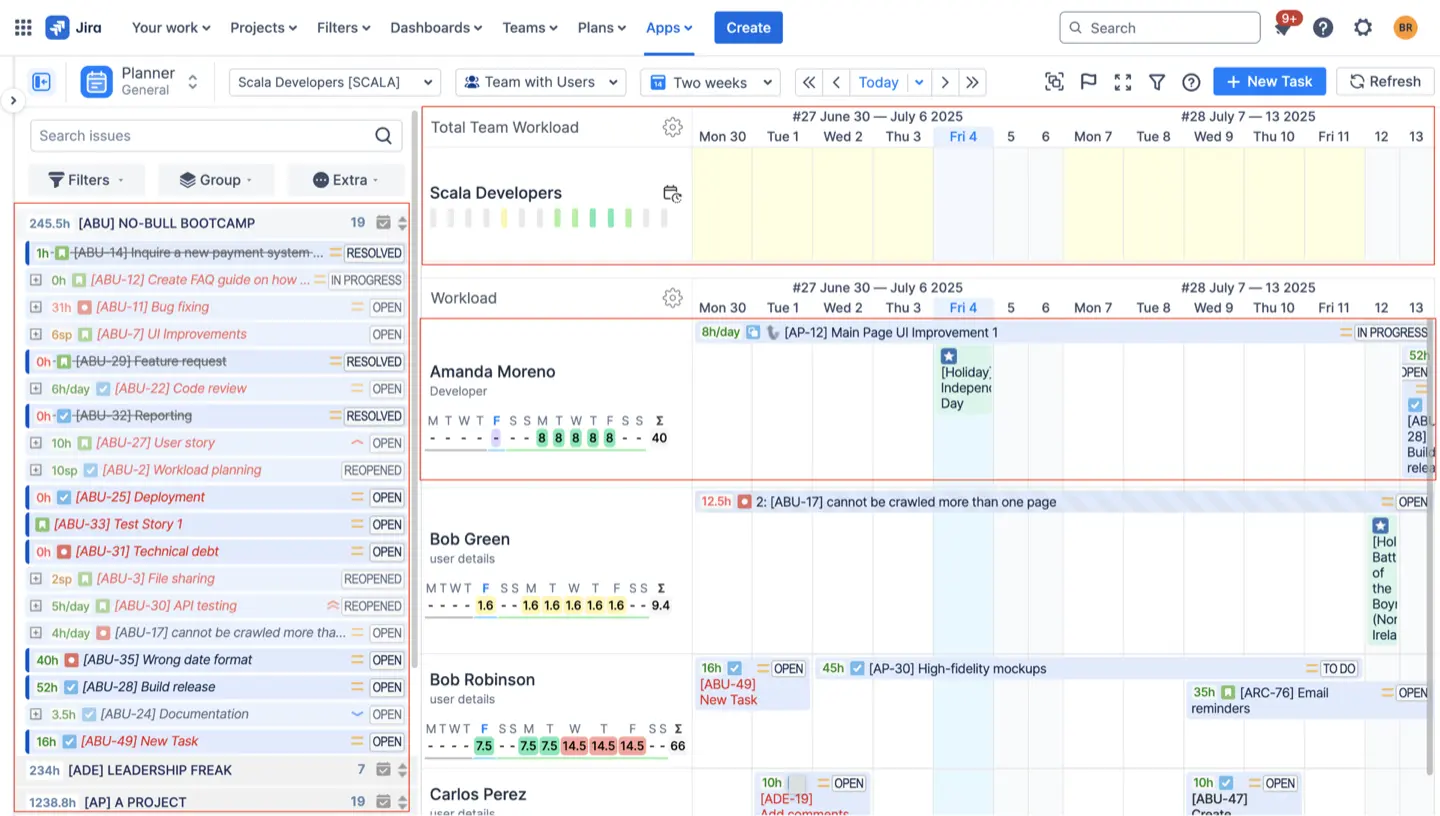
- Visualization: It provides a cross-project view with a timeline that displays teams, individuals, their schedules, and their current and upcoming tasks.
- Navigation: You can switch perspectives using a sidebar that includes options like My Work (personal schedule), Teams, Projects, and Skills.
- Task Cards: Clicking on a task card opens a detailed dialog where you can review subtasks, worklogs, and estimation history, or log time directly.
- Scheduling: You can easily drag and drop tasks to create new assignments, adjust task duration, and move tasks between users, with all changes instantly synchronized with Jira.
Workspace Module: The Employee Dashboard
The Workspace module is designed to give individual team members a clear space to organize their day.
- Personal Focus: Employees see a structured view of tasks grouped by Team, Project, or Sprint.
- Time Logging: It provides tools for team members to log time easily, manage their schedule, and stay aligned with ongoing priorities.
- Progress Charts: Users have visual access to charts comparing required versus logged hours and daily logged hours.

Timesheets Module: Auditing and Approval
The Timesheets module supports team leads and managers in overseeing logged hours and approving timesheets.
- Multiple Views: You can view timesheets in three ways: Progress (high-level completeness), Timeline (color-coded summary of over- or under-logging), and Detailed (granular worklog entries).
- Filtering: Filters allow you to refine data by Team/People, Project, Epic, Category, or Issue.
- Approval: Managers can revi

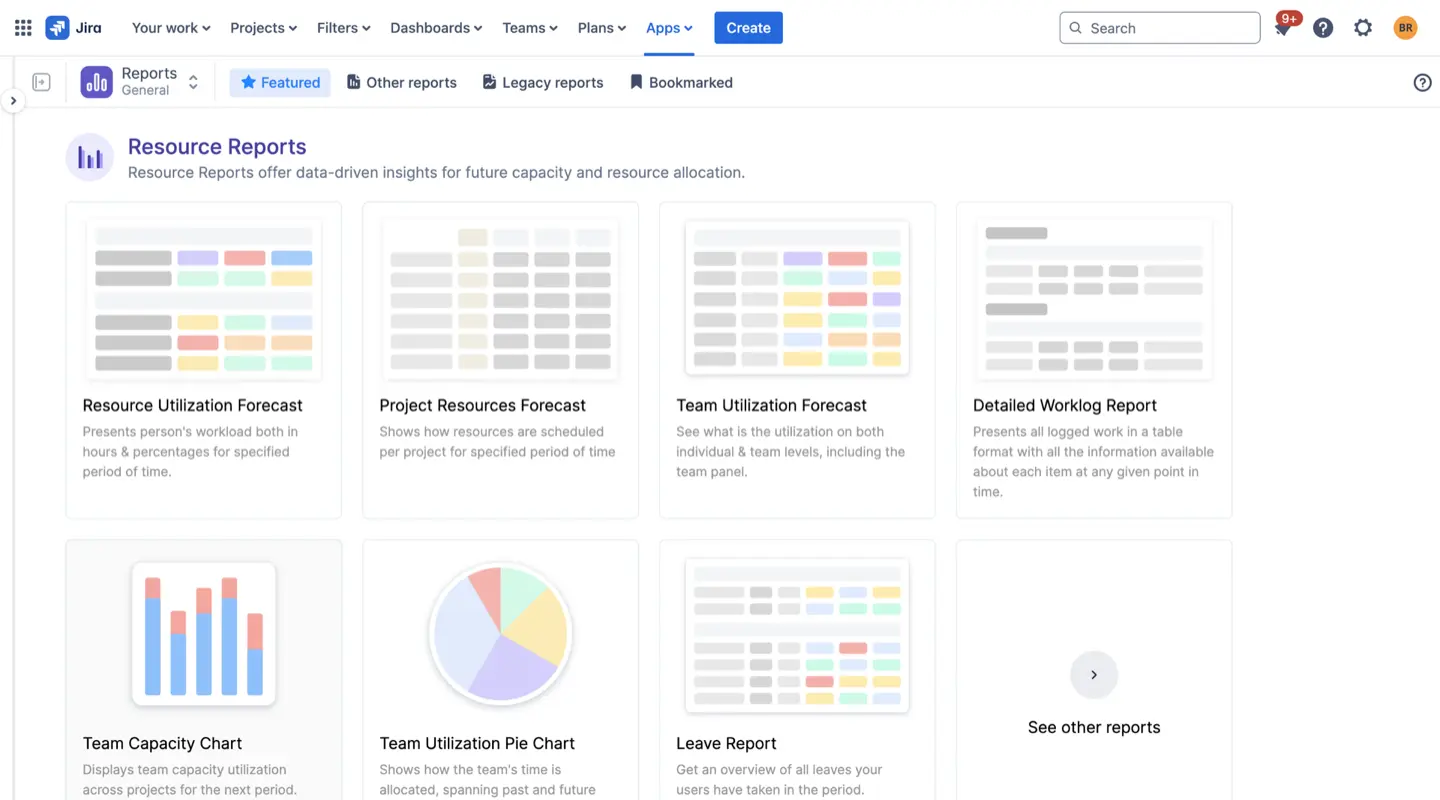
Reports Module: Data-Driven Insights
The Reports module helps you uncover insights into team capacity, time usage, and future workload through flexible, customizable reports.
- Resource Reports: Include Resource Utilization Report (person’s workload in hours/percentages) and Team Capacity Chart (visualizing capacity versus demand).
- Tracking Reports: Include Planned vs Actual Report (comparing planned time with logged outcomes) and Project Progress Report (tracking project progression).
- Customization: All reports can be customized by time frame, team, project, and by applying a Jira filter.
💡 How to Map Estimation Fields for Synced Plans: A Walkthrough
For effective synchronization in Company-Managed Projects (Option B), correctly mapping your time fields is non-negotiable. This ensures that when you schedule a task in ActivityTimeline, the dates are reflected in Jira, and the workload correctly draws from your Jira estimates.
Step 1: Navigate to Jira Integration Configuration
Go to Configuration > Jira Integration. This is where you control the two-way sync between ActivityTimeline and Jira.
Step 2: Map Planned Issue Dates
Under Company-Managed Projects, use the dropdown menus to select the fields that ActivityTimeline should read and write dates to:
- Planned Issue Start Date (Jira Custom Field)
- Planned Issue End Date (Jira Custom Field)
If you are using Jira's native Start date and Due date fields, select them. If your organization uses custom fields for this purpose (e.g., in BigPicture), map those instead.
Step 3: Map Time Estimate Fields
Further down, ensure your estimation unit is correctly set.
- Time Estimate: Select Remaining Time Estimate. This ensures that ActivityTimeline calculates future workload based on the remaining work, not the original total.
Step 4: Perform a Full Synchronization
After updating any mapping, you must perform a full sync to clear the cache and load the new configurations.
- Navigate to Synchronization > Refresh Issues.
- Select Full Issues Synchronization.
- Click Refresh Issues.
This process can take up to 30 minutes for large instances but is critical for ensuring data consistency.
🎯 Accurate Time Tracking Isn’t Magic — It’s Engineering
Jira holds the raw data. But accurate time tracking, workload forecasting, and clear visibility only happen when both Jira and ActivityTimeline are configured with intention.
You now have:
- A complete 10-point technical checklist of non-negotiable settings.
- A clean understanding of how AT’s modules transform data.
- A blueprint for building a reliable reporting system.
When configured correctly, ActivityTimeline becomes the single source of truth for time tracking, capacity planning, financial reporting, project forecasting, and resource allocation. Medium and large teams rely on it because it doesn’t just display data — it makes the data trustworthy.
{{rich-cta-5}}