
{{tl-dr}}
What Is Resource Management in Jira
For project managers, there is more to managing a Jira team than just keeping track of tickets. Resource management in Jira resource management process of planning, allocating, tracking and optimizing Jira team resources across tasks and projects. It guarantees everyone stays focused and avoids burnout.
To do this effectively, focus on the five main project requirements:
- Resource planning to specify what must be done.
- Jira resource allocation to match people to complete tasks.
- Jira resource management to balance how much work each person has.
- Track time to match your estimates to the real time spent.
- Reporting and optimization to improve future projects.
Why Resource Management in Jira Matters
Moving from basic task tracking to Jira resource management changes how you operate projects. Here’s what effective resource management Jira looks like in practice:
Core Challenges of Resource Management in Jira?
You’ll likely face these five issues when trying to plan team capacity with just Jira capacity planning native features:
- No native workload view. You can see ticket statuses, but you can't see if a developer is overloaded or idle.
- No cross-project visibility. Most teams work on several projects at once. This makes Jira portfolio resource management a challenge because Jira won't show a person's total workload in one place. You're forced to switch between tabs just to see if someone's actually free.
- Hard to track availability. It's difficult to account for vacations, time off, or real utilization within the basic interface.
- Manual coordination. Because these features are missing, you're forced to use spreadsheets or other project management tools just to stay synced.
- Disconnect between planning and execution. Usually your plans are in a different document than active tickets. You can't tell if you're reaching your goals because of this.
The 5 Stages of Jira Resource Planning and Allocation
Successful project delivery depends on how well you manage your team’s time. These five stages will help you transition from an unorganized backlog to a regular schedule.
Stage 1: Jira Resource Planning
Planning starts before you assign anything.
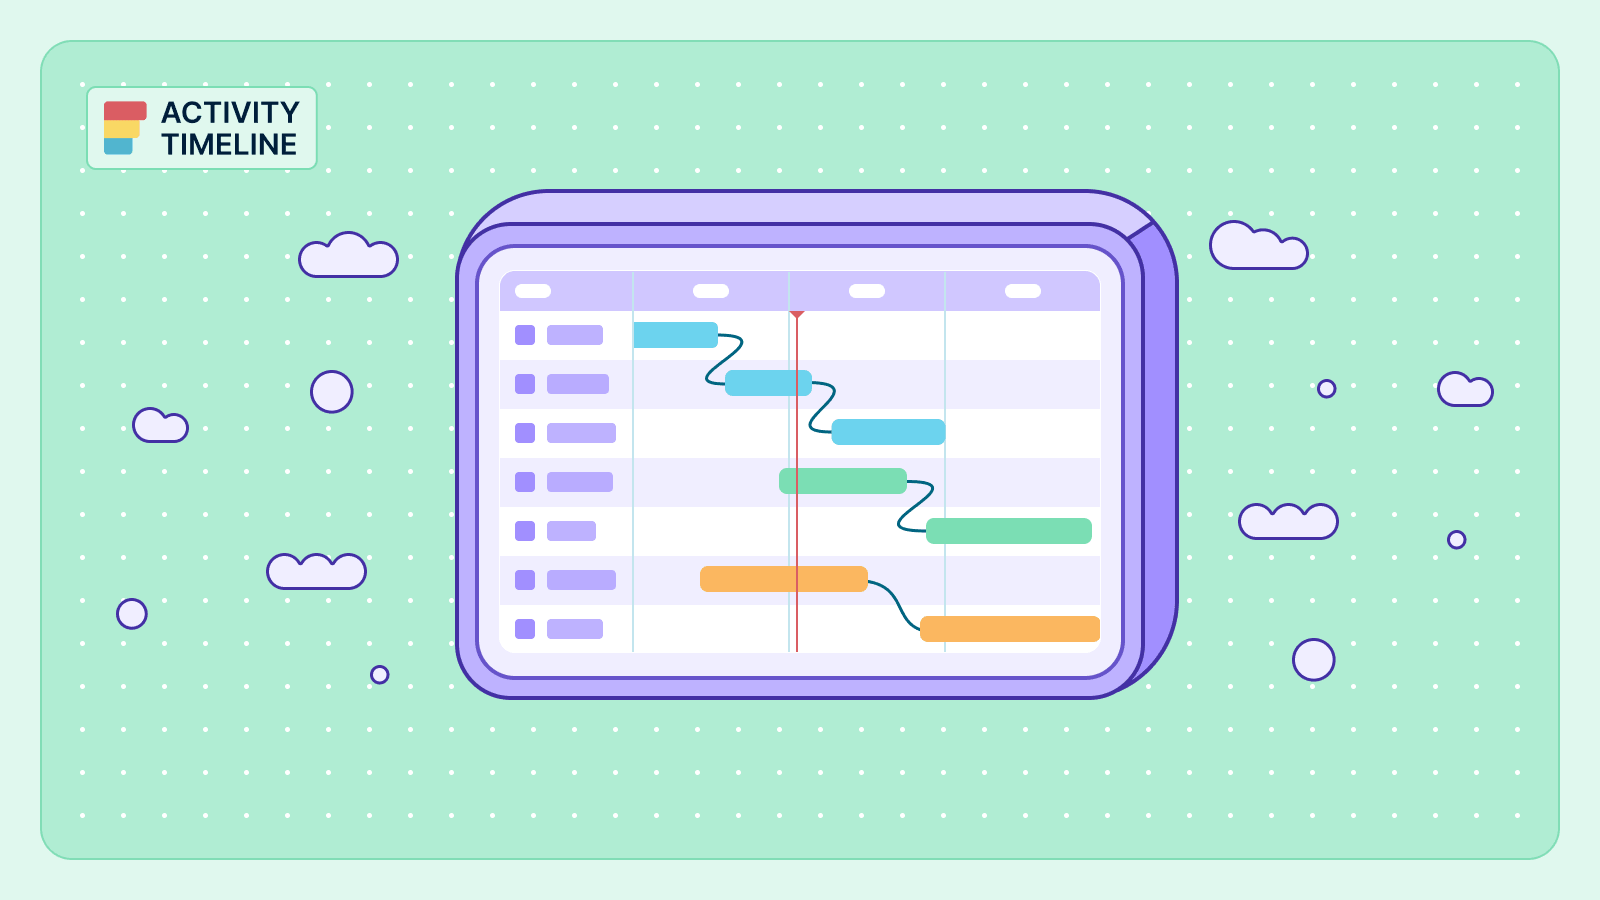
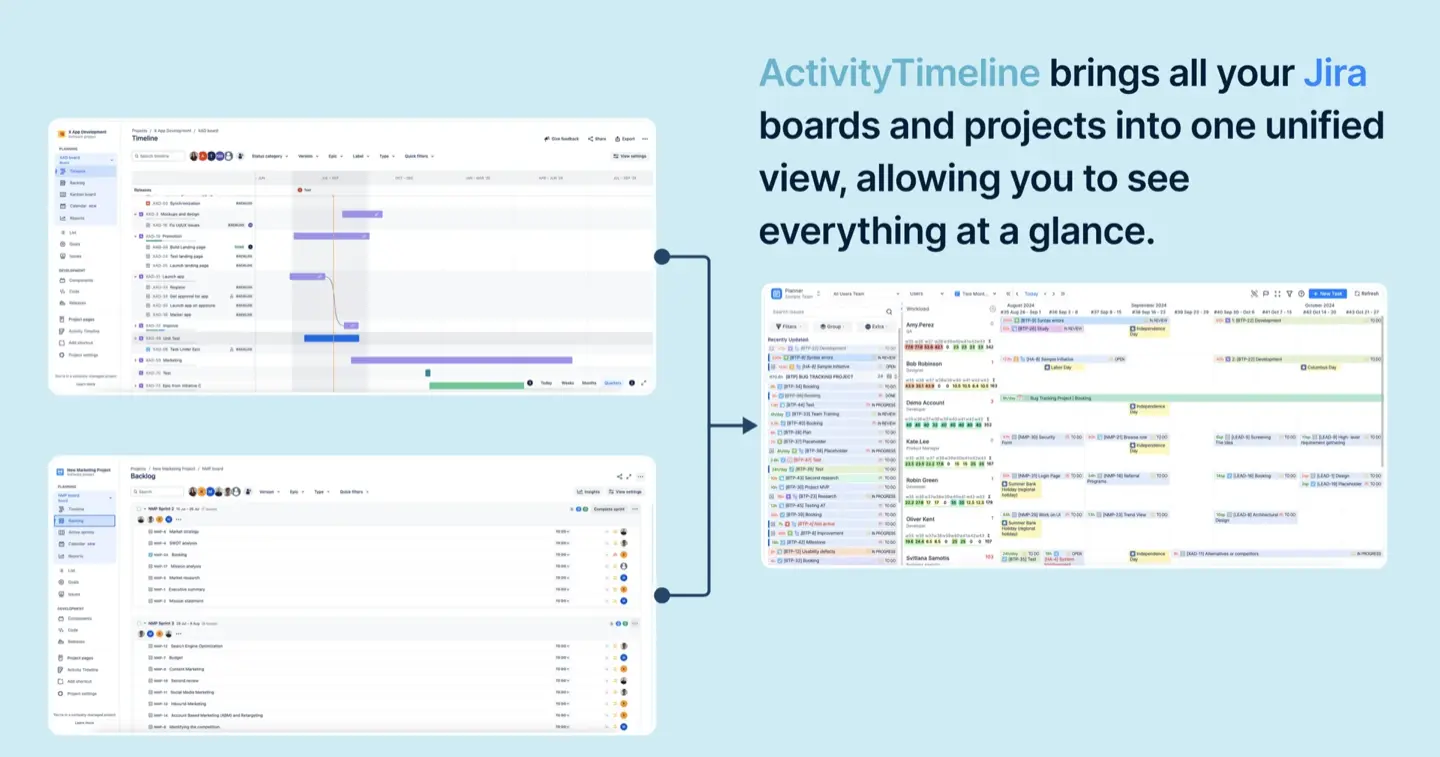
You break down the scope into tasks, estimate effort, define required skills — but the real challenge is visibility. In standard Jira views, tasks are scattered across boards and projects. You don’t actually see future impact.
ActivityTimeline changes that by giving you a centralized timeline of all tasks across projects. Instead of guessing whether someone “probably has capacity,” you see their upcoming workload laid out across days, weeks, or months.
You can analyze who is already booked, where gaps exist, and how new work will affect delivery timelines. This shifts planning from reactive to predictive. You’re not just estimating effort — you’re validating it against real capacity.
That’s the difference between planning tasks and planning resources.
Stage 2: Resource allocation
Allocation is where most teams create invisible problems.
Even if tasks are estimated correctly, assigning the wrong person — or overloading the right one — creates bottlenecks later.
That transparency prevents imbalance before it happens.
Key steps:
- Give tasks to team members based on their resource availability.
- Prioritize the tasks that are most important.
- Make sure task distribution is balanced across the team.
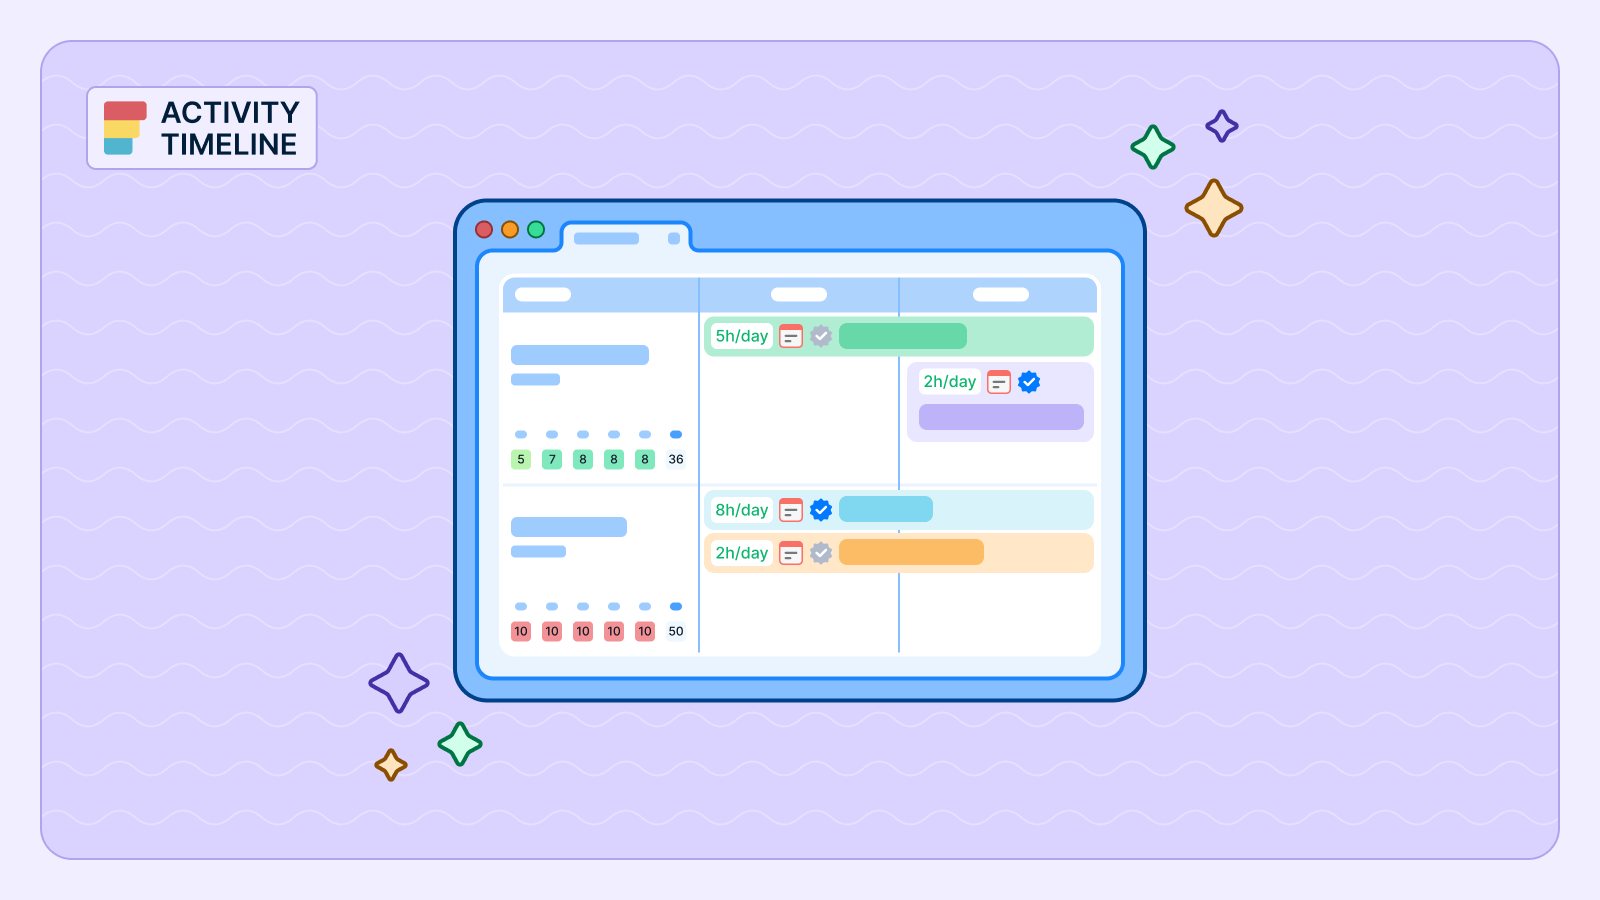
ActivityTimeline provides a visual resource timeline where every team member’s workload is clearly displayed. You can drag and drop tasks directly onto the schedule, immediately seeing how that assignment affects their capacity.
Because the system consolidates multiple Jira projects into one view, you avoid the classic mistake of overbooking someone who looks free on one board but is overloaded elsewhere.
Instead of distributing work based on intuition, you distribute it based on real-time availability and skill alignment. The moment you move a task, the impact becomes visible.
Stage 3: Workload management
Jira resource allocation isn’t a one-time event. Work shifts. Deadlines change. Scope expands. You need to constantly balance the workload distribution as new tasks come in or priorities shift.
Key steps:
- Watch for people who are overworked and might burn out.
- Find team members who have extra time to help.
- Move tasks around if the plan changes suddenly.
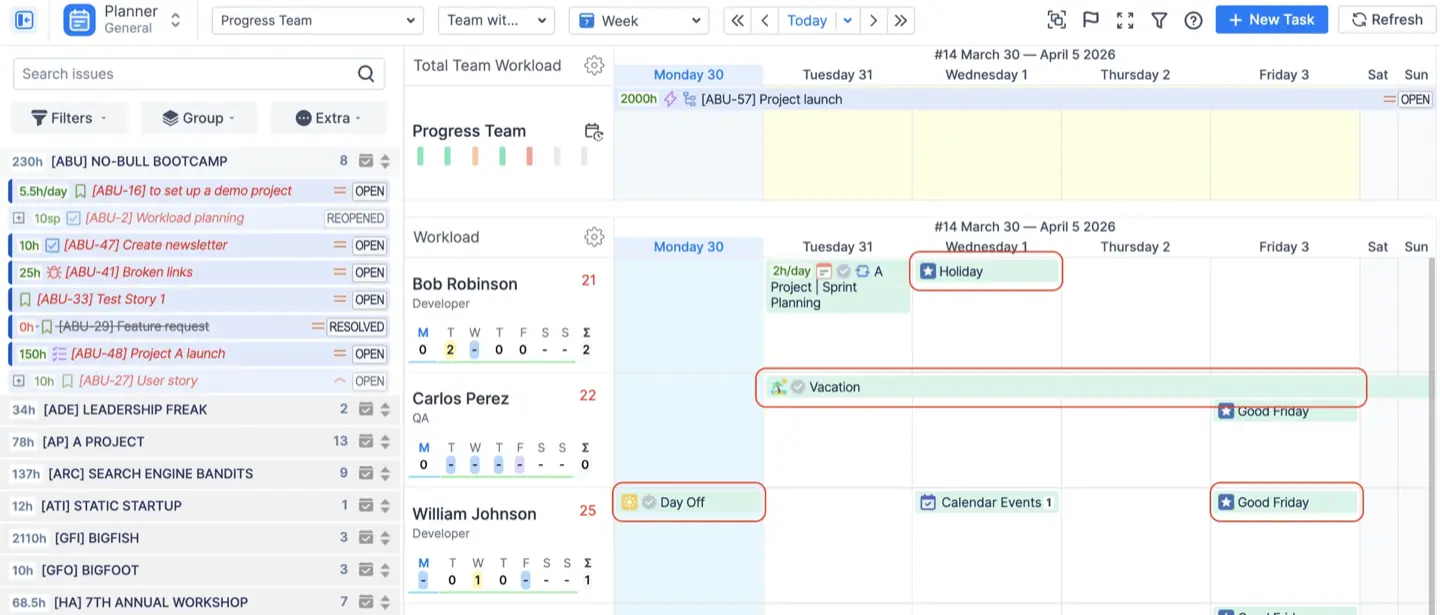
ActivityTimeline provides workload indicators that immediately highlight overbooked or underutilized team members. Color-coded visualization makes risk visible without digging into reports. If someone is overloaded, you see it instantly. If someone has free capacity, you can reassign work before delays occur.
Because updates reflect real Jira data, you’re always working with current information — not last week’s report.
This allows managers to adjust dynamically instead of reacting after a sprint fails.
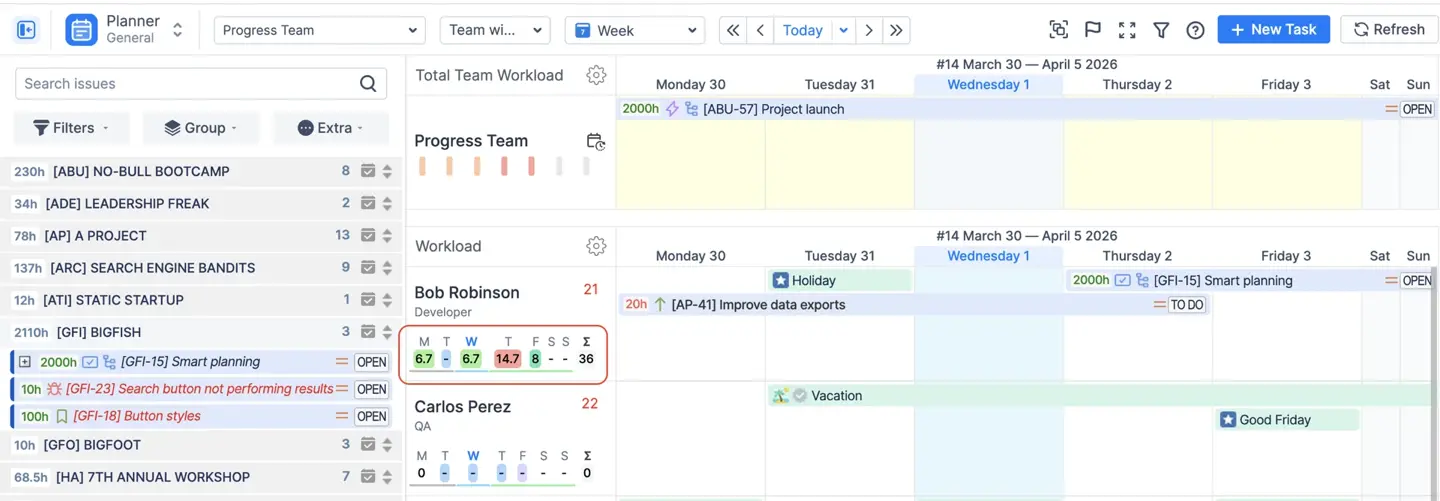
You can choose how the system calculates the work. Balance mode spreads hours evenly across the scheduled days. Liquid mode puts all the work hours at the start of the task. If someone gets sick, the system shifts their work to the next available day. This helps you see if a small delay will push back your final deadline.
Stage 4: Time tracking & execution
Also you must track progress by seeing how much time the team spends on their tasks.
Key steps:
- Have everyone record their hours every day.
- Check if the actual time spent matches your first guess.
ActivityTimeline gives every employee an "Individual Workspace" where they can see their schedule and log time. They can use a "Log Work" button, a manual table, or a built-in stopwatch timer to record their hours.
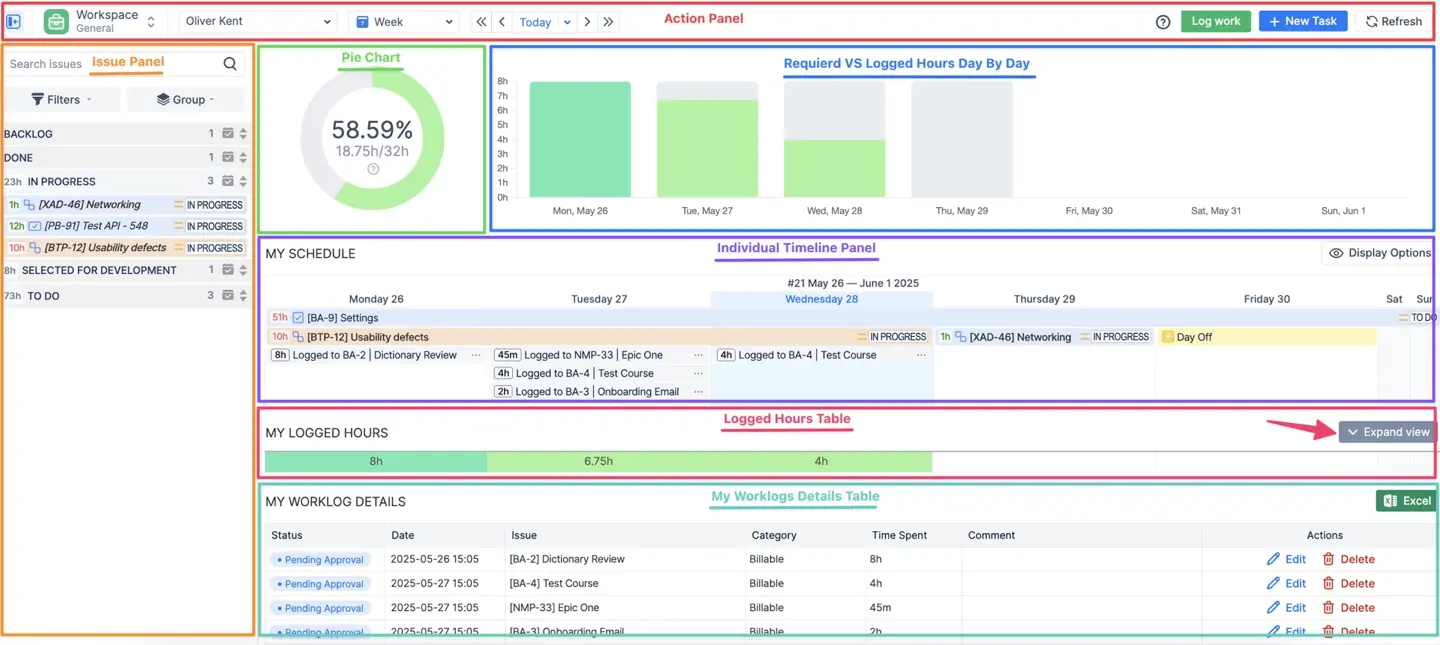
Managers then use the Timesheets module to review and approve these timesheets. To keep your data accurate, you can use an approval workflow that locks worklog once they’ve been checked. This ensures your project progress is based on real, verified numbers.
Stage 5: Monitoring & optimization
The final stage is about learning from the past to improve your future projects.
Key steps:
- Review the work to see what caused potential bottlenecks.
- Review team performance to find who is always busy.
- Use past data to make informed decisions.
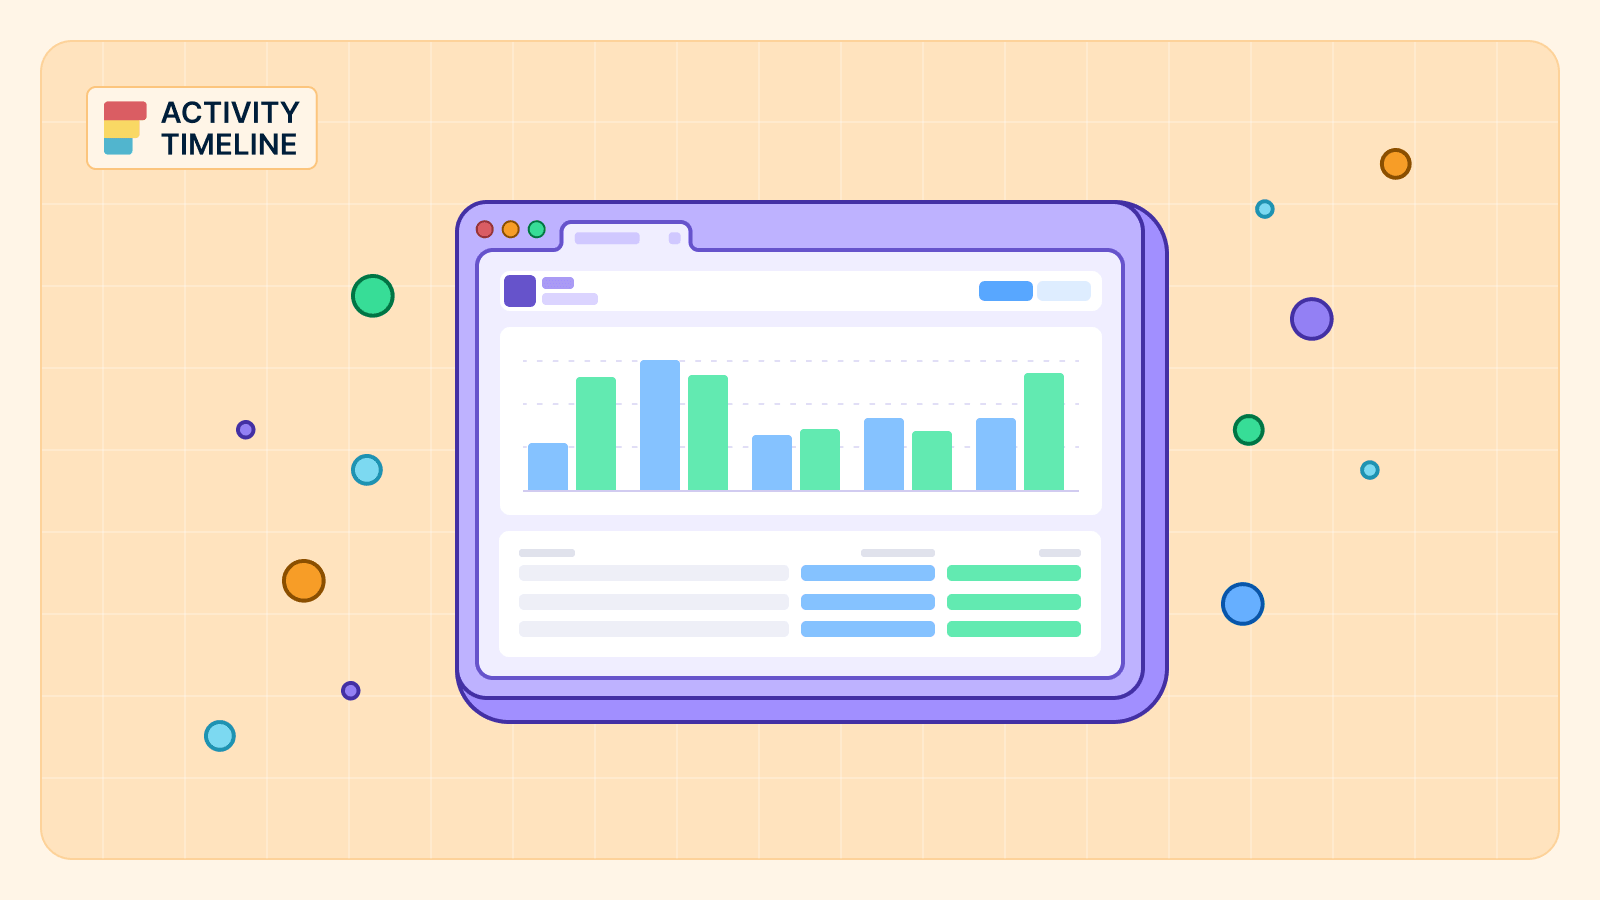
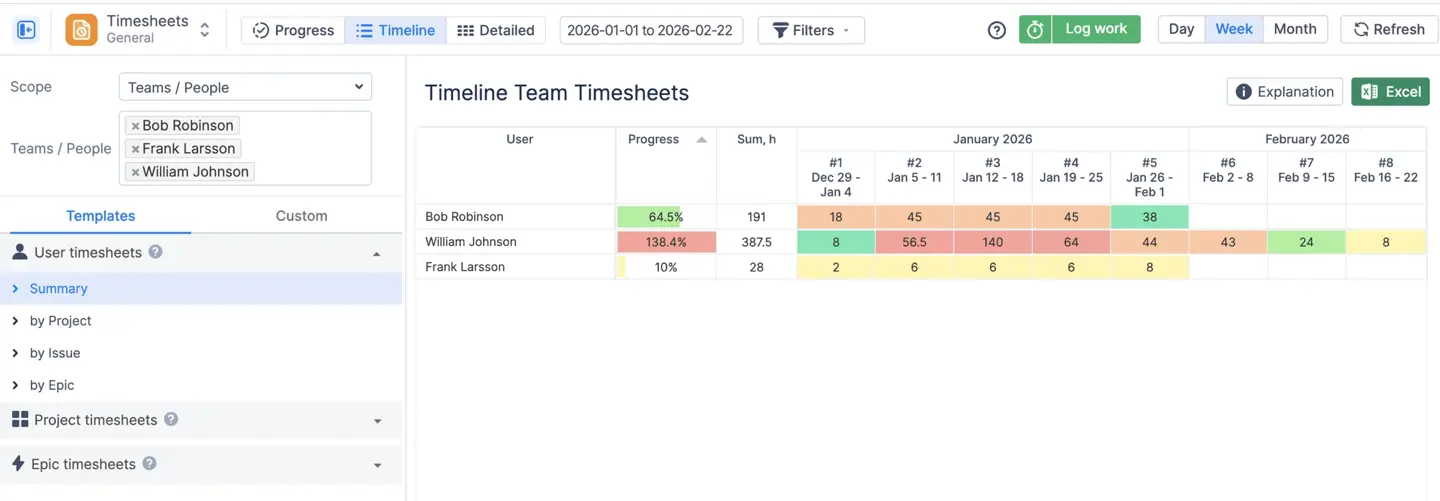
The Jira reports module provides the data you need to stop making assumptions.

Resource Utilization reports show how your team’s capacity is used over several months. Planned vs. Actual reports show exactly where your estimates were wrong. This helps you fix your plans for the next sprint.
You can save these reports as Jira gadgets to see them on your main dashboard. This data helps you decide if you need to hire more people. It also shows if you should change how you estimate tasks.
Features Required for Resource Management Jira
You need a few specific features to keep your team management projects on track.
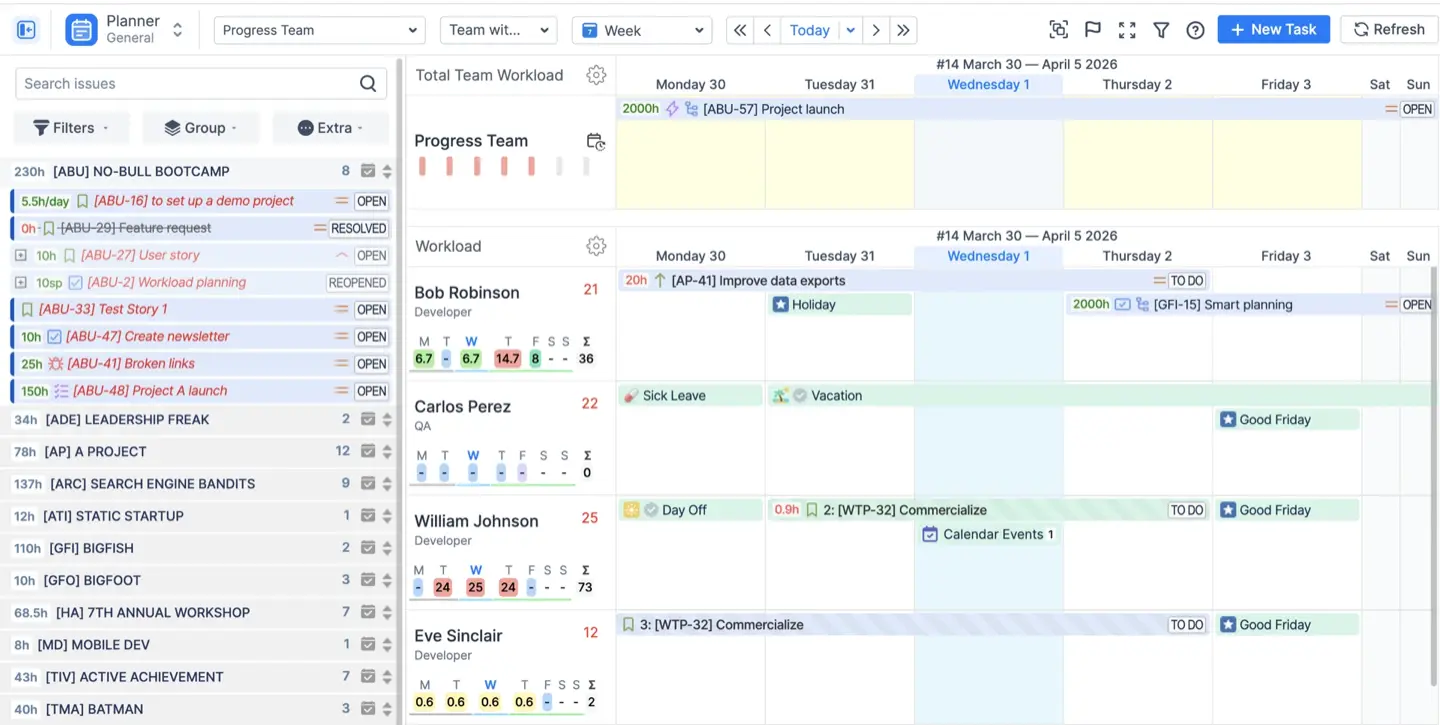
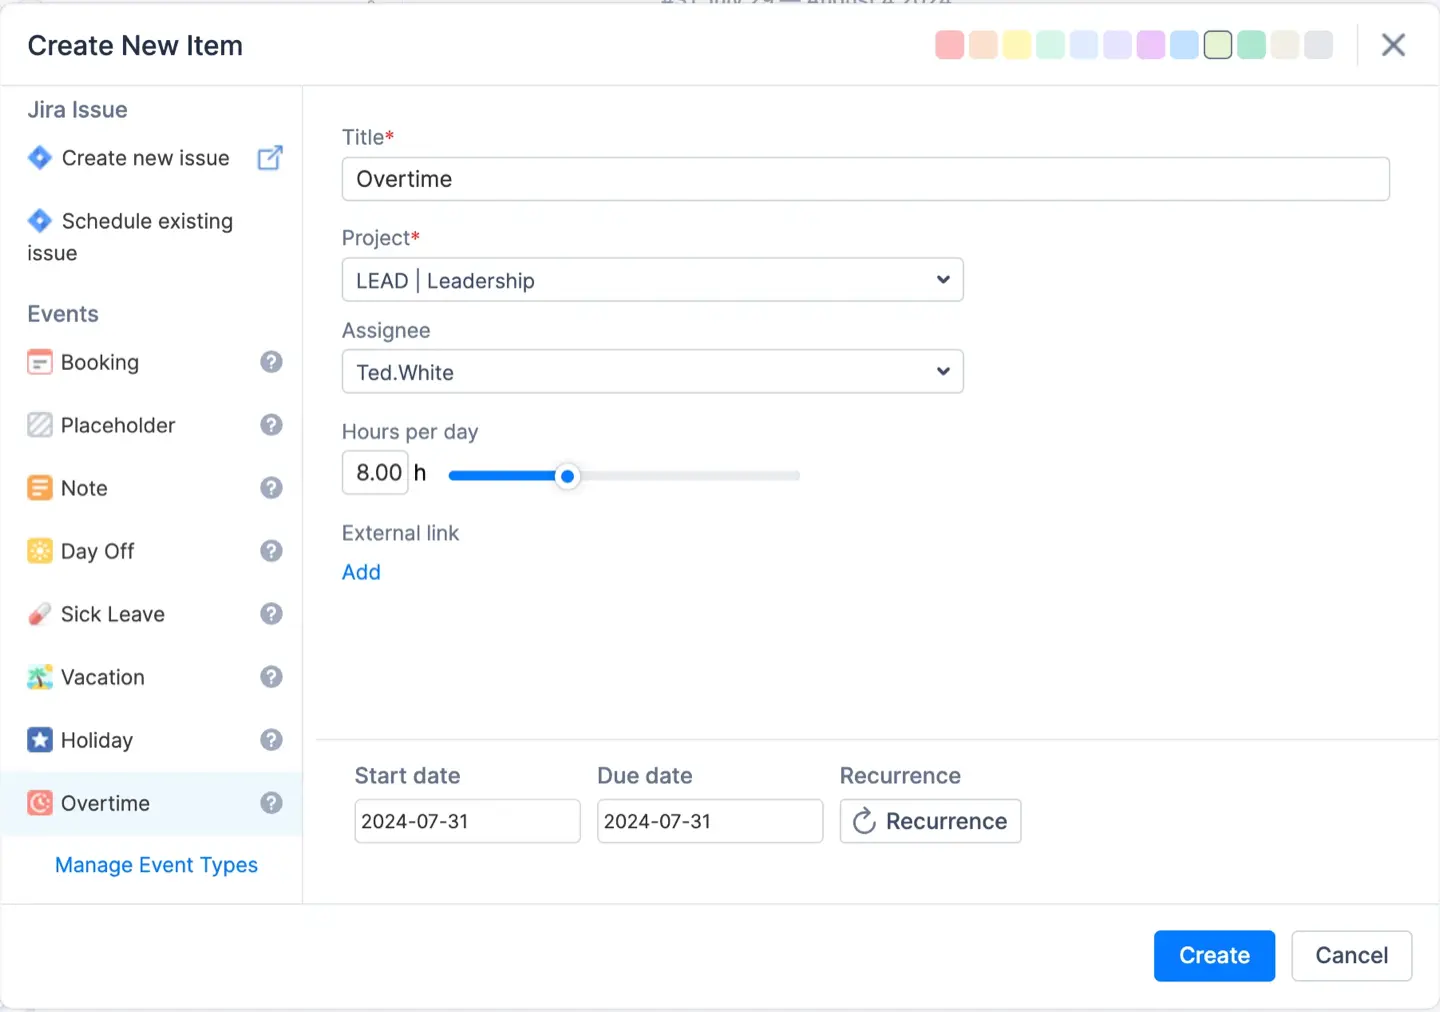
A unified timeline is the first thing you'll need simply because it's a waste of time to switch between resource management tools or project boards. ActivityTimeline offers a view of members tasks for your team management along with vacations, sick leaves and holidays. If you don't track these "non-working" events, your schedules won't stay realistic.
To boost productivity, you have to see if a team member is overloaded before you assign the next task. That is where color-coded indicators might help. You don't have to guess who’s free, the data is right under their name.
Managing people individually can be slow, so it's better to plan by roles or entire teams. In ActivityTimeline you can create non-human resources, roles or group people into functional teams to manage entire departments at once. This allows you to map out your needs months in advance.
Unexpected changes shouldn't ruin your entire week. Imagine someone gets sick on a Monday, requiring quick task reassignment. Your system should have a feature that shifts work to the next day automatically. This type of scenario planning helps you see the immediate impact on your deadline without manual work.
It’s also much better if team members have a private workspace to drag their tasks and log time. So, they can plan their day without waiting for a manager.
If you ignore your past performance, you won't improve your estimates. Your next sprint wouldn't be just a guess as comparing planned hours to actual time reveals where the team got stuck.
How to Manage Resource Allocation in Jira with ActivityTimeline
ActivityTimeline turns Jira into a complete resource planning tool by adding a visual layer to your tasks. You can follow these nine steps to organize your team’s workload properly:
Step 1: Connect Jira projects
Pick the projects you want to manage during the setup. You can sync issues and worklog manually whenever you need an update.
Step 2: Define team structure
Find the right person for a task more easily. Just group employees by skills, roles, or departments.
Step 3: Set capacity
Standard workdays are usually 8 hours, but you can set custom hours for part-time employees. You can also add customized holiday calendars for different countries.
Step 4: Include non-working hours
Don't miss your deadline because you forgot about a vacation. Include holidays, sick days, and vacations in the schedule to allocate resources effectively.
Step 5: Estimate tasks
Your tickets appear in a side panel. Give them hour estimates so the system can calculate how much time the work will take.
Step 6: Assign tasks
Want to assign work faster? Just drag a task onto a timeline to update Jira instantly. No more manual ticket editing.
Step 7: Balance the workload
Look at the color indicators under each name. Red means someone is overloaded; green means their workload is perfect.
Step 8: Track execution
Team members log their actual hours directly on their assigned tasks. This helps you see if the project is staying on schedule.
Step 9: Run reports
Look at the data to see how your original plans turned out compared to what actually happened. This helps you plan future projects more accurately.
Common Mistakes in Jira Resource Management
Even with all tickets assigned, your project schedules might be late. It's usually due to a couple common resource management plan mistakes:
- Using Jira boards for planning. Boards track task status, not people's capacity. Instead, use a timeline view to see who is busy and free.
- Ignoring real availability. If you don't plan for vacations or team meetings, you'll be behind schedule.
- Assigning work without visibility. If you can't see the current workload, you're just guessing who can take on more. Use a visual resource planner to not overbook people.
- Skipping actual time tracking. Making plans won't work if you don't know how long things really take.
- Managing projects separately. It is common for people to work on multiple projects simultaneously. Look at the entire workload to reduce delays.
- Failing to define project scope. Not knowing the full scope of work leads to inaccurate resource planning.
Conclusion
ActivityTimeline enhances Jira for resource management. It helps you plan tasks, assign the right people, and balance workloads in one place. ActivityTimeline keeps your project schedules realistic and prevents team burnout. It is the best way to handle capacity planning and manage time effectively.