Reporting time is coming. You don't have a reliable reporting mechanism and stress over missed deadlines, budget overruns, and team burnout. The reason behind the challenge is that you are planning based on assumptions rather than actual capacity.
In this guide, you will learn the definitive methods for building a Jira time tracking report from basic data extraction to advanced strategic oversight with ActivityTimeline.
{{key-takeaways}}
Introduction to Time Tracking in Jira
Time tracking is a foundational element of effective project management. It enables teams to monitor progress, allocate resources wisely, and make realistic estimates for future work. In Jira, time tracking allows users to log the time spent on specific tasks, providing a clear record of effort across projects and issues. This visibility is crucial for agile project management, where teams need to adapt quickly and identify bottlenecks before they impact delivery.
Native Jira time tracking offers basic tools for recording and reviewing time spent, helping teams monitor progress and compare actual work against estimates. By tracking time in Jira, project managers gain insights into how resources are allocated, which tasks consume the most effort, and where adjustments are needed to keep projects on track.
While native Jira provides a solid starting point, many teams enhance their time tracking capabilities with third-party plugins, unlocking advanced features for reporting and analysis. Effective time tracking in Jira empowers teams to make data-driven decisions, improve project outcomes, and deliver value consistently.
The Hidden Cost of Manual Time Tracking
Managing a team without accurate time tracking is like navigating a ship without a compass. You might be moving, but you have no idea if you will reach your destination before running out of supplies. Common consequences of poor tracking include:
- Resource Invisibility. Struggling to see available bandwidth makes it impossible to allocate workloads during employee absences effectively, especially when tracking work assigned to multiple users. It's crucial to log working hours for all team members to ensure accurate workload management.
- Burnout and Stress. Overloading team members with a 100% utilization rate leads to mistakes and exhaustion; healthy planning requires buffer time for deep focus.
- Financial Leakage. Without precise tracking of billable versus non-billable hours and the ability to distinguish billable time from non-billable working hours, firms risk undercharging and face challenges in invoicing clients accurately, ultimately hurting their overall profitability.
- Fuzzy Memory Errors. Waiting until the end of the week to log hours leads to inaccurate entries and missed details that complicate the billing process.
Accurate time tracking of working hours and work assigned enables project managers to make realistic estimates, improving planning and on-time deliveries. Additionally, tracking time helps in performance analysis, allowing teams to provide valuable feedback and increase productivity towards achieving set goals.
Step 1: Enable Time Tracking Infrastructure
Before you can generate a single report, you must ensure Jira is configured to capture the necessary data.
- Activate the Feature. Navigate to your project settings to ensure time tracking is enabled. Make sure the global time tracking feature is enabled in Jira.
- Verify Permissions. Ensure users have the “Work on Issues” permission to submit their hours. Select the appropriate scheme to define permissions for different user roles and groups.
- Configure Fields. Add the “Original Estimate” and “Remaining Estimate” fields to your issue screens. The time tracking field must be added to each issue type, which requires Jira admin rights. Time is typically entered manually by users, either by inputting hours directly or using a timer.
Note: Native Jira time tracking does not support automated time tracking, so all time must be entered manually, which can lead to inefficiencies and potential inaccuracies.
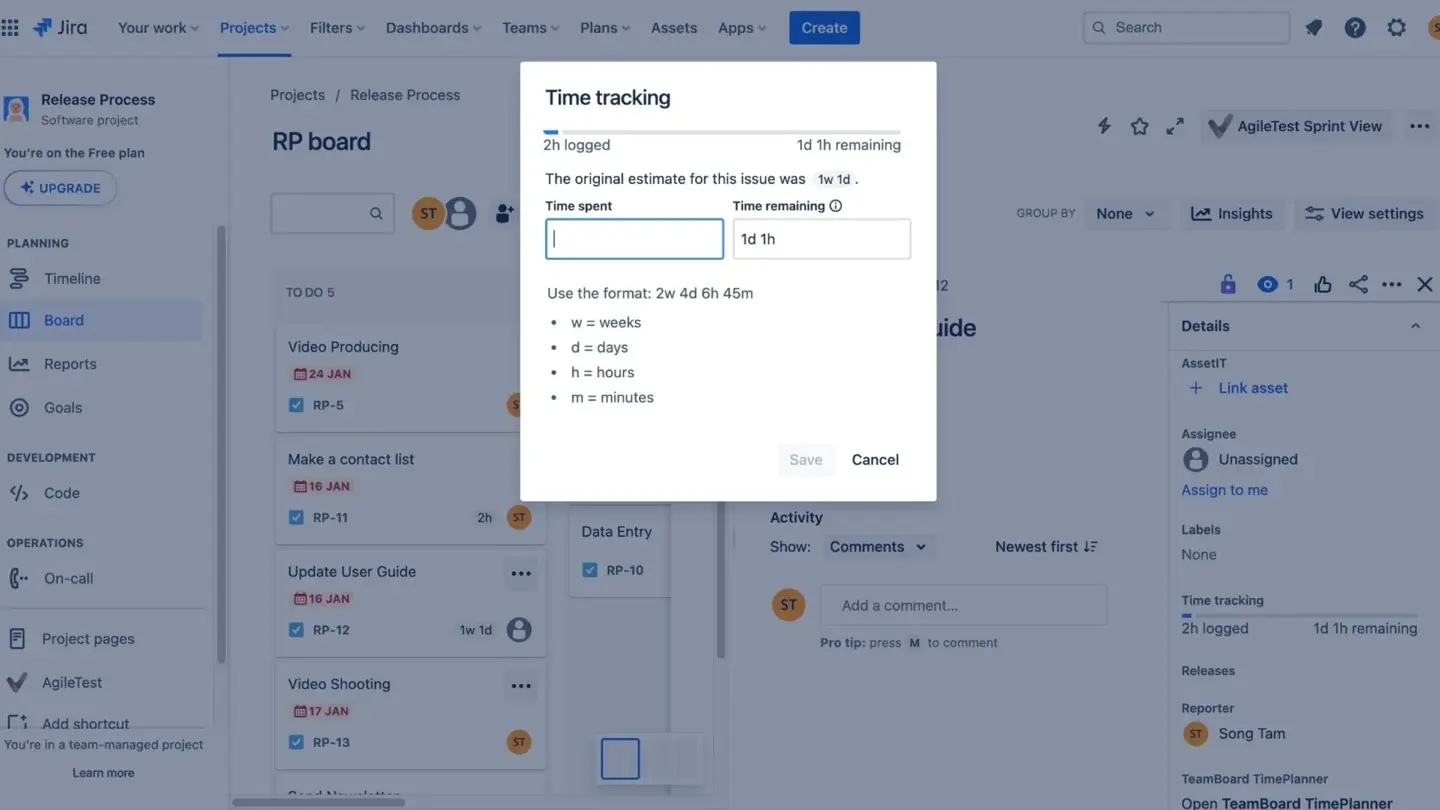
Step 2: Logging Time in Jira
Logging time in Jira is designed to be straightforward, ensuring that team members can easily record their efforts as they work on multiple projects and tasks. Each Jira issue includes a time tracking field where users can manually enter the time spent or use a timer to capture their work in real time. For deeper guidance on best practices for logging work hours in Jira, teams can adopt standardized workflows that boost consistency and data quality. This flexibility allows for accurate tracking of both short tasks and longer assignments.
When logging time, users can specify the duration, add a description of the work performed, and indicate whether the time is billable or non-billable. This distinction is especially valuable for teams that need to invoice clients or provide detailed reports to the accounting department. Native time tracking in Jira supports logging time across various projects and issues, making it easy to maintain a comprehensive record of all work performed.
Step 3: Advanced Reporting with ActivityTimeline
While basic Jira tools offer snapshots of individual tasks, they often fail to provide the multi-project oversight that modern managers require. Software development teams often use marketplace apps like ActivityTimeline to enhance Jira time tracking and reporting capabilities. This marketplace app provides advanced features such as user-level time tracking, customizable reports, and aggregation of logged time by project or epic.
ActivityTimeline allows users to create time tracking reports by user and project with just a few clicks, while also enabling tracking time against projects and epics for insights into team performance and resource allocation.
ActivityTimeline serves as a comprehensive resource planning and time tracking provider that integrates directly with Jira. It supports agile teams by incorporating story points and time estimation, helping teams forecast project timelines and manage workload through long-term planning and strategic roadmapping in Jira. The user workload report in ActivityTimeline helps monitor team capacity and resource allocation, addressing the limitations of Jira's built-in reporting for multi-user and customizable workload visibility.
Timesheets Approval Workflow
In some specific cases, for audits as an example, you may need to export data from the time tracking report, as it provides a verifiable record of worklogs. That’s why in AcitivityTimeline you can enable a timesheet approval period (e.g., weekly) to review and lock entries while preventing backdating or unauthorized changes.
Timesheets approval is a structured way to manage and enforce rules around time tracking and worklog approvals. These settings allow you to configure how to lock reporting periods.
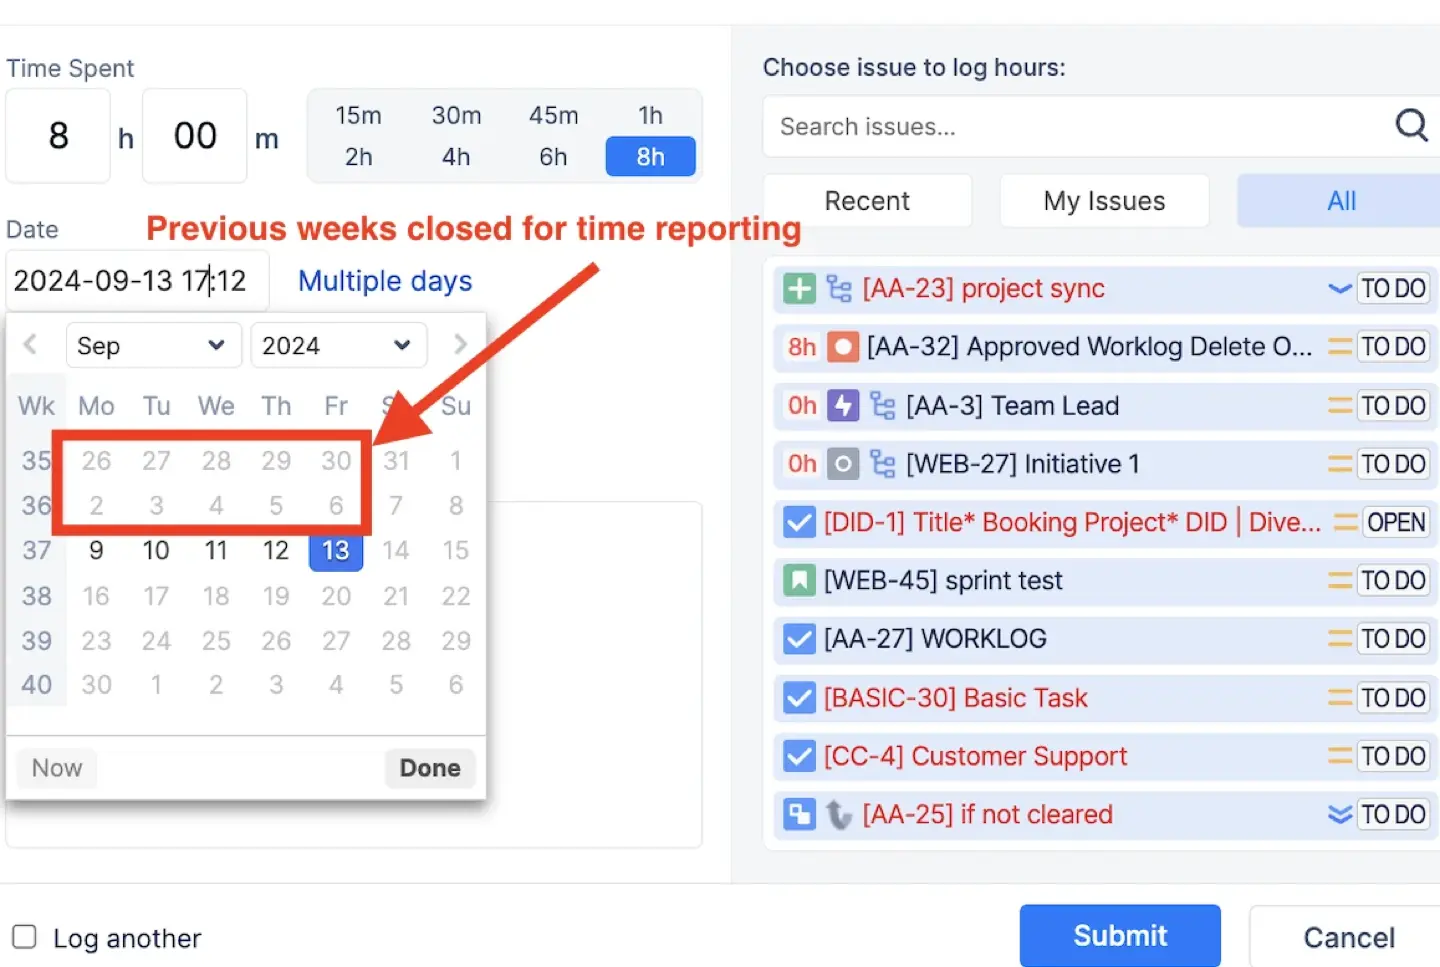
The Time Logging Grace Period setting defines how many extra days after the end of a reporting period users can still log their time. This grace period offers flexibility, allowing for late submissions without keeping the reporting period open indefinitely.
- The grace period can be configured to allow from
No grace periodup to+30 daysafter the reporting period ends. - You can specify the exact cutoff point for logging time by selecting a combination of days and a specific time (e.g.,
+3 days, 12:00).
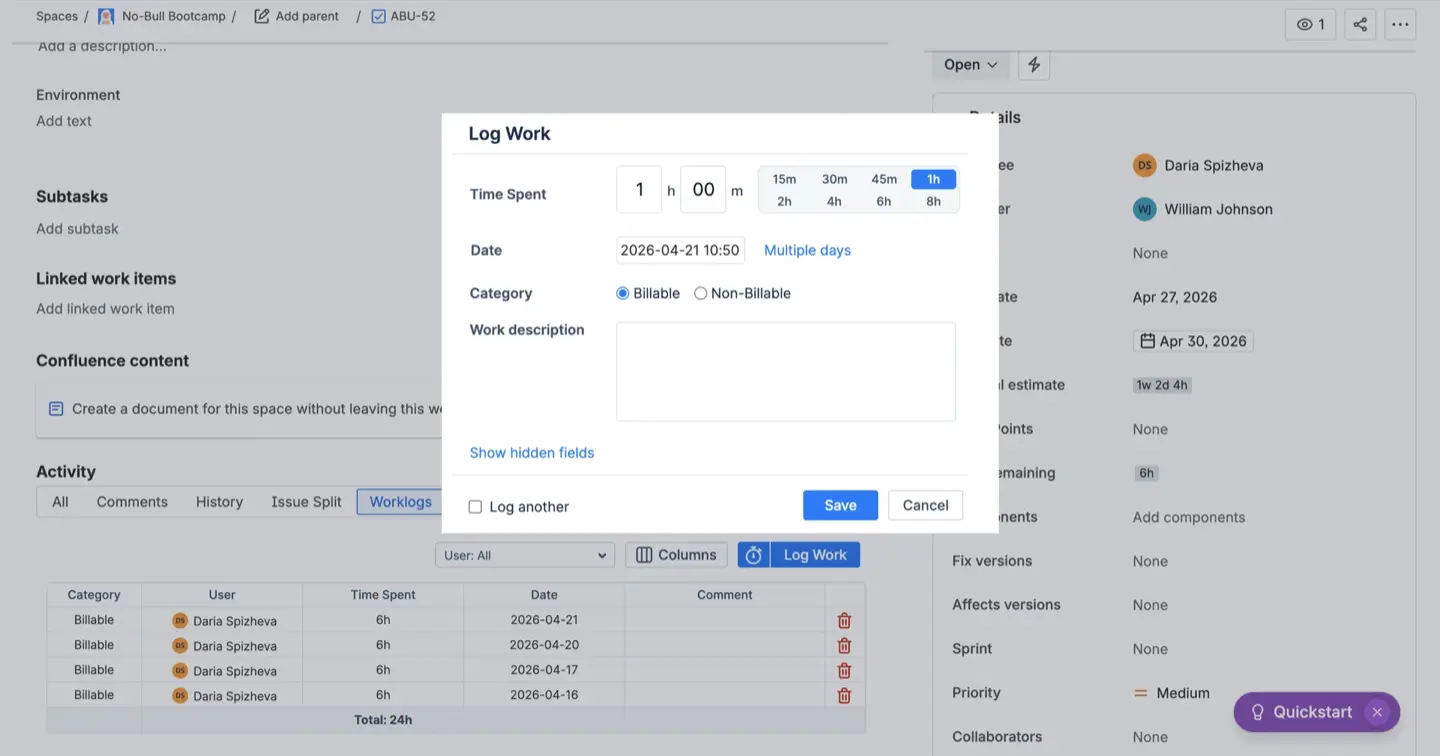
Worklog Attributes
Worklog Attributes allow you to add custom fields to worklogs, helping you capture additional details such as Cost Center, Client Name, or Location. These attributes can be used to enhance reporting, streamline approvals, and ensure accurate billing.
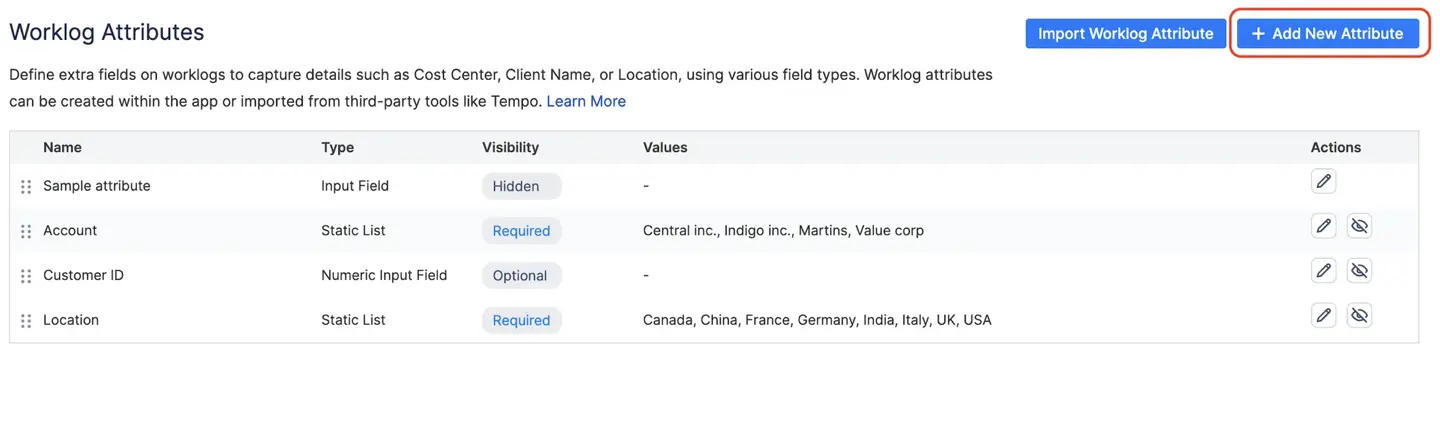
To streamline the user experience while maintaining data integrity, you can apply specific visibility rules to each attribute. These rules dictate how and when fields appear to your users:
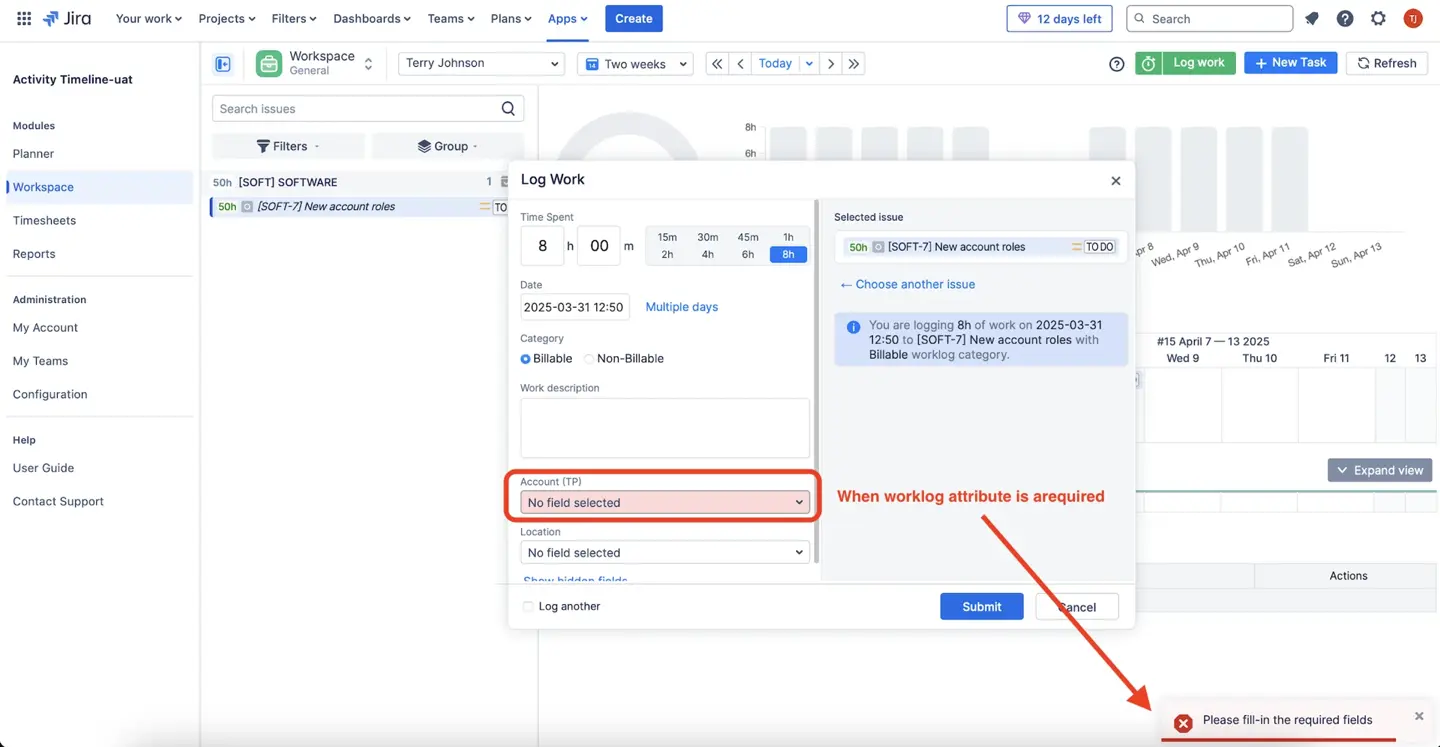
- Required: The user must complete this field to submit their worklog. If left blank, the system prevents submission and triggers a validation message, ensuring critical data is never missed.
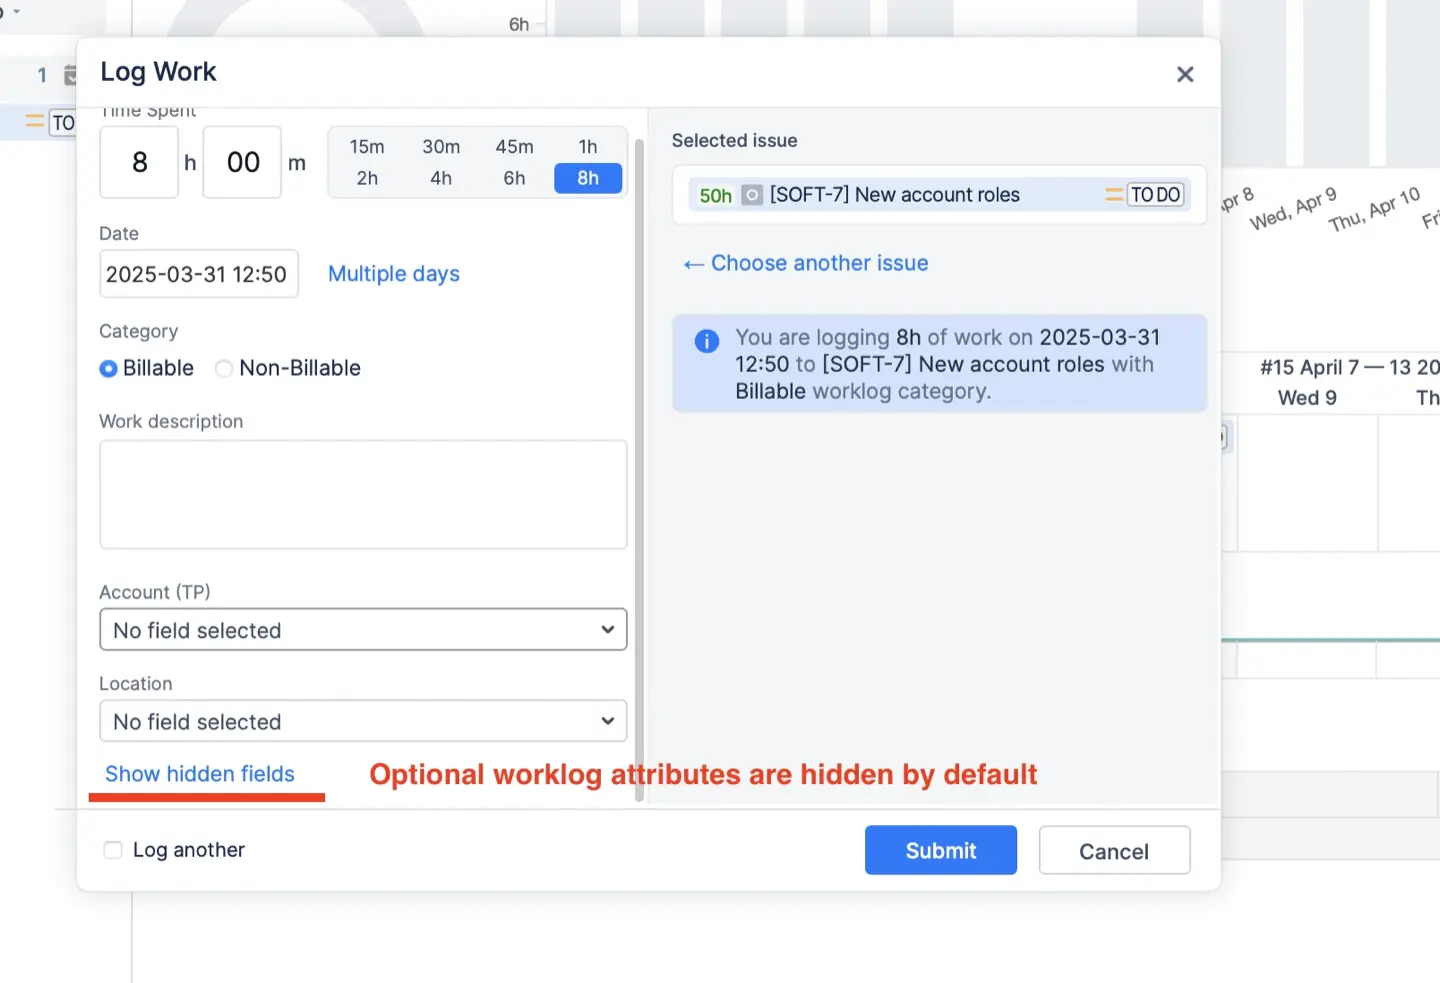
- Optional: These attributes are hidden by default to keep the “Log Work” dialog clean. Users can access them by clicking “Show hidden fields” if they need to add extra context.
- Hidden: This status is useful for deprecating attributes. The field is removed from the interface for new entries, but your historical data remains intact for reporting.
You can either create Worklog Attributes directly in ActivityTimeline or import them from Tempo Timesheets Cloud if you already use that integration.
Step 4: Visualizing Progress
Data is only valuable if it is actionable. Effective reports should translate raw numbers into visual stories. Native Jira reporting primarily focuses on issue status and workflow visualization, offering insights into the progress of tasks through various stages. However, for deeper analysis, time reports are essential.
Timeline Timesheets
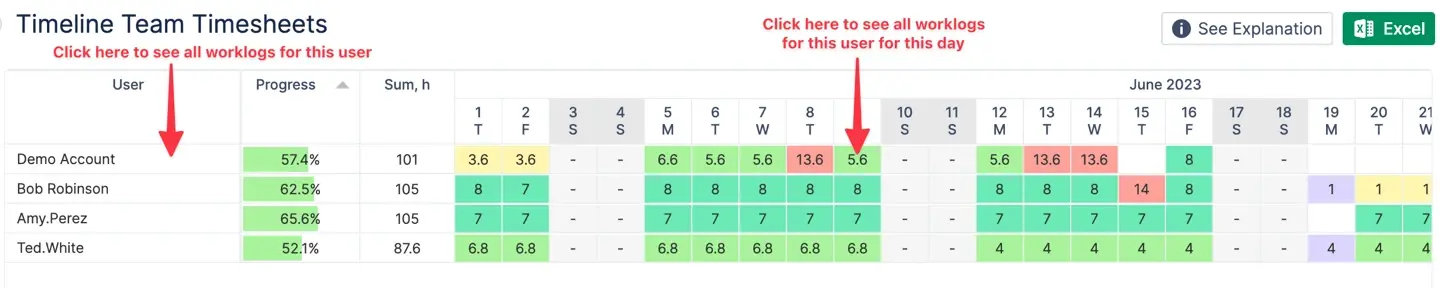
Timeline Team Timesheet provides a simplified and visually intuitive way to view time spent. This view allows you to see all users at a glance and use color-coded indicators to quickly assess whether users have logged too much or too little time relative to their involvement. View the total hours logged by users over a selected period and track logged time day by day, allowing for detailed analysis of daily work patterns and time distribution.
Planned vs. Actual Comparisons
The Planned vs. Actual Chart is your definitive tool for measuring estimation accuracy by comparing estimated time, actual time spent, and time remaining for each task. It highlights deviations, marking tasks as “On Track” (Green), “Overestimated” (Yellow), or “Underestimated” (Red). This comparison helps you identify “time black holes” where effort is being wasted and provides insight into team workload and project progress.
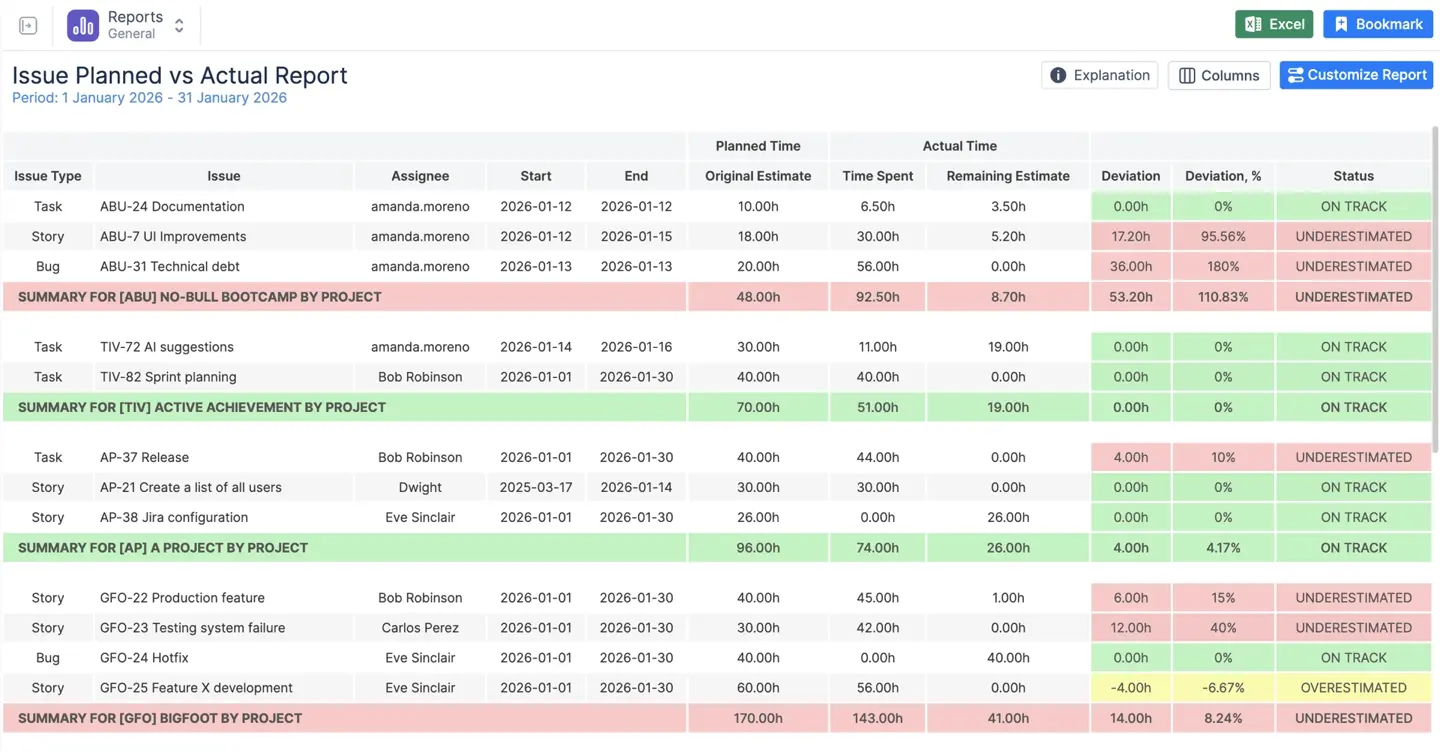
Jira’s basic time tracking features allow users to log work manually and generate these comparisons between estimated time, actual time, and time remaining. However, basic time tracking may lack advanced forecasting capabilities found in more sophisticated plugins or tools. Accurate forecasting in Jira is further aided by analyzing historical data from previous sprints, enabling more realistic delivery estimates for future sprints and iterations.
Step 5: Create a Reusable Timesheet Report
When designing reusable reports, it helps to understand how Jira timesheets can be optimized for productivity and billing, including approval workflows and advanced visualization.
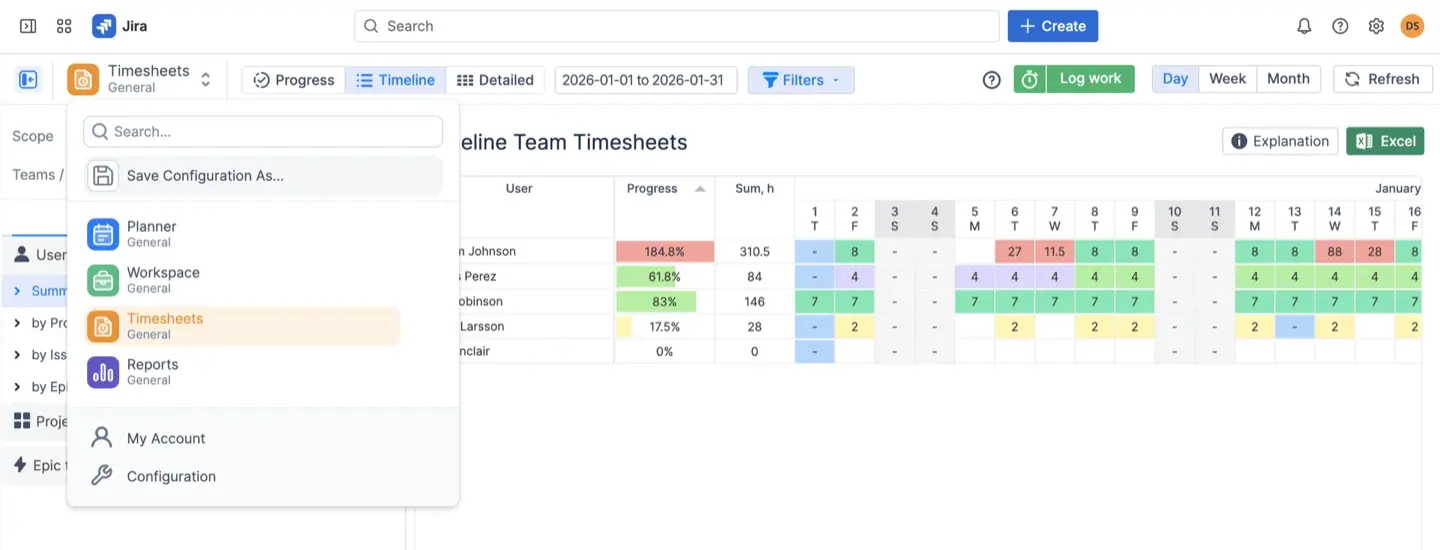
Follow these steps to build a report that updates automatically:
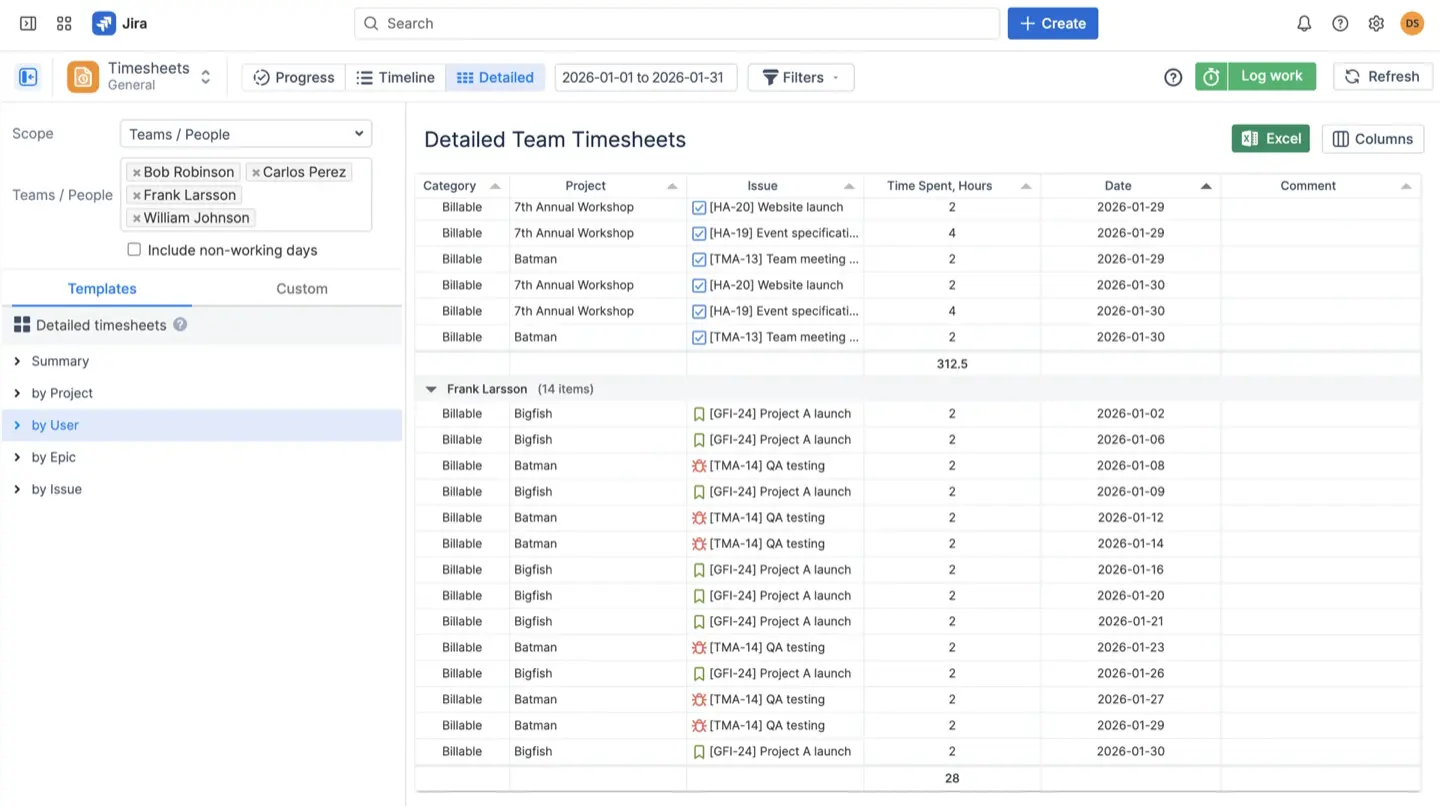
- Access the Module: Open the Track module within the application and select Timesheets.
- Select Your Scope: Choose whether you want to report by Team, Project, or Epic to narrow down the data.
- Pick Your View: Use the Timeline View for a color-coded summary of progress, the Calendar View for a user-friendly visualization of time entries and scheduling, or the Detailed View to inspect individual worklogs for granular analysis.
- Apply Filters: Group data by Jira custom fields or worklog categories like “Billable” and “Non-Billable” to refine your results. You can also filter by a chosen date range by specifying a start date and end date, allowing you to analyze time logged within a specific period.
- Save for Future Use: Click the “Save Configuration As” button to create a saved dashboard that can be shared with stakeholders.
For further analysis or record keeping, you can use the excel export feature to export your timesheet data, including logged hours, total hours, and actual time, for any chosen date range, mirroring many of the capabilities described in this overview of Jira time tracking reports and their optimization.
Best Practices for Data Integrity
In Jira, administrators have the ability to configure permissions at the project level, determining who can log time, edit worklogs, and access time tracking reports. This ensures that only authorized team members can make changes to time tracking data, reducing the risk of errors or unauthorized modifications.
To ensure your Jira reports are accurate for 2026, implement these team standards for both Jira Cloud and Server environments:
- Daily Logging Habits. Train your team to log work in real-time or at the end of every day to minimize memory errors, ensuring the time tracking report reflects accurate data.
- Mandatory Descriptions. Configure the system to require a short description for every worklog, ensuring an audit trail for client billing and supporting data integrity.
- Treat Meetings as Worklogs. Use “Booking” events for non-Jira activities like training or meetings so they are captured in your total utilization reports, and ensure these are included when exporting data for comprehensive reporting, following best practices for Jira log work usage.
Conclusion
Building a Jira time tracking report is no longer just about compliance; it is a strategic necessity for project success. While Jira's native time tracking provides a solid foundation for logging work and generating basic reports, many teams find it lacks the depth needed for comprehensive analysis.
By moving away from scattered spreadsheets and embracing advanced tools like ActivityTimeline, you gain the clarity needed to balance workloads and hit project milestones with confidence, especially when you take advantage of its capacity management and resource utilization features and follow a structured approach to implementing time tracking in Jira with advanced plugins.
{{rich-cta-3}}