Let’s be honest, we all want to spend less time on manual tasks and more time focusing on the stuff that really matters. That’s where Jira Automation comes in—helping teams cut down on repetitive work and keep projects moving smoothly. Whether you’re automating task assignments to auto assign issues based on specific criteria such as components or team workload, or generating reports, the right automation rules can save time, reduce errors, and boost productivity across the board.
But it doesn’t stop there. By combining the automation in Jira with project timeline tools like ActivityTimeline, you can take things to the next level. In this article, we’ll show you some killer hacks to get the most out of Jira Automation, from setting up recurring tasks to syncing timesheets automatically.
Key Takeaways
- Jira Automation simplifies workflows by automating repetitive tasks, freeing teams to focus on higher-value work and improving overall productivity.
- Consistency is enhanced through automation, as it standardizes processes and reduces human error, ensuring tasks are completed uniformly across projects.
- Highly customizable rules make it easy for teams to tailor automation to their specific needs, using triggers, conditions, and actions that fit their workflows seamlessly.
- Effective rule creation requires starting simple and testing thoroughly to ensure that automation works as intended, alongside documenting rules for clarity and future reference.
- ActivityTimeline can further enhance Jira Automation by offering features like recurring task scheduling, automated timesheet generation, and customizable alerts, making project management smoother and more efficient.
What Is Jira Automation, and Why Is It Important?
Jira Automation is a powerful tool designed to streamline workflows and reduce the need for manual, repetitive tasks by automating key processes. Its “no-code” rule builder allows users to easily create automation rules based on Jira events, such as issue creation, transitions, or status updates, making it accessible to non-technical teams.

Atlassian has created a Jira automation template library of everyday use cases to get your team set up and save you hundreds of work hours every month. Whether managing projects in Jira Software or responding to requests in Jira Service Management, automation for Jira provides significant efficiency gains.
Productivity
By automating mundane tasks like updating statuses, assigning tasks, or sending notifications, teams can focus on higher-value work. It eliminates the time spent on repetitive administrative work, leading to improved productivity.
Consistency
Automation reduces human error by standardizing workflows, ensuring tasks are completed the same way every time. This consistency improves accuracy across multiple projects, and services, especially in complex workflows.
Transparency
With automation, all team members have a clear view of task progress and workflow statuses. Automated actions are visible to everyone, enhancing accountability and transparency, especially in distributed teams.
Customization
Jira Automation is highly flexible, allowing teams to customize rules that fit their unique workflow needs. Users can set triggers, conditions, and actions tailored to their processes, ensuring automation works seamlessly with their existing systems.
Integration
Jira Automation integrates well with other Atlassian tools and third-party applications, enabling more comprehensive workflows. It helps teams connect multiple systems and automate complex cross-tool processes, further enhancing productivity and collaboration.
Additionally, changes in child tasks automatically update their associated parent issue, streamlining workflow and eliminating the need for manual updates.
Automating Jira: How Does It Work?
Creating automation rules in Jira is like building with blocks—you can mix and match elements to build automation rules and customize workflows to your team’s needs. These rules are built around three main parts—triggers, conditions, and actions—and can automate repetitive tasks or streamline complex processes, making everything run more smoothly.
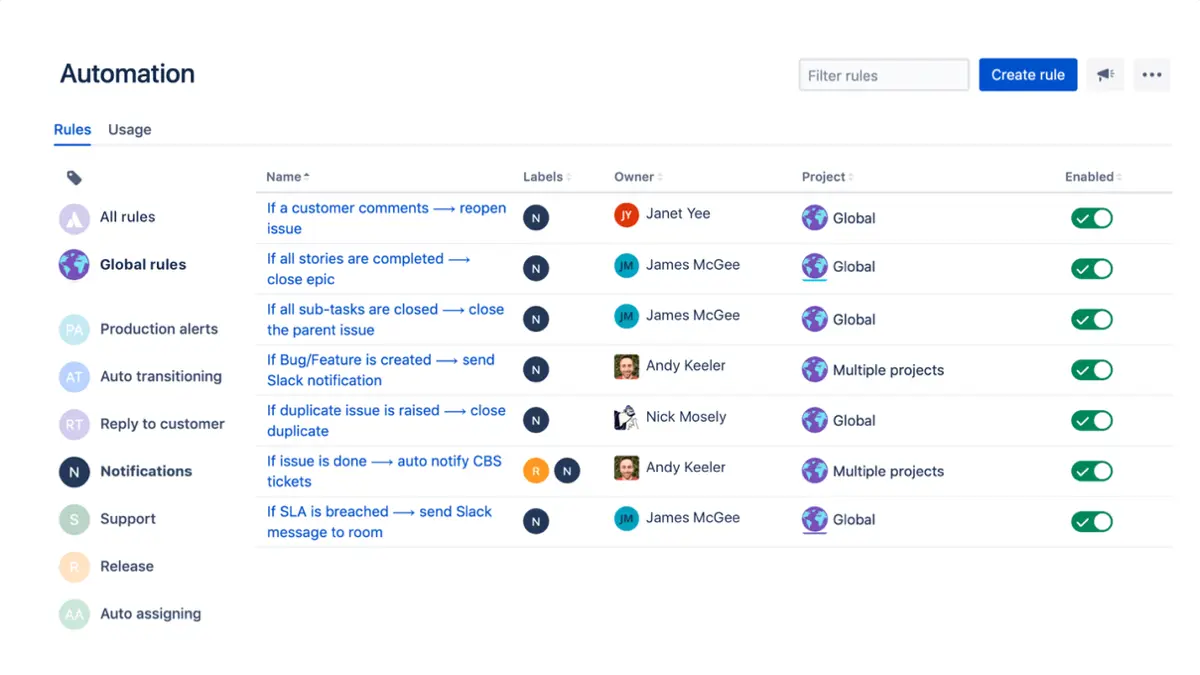
Rules
Jira automation rules are basically the “blueprints” for what you want Jira to do automatically. You set up criteria and tell Jira, "When THIS happens, and IF these things are true, THEN do that." Rules can apply to one project or even across multiple ones, but only admins can create and manage them.
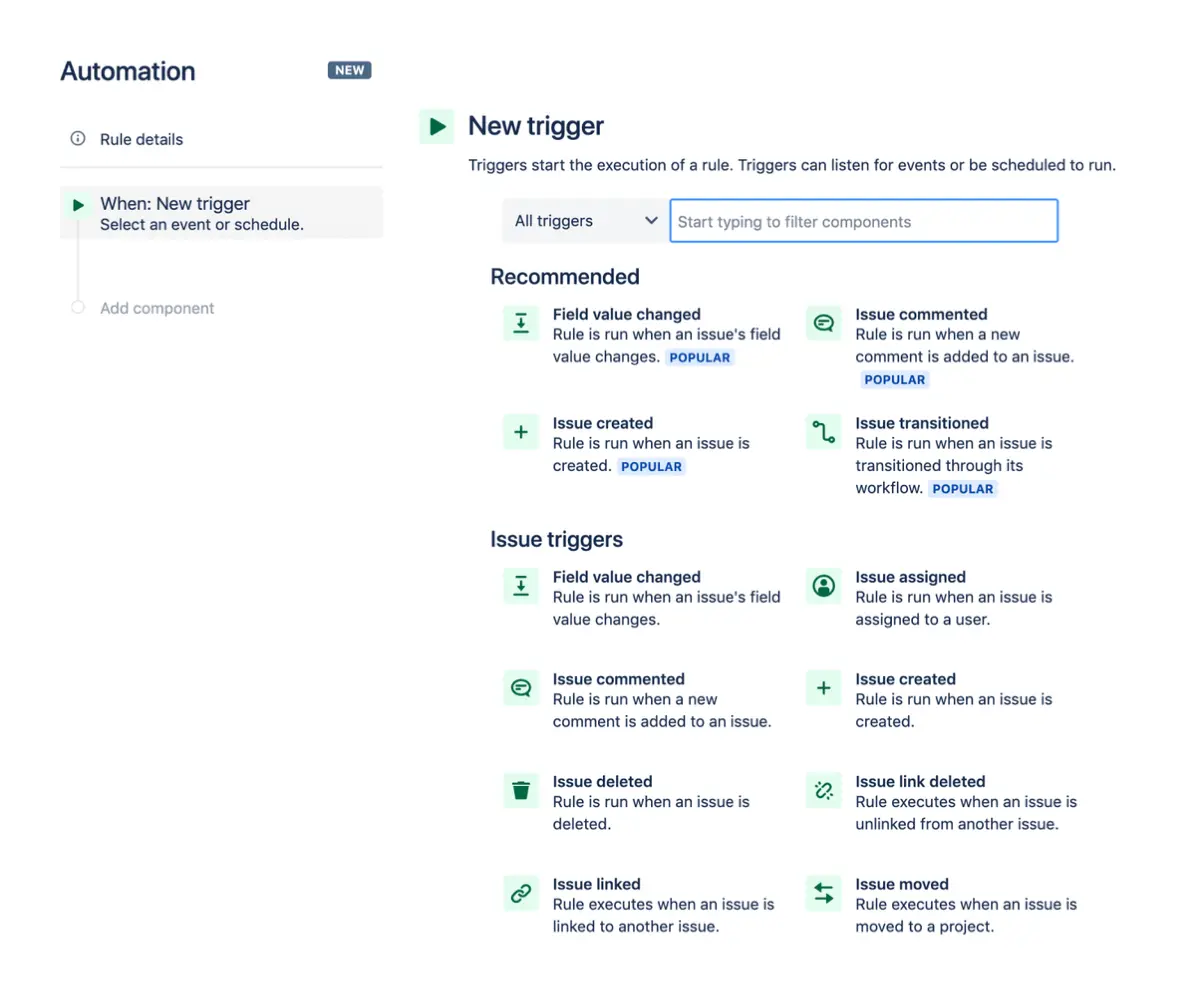
Triggers
Triggers are what kick off a rule. They wait for specific events to happen, like:
- Field Value Changed: When details in a task get updated.
- Issue Created or Deleted: When a task is added or removed.
- Issue Transitioned: When a task moves from one status to another.
- Work Logged: When time is logged on a task.
- Scheduled: The rule runs at a set time, like an alarm.
- Manual Trigger: A user starts the rule manually.
Conditions
Conditions make sure everything’s in place before the action happens. For example, Jira might check if a task’s priority is set to “High” before doing anything. Some common conditions are:
- Issue Fields: Compares task details to values you’ve set.
- JQL: Uses Jira’s special query language to filter issues.
- If/Else Blocks: Different actions happen depending on whether criteria are met.

Actions
Actions are what Jira does once the conditions are met. These can be things like:
- Assign Issue: Automatically assign a task to someone.
- Add Comments: Post updates or notify users.
- Transition Issue: Move a task to the next stage in the workflow.
- Create Sub-tasks: Break down tasks into smaller steps.
- Send Notifications: Trigger messages in tools like Slack, Teams, or via email.
Branching
Branching lets you extend rules to related tasks. For example, if a parent task is completed, you can set up branching so all its sub-tasks are automatically marked “Done” too. This helps you manage multiple linked issues in one go.
Smart Values
Jira automation smart values are like placeholders that automatically pull in real-time data, such as task titles or dates. This makes your rules dynamic and useful across different workflows, without needing to hard-code specifics. For example:
- {{issue.summary}} inserts the task title into a comment.
- {{now.plusDays(3)}} calculates the date three days from today.
Rule Status
A rule’s status shows whether it’s active, paused, or being edited:
- ENABLED: The rule is live and running.
- DISABLED: The rule is inactive.
- DRAFT: The rule is still being worked on but hasn’t gone live.
Monitoring the status helps you ensure everything’s working as expected.
Audit Log
Jira’s audit log is your go-to tool for checking on your automation rules. It tracks every time a rule is triggered and tells you what actions were taken and whether they worked.
Make it a habit to review the audit log to spot any issues or confirm that everything is running smoothly. You can check the logs on three levels:
- Individual Rule: See the full history of a specific rule.
- Project-wide: Get an overview of all rules within a project.
- Global Scope: View the log for rules across all your Jira projects.
Top 5 Automation Rules to Boost Productivity
These Jira automation examples are great starting points to supercharge your productivity with Jira Automation. They’re simple to set up and can make a big difference in how smoothly your workflows run.
Rule 1: Auto-Assign Based on Issue Type or Component
Trigger: Issue Created
Condition: Issue type is “Bug” or Component is “UI”
Action: Automatically assign the task to a specific user or team, like the QA team for bugs or the UI team for front-end issues. This rule can auto-assign issues based on issue type or component, ensuring tasks are directed to the appropriate team members efficiently.
Why It’s Useful: This rule takes the guesswork out of task assignment. When a bug or UI-related issue is created, it lands directly in the hands of the right team. No need for manual intervention or delays, meaning faster response times and smoother workflows.
Rule 2: Notify Stakeholders on Priority Changes
Trigger: Issue Updated
Condition: Priority field has changed
Action: Send an email notification to the issue reporter, assignee, and any key stakeholders.
Why It’s Useful: When priorities shift, everyone needs to know immediately. This rule ensures that as soon as an issue becomes more (or less) urgent, the right people are instantly in the loop. It helps teams adjust their focus without missing a beat.
Rule 3: Automatic Escalation for Overdue Issues
Trigger: Scheduled (e.g., check every day at 9 AM)
Condition: Due date is past, and the issue status isn’t “Done”
Action: Transition the issue to “Escalated” and notify the project manager.
Why It’s Useful: Overdue tasks can easily slip through the cracks. This rule automatically flags overdue issues and brings them to the project manager’s attention. It keeps things on track by preventing delays from dragging on unnoticed.
Rule 4: Close Dormant or Stale Issues
Trigger: Scheduled (e.g., check every week)
Condition: No updates or comments for over 30 days, and the status is “Waiting for feedback”
Action: Transition the issue to “Closed” or “Archived,” with an automatic comment explaining the closure due to inactivity.
Why It’s Useful: Old, forgotten issues clutter your backlog and make it harder to focus on what matters. This rule clears out stale issues, helping your whole development team to focus on active, relevant tasks. Plus, it maintains a cleaner, more organized project board.
Rule 5: Auto-Linking Related Issues
Trigger: Issue Created or Updated
Condition: Issue summary or description contains a specific keyword or issue key
Action: Automatically link the issue to a related one.
Why It’s Useful: Linking related tasks keeps everything connected. When issues share a keyword or reference another task, they’re automatically linked, making it easier for teams to see relationships and dependencies between tasks. No more manually hunting down connections—this rule does the heavy lifting for you.
Ways to Enhance Jira Automation with ActivityTimeline
Managing tasks in Jira can get pretty tricky, especially when you're juggling deadlines, dependencies, and changing task statuses. That's where ActivityTimeline's advanced auto-scheduling features come in, making life a lot easier by automating much of the manual work.
Below, we'll dive into three key use cases that show how ActivityTimeline, integrated with Jira, helps streamline your team's workflow.
#1. Auto-Estimate and Schedule Tasks Based on Start/Due Dates
Sometimes, figuring out how much time a task is going to take can be a challenge. Luckily, ActivityTimeline can automatically calculate task duration based on the Start and Due Dates you set in Jira.
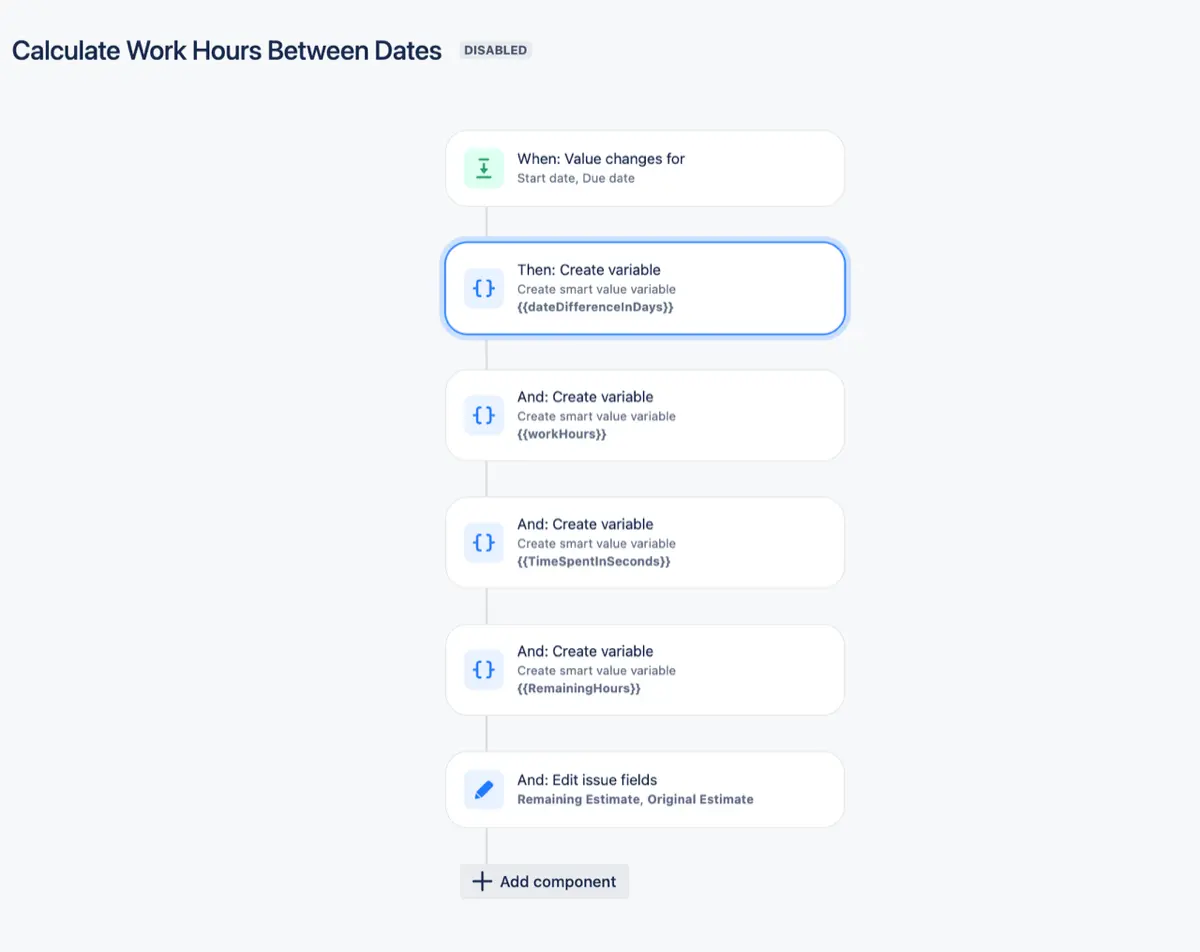
How It Works:
- Once you assign Start and Due Dates to a task, ActivityTimeline steps in to figure out how much time needs to be allocated between those dates. It does this while factoring in things like weekends, holidays, and vacations.
- ActivityTimeline then auto-schedules the task on the team member’s timeline based on their availability, spreading the workload evenly over the available days.
Why It’s Useful:
- You don’t have to manually estimate or block out time—ActivityTimeline does that for you, ensuring that the task is completed within the defined time window.
- It also helps avoid overload by distributing the work evenly over the available days.
This feature takes the stress out of trying to fit tasks into tight schedules by doing all the calculations for you.
#2. Auto-Schedule Linked Blocked Tasks to Avoid Delays
Another great feature of ActivityTimeline is that it can automatically handle tasks that are blocked by other tasks. This means you won’t accidentally forget about a task that can’t start until another one is finished.
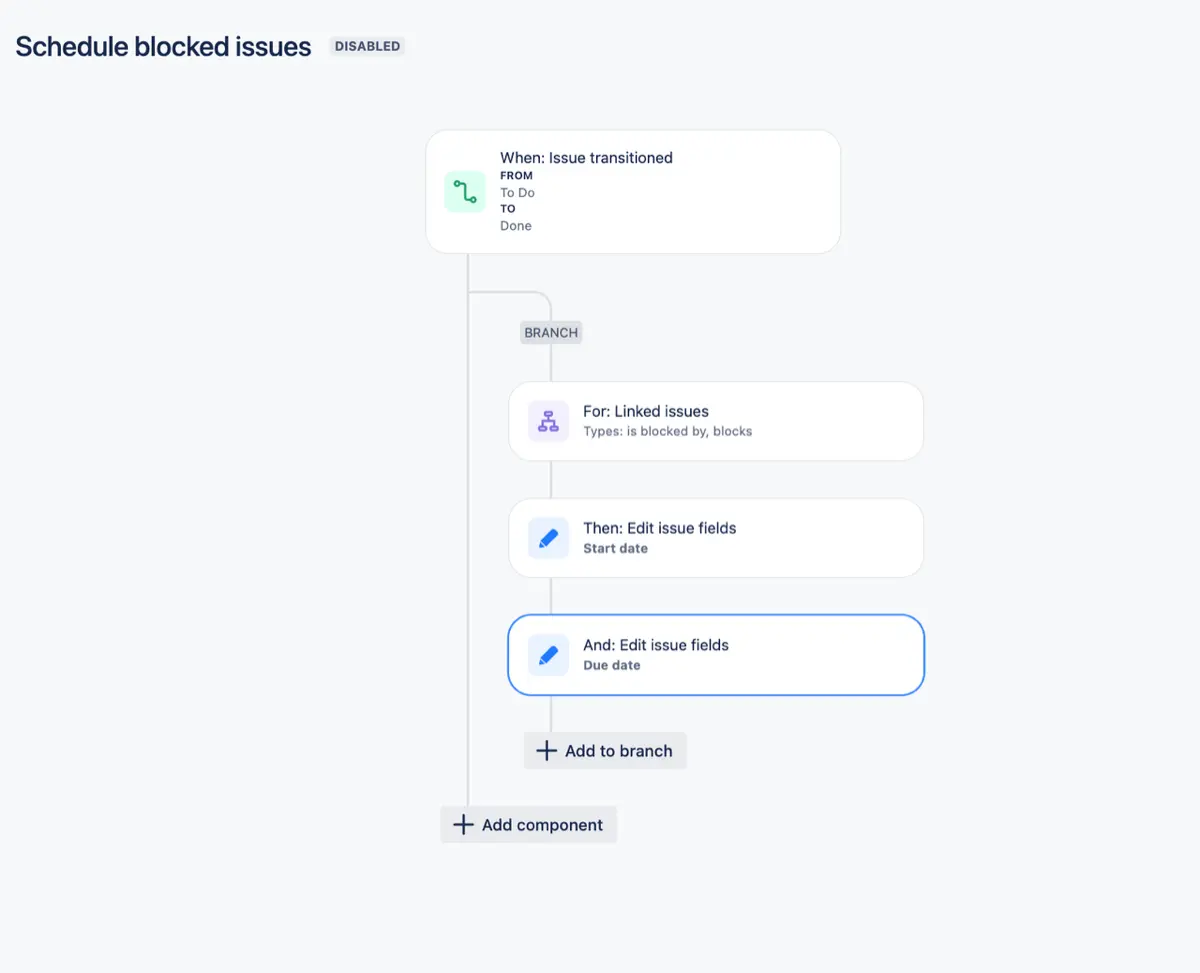
How It Works:
- When tasks are linked in Jira, like when Task A blocks Task B, ActivityTimeline recognizes that relationship and schedules them accordingly.
- For instance, Task A will be scheduled first, followed by Task B once Task A is completed, so you can see the flow of work on the timeline.
Here’s a detailed breakdown how issue dependency works in ActivityTimeline.

Why It’s Useful:
- You won’t miss tasks that depend on others being done first. The system ensures that everything is scheduled in the correct order.
- You’ll have a clear visual representation of dependencies right on the timeline, making it easier to track progress and prevent bottlenecks.
#3. Jira Automation-Driven Auto-Scheduler
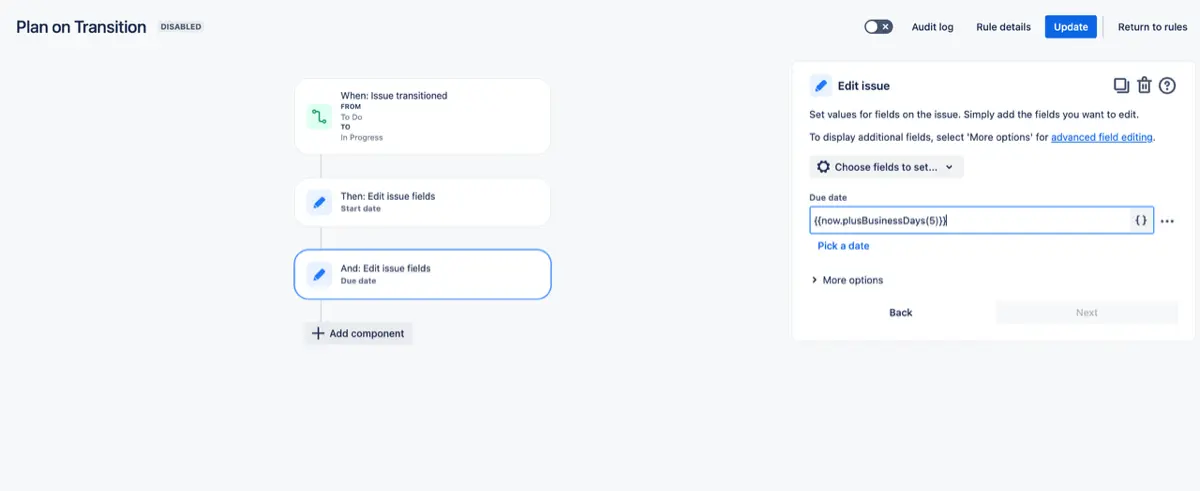
Ever wish that changing the status of a task could automatically schedule it? With Jira Automation and ActivityTimeline working together, you can make that happen.
How It Works:
- Let’s say a task’s status changes from To Do to In Progress. Jira Automation can trigger an update to the task's Start Date (set to the current date) and Due Date (set to a few days later, depending on your average task duration).
- ActivityTimeline then takes these updated dates and schedules the task on the timeline, placing it within the person’s available time.
Why It’s Useful:
- No need for manual adjustments—everything happens automatically, so the timeline always reflects the latest task updates.
- It helps you stay organized and on top of things without the need for constant micromanagement.
Tips for Effective Automation Rule Creation
Creating effective automation rules in Jira can really boost your team’s productivity, but it’s important to approach it the right way. Here are some tips to make sure your rules work smoothly and give you the results you’re looking for.
Start Simple
Kick things off with basic rules to get the hang of Jira Automation. For example, set up something simple like automatically moving an issue when someone adds a comment. This will help you get familiar with the process without getting too complicated. As you get more comfortable, you can try more advanced rules with multiple conditions, actions, and even branches.
Test Thoroughly
Always test your new rules on a small batch of issues before rolling them out to everything. This helps you catch any bugs or unintended side effects early, without messing up your main workflow. By taking it slow and testing in stages, you can fine-tune the rules and make sure they work as intended.
Document Your Rules
Don’t forget to document your rules. Write down why you created them, how they work, and what they’re supposed to do. This not only helps your team understand the automation but also makes it easier to troubleshoot or update rules later. Good documentation keeps your automation strategy clear and scalable.
Be Transparent with Automated Comments
Whenever the automation feature takes an action, make sure an automated comment is added so everyone knows what’s happening. For example, if an issue is reassigned or updated, a comment explaining the action can prevent confusion. This keeps the workflow clear and ensures everyone stays in the loop.
Use Labels and Components for Targeted Automation
Labels and components can help you fine-tune your rules so they only apply to specific issues. For example, you can set up rules that only affect tasks with a certain label or in a specific project component. This targeted approach keeps your automation focused and avoids unnecessary actions.
Conclusion
Jira Automation is a great tool for cutting down on repetitive tasks and boosting productivity. By following these tips, you can create effective rules that help your team work smarter and manage projects more efficiently.





![Top 11 Best Jira Add-ons: A Detailed Guide [2026]](https://cdn.prod.website-files.com/60c76f07dc83db305171350c/692dadbde37b1016cdc2657e_thumbnail_Best%20Jira%20Plugins.png)


